background image

3

Remarks:

This player utilizes a 7" TFT, LCD Display with multi audio/video outputs presented 
 as a 2 channel audio output. Please make sure the power is off on both the player 
and TV before connecting the leads.
Connecting to a TV: The Player can be connected to a TV to display the sound and 
video of the DVD or other disc being played. To achieve this use the leads provided. 
The YELLOW jack plug connect to (11) the Video OUT Jack and the BLACK to the
 (10) the  Audio OUT Jack on the Player. Both units should be switched off when the 
connections are made. Ensure the TV and Player are set to the correct (same) 
systems (PAL/NTSC/AUTO) and screen format (4:3 / 16:9)

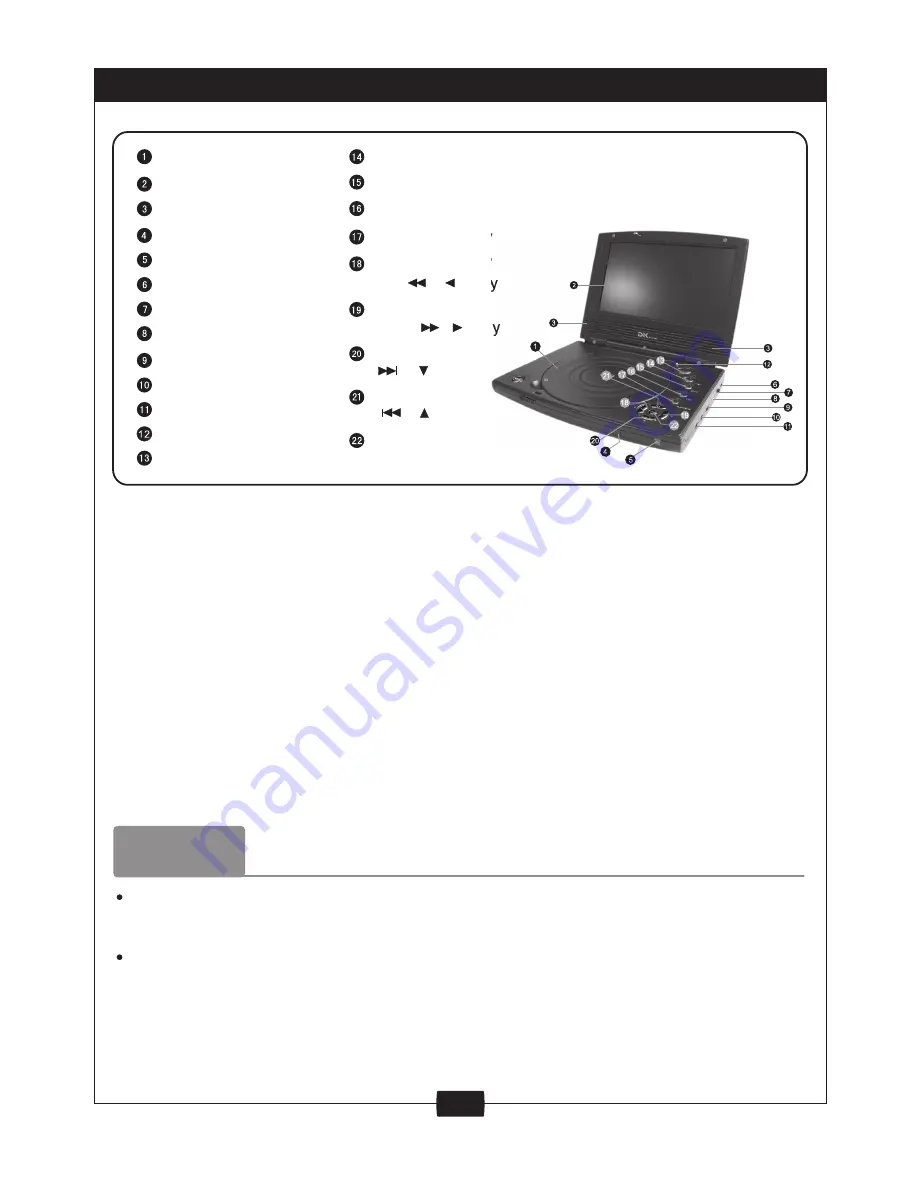
THE DVD PLAYER

Open/Close(push)

TFT Screen

Speaker

Remote Sensor

Power Indicator

DC +9V IN Jack

Power ON/OFF Switch

Earphone output Jack

Audio OUT Jack

Volume Controller 

Video OUT Jack

TFT Switch

 Key

Menu

Audio key 

Setup key

Stop key

Play/Pause key

Fast Backward/
Left(      /     ) key

Fast Forward/
Right(     /    ) key

Enter 

Next/Down
(      /     )key

Previous/Up
(      /      ) key

1. Powering the Player: The Player can be operated in two ways:
a. If you are near a convenient power source it is best to power the unit directly from the 
    supplied adaptor by connecting the DC output of the adaptor to (6) the DC Input.
b. If you have no source of power then the battery can be used. Attach the battery to the 
    case as shown in BATTERY ATTACHMENT and then connect the output lead of the 
    battery to (6) the DC Input on the player.

NOTE: Battery life will be reduced if the display is operated at high levels of 
             brightness and contrast. A low battery symbol will appear on the screen 
             when your batteries power is running low.

2. Loading  / Removing a Disc:
a. Loading a Disc: Press the button marked "PUSH" on the Player. Place the disc in the 
    player taking care to not touch the active surface of the disc. Using two fingers either 
    side of the center spindle press the disc down until it clicks into place.
b. Removing a Disc; Stop the Player. Press the button marker "PUSH" Using your third 
    finger to support the spindle lift the edge of the disc upwards with your thumb. Avoid 
    touching the active surface of the disc.

Summary of Contents for DVP-188

Page 1: ...DVP 188 Portable DVD Player PLEASE READ THIS MANUAL CAREFULLY BEFORE OPERATING YOUR PLAYER...

Page 2: ...YER REMOTE INTRODUCTION PLAYING MP3 FILES BATTERY PARAMETERS SPECIFICATION DISPOSAL ADVICE SAFETY INFORMATION FUNCTION BUTTONS SETUP MENU BATTERYATTACHMENT ANDUSE ACCESSORIES TROUBLESHOOTING 2 3 4 5 8...

Page 3: ...ectric shock Repair work must be undertaken by qualified personnel If the unit is moved from a cold to a warm environment condensation may develop on the lens of the laser To ensure correct operation...

Page 4: ...ey Enter Next Down key Previous Up key 1 Powering the Player The Player can be operated in two ways a If you are near a convenient power source it is best to power the unit directly from the supplied...

Page 5: ...P button 23 PLAY PAUSE button 24 FAST BACKWARD button 25 FAST FORWARD button 26 NEXT button 27 PREVIOUS button 28 VOLUME button 29 VOLUME button 30 PBC button 31 MUTE button 1 Remote Control Layout Fu...

Page 6: ...gle track discs cannot be programmed NOTE NOTE Press the TFT POWER to turn off on the Display Press PROGRAM button on the remote controller to program a disc play in a desired sequence In PBC off mode...

Page 7: ...VOL While playing back a disc press the VOL or VOL button to adjust the volume output volume level will Volume level control does not apply to digital audio output level while MUTE While playback a d...

Page 8: ...NOTE NOTE NOTE Some DVD discs and MP3 disc do not allow search function and search function do not work during program playing While playing back a DVD disc P r e s s t h e A U D I O b u t t o n repe...

Page 9: ...an setup the TV SYSTEM SCREEN SAVE TV TYPE by pressing the direction b u t t o n a n d t h e E N T E R b u t t o n NTSC PAL AUTO There are three kinds of TV system you can select by pressing the direc...

Page 10: ...default Press UP DOWN button to highlight the LANGUAGE item then you can setup the OSD MENU AUDIO and SUBTITLE languages by pressing the direction and ENTER buttons Chinese English Japanese French Spa...

Page 11: ...utton to highlight the AUDIO SETUP item then you can setup DOWN SAMPLE by pressing the direction button and the ENTER button 48K 96K 192K You can select any of them that you want by pressing the direc...

Page 12: ...and then pressing ENTER button to confirm You can adjust the HUE from 6 to 6 by pressing the UP DOWN button and then pressing ENTER button to You can adjust the SATURATION from 0 to 12 by pressing th...

Page 13: ...ETUP STEREO MONO L MONO R MIX MONO SETUP MENU DYNAMIC RANGE You can adjust the dynamic range by pressing the UP DOWN button and then pressing the ENTER button to confirm DUAL MONO STEREO MONO L MONO R...

Page 14: ...or PLAY buttons to play a disc Press the NEXT button to select the next folder You can also connect a set of earphones for personal use Earphone function earphone set not included Remarks 2 JPEG Photo...

Page 15: ...free it from the clips on the side of the battery pack then move the pack to the right to free it from the clips RECHARGING RED LED FULLY CHARGED GREEN LED ATTACH LOCKED DETACH UNLOCK Notes 1 Do not p...

Page 16: ...rast Storage and work circumstances 1 Storage circumstances Temperature Humidity 0 0 6 months 10 C 45 C 65 20 0 0 1 week 10 C 65 C 65 20 2 Work circumstances Temperature Humidity Standard charge Stand...

Page 17: ...16 ACCESSORIES ACCESSORIES AV Cable AC DC Adaptor Car Adaptor Remote Control Rechargeable Ni MH battery pack Instruction manual Carrying Bag 1 1 1 1 1 1 1...

Page 18: ...function remote control 5 Build in Dolby AC 3 decoder 6 27 Mhz 10 bit video DAC 7 192KHz 24 bit audio DAC 8 NTSC PAL system conversion output 9 Rechargeable Ni MH battery 10 Composite video output 11...

Page 19: ...18 SPECIFICATION TROUBLESHOOTING If you have trouble during the operation of your device please contact our Service Hotline under 0900 1 393 684 Euro 1 89 min or send an email to info dk digital com...

Page 20: ...19 SPECIFICATION DISPOSAL ADVICE When the operating life of this device has ended it must not be disposed as domestic waste but in accordance with national environmental guidelines...

Page 21: ......

Reviews: