5.3 Routine Maintenance Schedule
• The filter frame must be replaced
so that the cage side is facing
upwards to prevent the media
from being sucked out of the frame
• Inspect the HEPA after filters
and replace if the filters are
saturated
3. Clean the inside of the unit completely from top to bottom, using
wire brush or scraper and a pressure washer to remove all
accumulated sludge and debris
• Remove the inlet duct to clean the inside of the back of the
collector and inspect the inlet ductwork for dust accumulation
4. Drain the dirty water using the optional WV-55 sludge-vacuum to
separate the metal fines from the water, remove sludge on the
bottom of the tank and skim the residual material floating on the
water surface
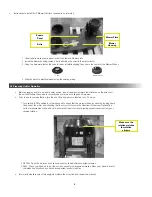
5. Open the water level control box to inspect
the level probes or ultrasonic sensor and
remove all accumulated particulate
1. Open the knobs or latches on the two
front panels of the wet dust collector
2. Inspect the mist eliminator filters inside the unit for holes or dust
accumulation, replace the media if torn or dirty
•
All debris must be
stored in a ventilated
metal drum to prevent
hydrogen gas buildup
• If the collector has the
optional strainer system,
remove the basket and
dump the accumulated
dust, clean out the
basket and replace it.
• Dust needs to be
disposed of according
to local regulation
6. If the level probe is loose, tighten the
terminal screw and ensure the probes are at
the right level and touching each other.
Ensure the probe gasket is cleaned of all
residue
• If the level probes require maintenance
use an abrasive sponge to remove all
accumulated particulate
7. Ensure the passage from the probe housing
to the water basin is free and clear of
debris
8. Once the entire machine has been cleaned
out, re-install the front doors, mist filters,
and probe box assembly
13
Whenever several inches of dust buildup inside the wet collector water tank, it is necessary to remove the material as soon as possible. Depending on
application dust loading, The Wet Collector may needs to be maintained daily.
Cleaning Instructions:
Summary of Contents for TYPHOON WX Series
Page 19: ...19 NOTES...


