background image

20

e.) Handle being moved too rapidly on

the down stroke.

f.) Rocks or other foreign objects in

cases.

Station 3: Primer Pocket Swaging Prob-

lems

1.) Primers smearing or crushing:

a.) Swage back-up rod not down far

enough (#13332 or #13348).

b.) Swage rod not adjusted high

enough (#20314 - large or #20313 -
small).

Station 4: Priming Problems

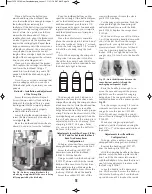
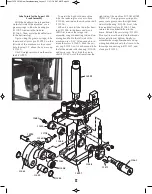
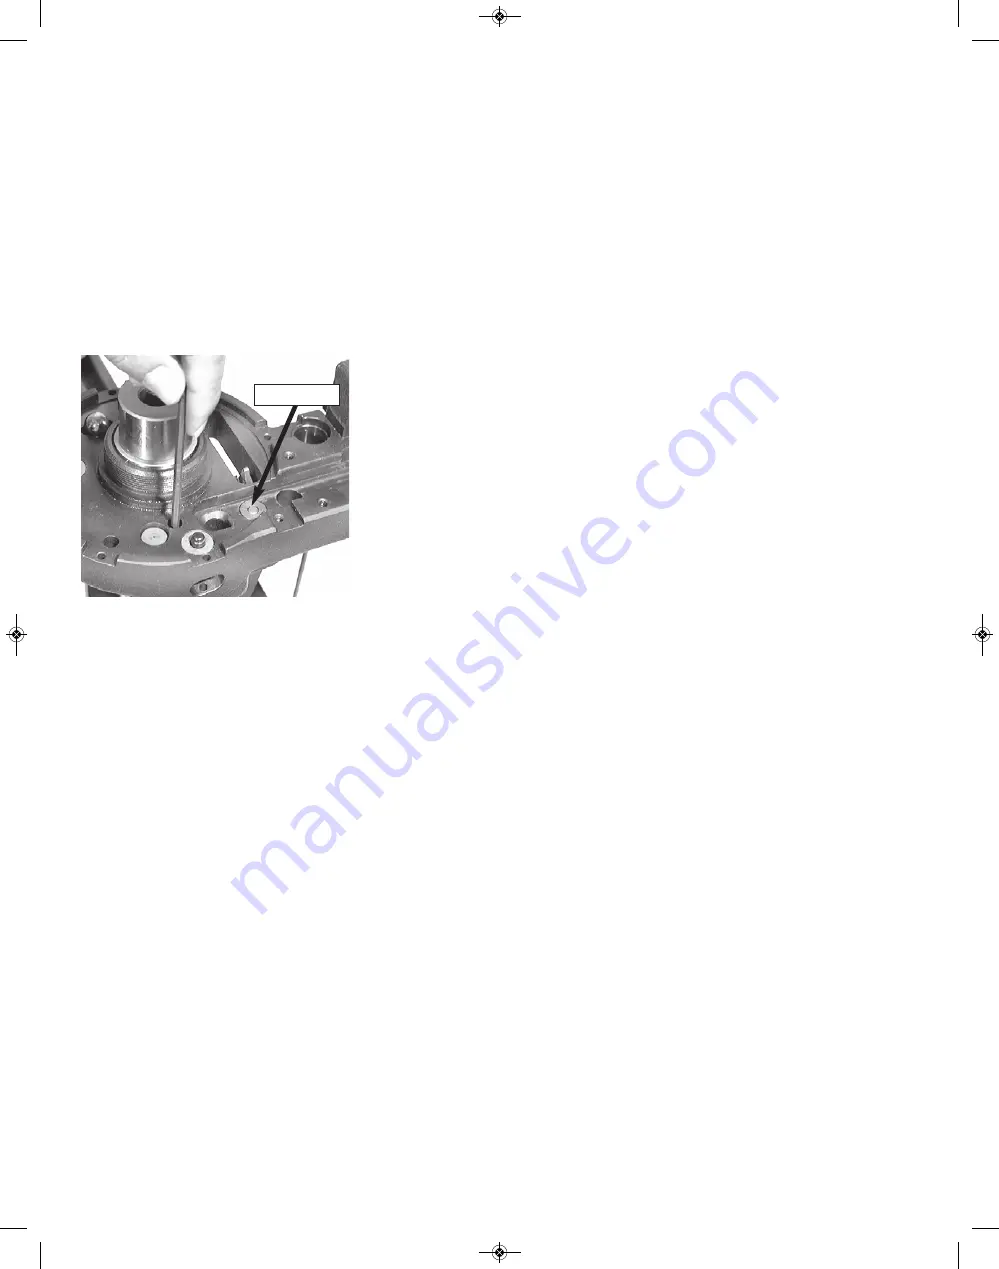
The above photo shows the rocker arm

set screw (#13226) being adjusted. The
Super 1050 comes from the factory with
this set screw properly adjusted, but over
time it can move. When the rocker arm
set screw is out of adjustment, it can dent
primers and/or cause the primer slide to
stick. When properly adjusted, the
primer punch (#12849 large - #13307
small) will be flush with the platform sur-
face – see arrow above.
1.) Crushed primers:

a.) Swage rod  (#20314 - large or

#20313 - small) not adjusted correctly,
dirty or worn out.

b.) Dirt in the shellplate (#12600*).
c.) Ringed primer. When a spent

primer has been pierced by the decap-
ping pin leaving a ring of metal from the
primer in the pocket.

d.) Primer station retain tab (#12930)

not adjusted correctly.

e.) Worn primer punch (#12849).
f.) The bench that the machine is

mounted on is not rigid enough. This can
be corrected by affixing a board to both
the wall and your bench.

g.) Hot-loaded ammo that has been

fired several times and the base of the
case has been flattened out.

2.) High primers:

a.) Adjust the primer push rod

(#12819).

b.) On .223 cases the swage back-up

rod (#13332) is down too far, slightly col-
lapsing the primer pocket and not allow-
ing the primer to seat fully.

c.) Loose shellplate (#12600*).
d.) Erratic handle motion.
e.) Do not remove the rubber piece on

the primer slide.
3.) Smeared primers - see Station 3:
Primer Pocket Swaging - item 1
4.) Locator tab:

a.) When adjusting the priming sta-

tion locator tab, it should be set as
close to the case as possible without
touching it. Be sure the cases in the
shellplate rotate freely past the tab.
Change primer magazine tips every
20,000 rounds. Note: Move the handle
down, bringing the toolhead down.
Move the locator tab in to the case in
the priming station. 

Station 5. Powder and Case Mouth

Belling Problems

1.) Crushing cases:

a.) Wrong size or missing locator but-

tons.
2.) Spilling powder:

a.) Slamming or going too fast with the

operating handle (#17071).

b.) Stick or pencil-lead type powders

bridging on the case mouth in the pow-
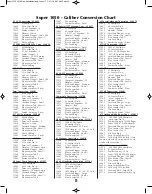
der funnel (#13005). See conversion
chart.

c.) Check powder bar adjustment.

3.) Erratic belling:

a.) Variation in case length. Divide

cases by brand.

b.) Handle not moving all the way

down on each stroke. Note: Try setting a
bullet on the case mouth in Station 6.
4.) Erratic powder charges:

a.) Powder bar not moving full length

of its travel. Turn the powder die down
until it does.

Station 7: Bullet Seating Problems

1.) Erratic seating depth of the bullet:

a.) Build up of lead shaving and/or

lube in the seater or crimp dies.

b.) Bullets having erratic dimension

(length and/or the ogive).

c.) Use the proper seating stem for the

type of bullet being used.

d.) Variations in case types and/or lots

– sort brass.

e.) Refer to a loading manual for

proper loaded length (OAL) and addi-
tional information.

Station 8: Crimping Problems

1.) Erratic crimping:

a.) Length of cartridge cases erratic,

probably due to mixed brands of brass.

b.) Worn out or improperly made die,

use Dillon dies whenever possible.
2.) Loose bullet:

a.) Too much taper crimp. Note, this

condition also ruins accuracy.

b. Wrong expander (#12749*).
c.) Thin cases.

Maintenance

Loctite

Loctite should be used following ad-

justments to or replacement of all
threaded screws. Please note that Loctite
should be applied to threaded portions
only and should be of a non-permanent
type. Blue Loctite #242 is recommended.

Swage

Clean the swage by pulling the operat-

ing handle down and use a small brush
to clean the tip. Every 10,000 rounds, re-
move the swage rod  (#20314 - large or
#20313 - small). and clean, lightly grease
and replace. Note: Do not grease the tip
of the swage where it contacts the primer
pocket.

primer punch

Super 1050 2018 New Casefeeder.qxp_Layout 1  1/31/18  6:47 AM  Page 20

Summary of Contents for Super 1050

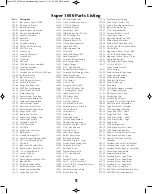
Page 1: ...Dillon Super 1050 Instruction Manual April 2021 Manufacturers of The World s Finest Loading Equipment Super 1050 2021New Casefeeder qxp_Primer Sys 3 30 21 6 47 AM Page 1 ...

Page 2: ...efeed Plunger Conversion 15 Die Adjustments 15 Sizing Decapping Die Station 2 15 Back up Expander Die Swager Station 3 15 Powder Die Station 5 16 Bullet Seating Die Station 7 17 Crimp Die Station 8 18 RL 1050 vs Super 1050 19 Troubleshooting 19 Maintenance 20 Lubrication Points 21 22 Caliber Conversion Charts 24 25 Parts List 26 Schematics 27 31 Any modifications performed to Dillon machines or th...

Page 3: ... Use only recommended loads from manuals and information supplied by reliable component manufacturers and suppliers Since Dillon Precision has no control over the components which may be used on their equipment no re sponsibility is implied or assumed for results obtained through the use of any such components Seat bullets as close to maximum cartridge length as possi ble Under some conditions sea...

Page 4: ...cific casefeed plate case feed mounting post casefeed tube and post studs Collection bin support bracket Bullet bin bracket Collection bin Bullet bin Spent primer cup Powder measure assembly Powder bar return rod assembly Primer early warning system Operating handle Die box See the schematics pages in the back of this manual for more detail Super 1050 2018 New Casefeeder qxp_Layout 1 1 31 18 6 47 ...

Page 5: ...sure at this station Dillon s Low Powder Sensor provides an audible and visual reminder when it s time to refill the powder reservoir Station 6 This station is open to allow for case inspection Station 7 The bullet is seated to its proper depth at this station Station 8 In this station the bullet is crimped into place The cartridge is then automatically ejected into a collection bin Your dies have...

Page 6: ...he one that feels best for you The longer the handle the less force required but the stroke is longer The toolhead 20420 is held down on the main frame for shipping by the use of plastic ties Remove the ties while holding the handle Fig 3 Slowly move the handle up This will move the toolhead approximately three inches to its up position Note If the handle is not moving freely carefully in spect fo...

Page 7: ... powder measure clamp screws 14037 Step 4 Installing the Spent Primer Cup and Bullet Bin Install the spent primer cup 16699 on the right side as shown on the schematic on page 27 Fig 11 Hook the bullet bin 13756 and the collection bin 13484 on to their re spective brackets Fig 12 Fig 6 Shown is the proper position of the power cable 13539 clamp 13495 and bin support bracket 10991 Fig 7 The proper ...

Page 8: ...ight Caution While you do not have to use a Dillon Precision powder scale you should use a scale of equal quality Do not use scales with plastic frames or razor blade pivots Quality scales have jew eled pivot points Razor blade pivots can dig into the frame of the scale and give dangerously inaccurate readings Powder Measure Adjustments In Station 5 we adjust the powder measure It works like this ...

Page 9: ...rs and pressing down You will notice that the primer maga zines and primer pick up tubes have dif ferent colored tips They have been color coded to help you identify size more eas ily The color code is as follows Blue Small Primer Magazine Orifice Red Large Primer Magazine Orifice Yellow Small Primer Pick up Tube Green Large Primer Pick up Tube The shiny side of the primers should be facing up Thi...

Page 10: ...w when you re down to approximately three primers Station 5 Here the case is belled and powder is dropped by the case activated powder measure It is extremely accurate and will not drop powder unless a case is present Dillon Precision offers an op tional accessory to be utilized with the automatic powder measure at this station Dillon s Low Powder Sensor provides an audible and visual reminder whe...

Page 11: ...12819 Clockwise turns of the primer push rod will cause the primer to be seated deeper while counterclockwise turns will seat the primer higher Cycle the handle again the automatic powder measure will drop the charge you ve selected Pistol casemouths will be belled at this time Look through the inspection hole in Station 6 you should be able to see your powder charge in the case Cycle the handle a...

Page 12: ... operating handle Rotate the swage connecting rod a half turn and remove it This will allow you access to the swager Pull the swager down and out of the machine Fig 29 Insert the new swager and reassem ble Swage Adjustments Use ONLY an unswaged military case for these adjustments With the handle in the down posi tion screw the swage back up ex pander down until it makes contact with the case botto...

Page 13: ...t on your bench Remove the toolhead Fig 36 For more information see the following section TOOLHEAD REMOVAL Now remove the shellplate lock nut 13425 by loosening the four locator tab screws 13895 about four full turns Fig 37 Loosen the ejector tab screw 13896 and swing the ejector tab 13189 out of the way Fig 38 Next slide the casefeed plunger 13073 back and remove the shellplate Rotate the primer ...

Page 14: ...0420 Due to being spring loaded there will be some resistance Wiggle the toolhead up and off while holding the handle After removing the toolhead carefully lower the handle When reinstalling the toolhead bolt 13342 turn it in only finger tight then cycle the handle up and down to make sure everything is properly located With the handle in the down position tighten the toolhead bolt with the above ...

Page 15: ...in the casefeed funnel Here the case drops to the casefeed plunger Cycle the handle The casefeed cam pushes the roller bushing back dropping the case into the slot of the plunger Cycle the handle The case is inserted into the shellplate Note After raising the handle insure that you push the handle against its full aft stop This will insure that the shellplate fully advanced to the next station Not...

Page 16: ...ce the re sistance at the end of the down stroke This is the resistance of the case in the sizing die Raise the handle The case will index to Station 3 Cycle the handle to advance the case to Station 4 Again cycle the handle to prime the case and index it to Station 5 Cycle the handle If the white cube has not traveled its full distance raise the toolhead just enough to pull the case off of the po...

Page 17: ... pur pose of the cannelure and crimping groove is to secure the bullet by giving the mouth of the case a place to go without deforming the bullet when being crimped When the bullet is prop erly seated the mouth of the cartridge case should be near the top of the can nelure crimping groove Refer to your reloading manual Under the section specified for the caliber you re loading you ll find a schema...

Page 18: ...g over crimped A line like this will only appear if the crimp die is adjusted down too far Warning Over crimping 45ACP 38 Super 9mm etc can actually cause the bullet to be loose in the case Adjustments for calibers 9mm 38 Sp 45 ACP and for hot loads that have been fired many times Configuration 1 To begin place a military case sized decapped and unswaged into Station 3 Screw the back up rod 12749 ...

Page 19: ...er cup and bracket It is not interchangeable Using RL 1050 toolheads and dies on the Super 1050 If you want to interchange an RL 1050 toolhead already set for a caliber you want to load onto the Super 1050 you will need to check for the following clearances 1 Remove the toolhead assembly from the Super 1050 2 Replace the shellplate with the shellplate for the caliber you intend to load with 3 Remo...

Page 20: ...ine tips every 20 000 rounds Note Move the handle down bringing the toolhead down Move the locator tab in to the case in the priming station Station 5 Powder and Case Mouth Belling Problems 1 Crushing cases a Wrong size or missing locator but tons 2 Spilling powder a Slamming or going too fast with the operating handle 17071 b Stick or pencil lead type powders bridging on the case mouth in the pow...

Page 21: ...72 13515 lo cated under the toolhead Cam Guide Bolt 12486 and its mated slot Toolhead Bore 20420 lightly to avoid rusting and or freezing up Mainshaft Lubrication Use only 30 weight motor oil DO NOT use a pen etrating lubricant such as WD 40 Breakfree etc Swage Connecting Rod 13417 and Clevis Pin 13522 Shellplate lock ring 20311 bottom surface to shellplate face Shellplate center hole It s easiest...

Page 22: ...s 11008 in the frame and crank shaft first remove the swage rod assembly swage connecting rod and op erating handle On the left side of the machine use a 5 32 Allen wrench to re move the screw 13685 Slide the car rier cap 11010 out of its bore and lube the left hand side roller bearing 11008 and carrier cap Next slide the crank shaft 11061 out of the frame from the right side of the machine BUT NO...

Page 23: ...The block can be adjusted by loosening the two 8 screws with a 3 32 hex wrench Slide the block to the desired position based on pistol or rifle cartridge and tighten the two screws to no more than 5 to 7 inch pounds to lock the Case Deflector Block into position Troubleshooting the Casefeeder Casefeeding A Casefeeder is on but will not rotate 1 Brass caught under casefeed plate 2 Casefeed is too f...

Page 24: ...on 20788 12940 W Shellplate 14062 2 Locator Pin 6 12912 10mm cal Expander W 13872 Adapter Red 13098 Casefeed Plunger Medium 17384 Blue Locator Tab Short 1 13569 Blue Locator Tab 5 14067 Die Lock Ring 13005 Powder Activator Pistol 38 40 Winchester Conversion 21160 16153 1050 N Shellplate 14047 4 Locator Pin 6 13600 Powder Funnel W Pistol 13654 1050 Adapter 41 44 45 Colt 13073 Casefeed Plunger Large...

Page 25: ... Adapter 7 62x39 13098 Casefeed Plunger Medium 17384 Blue Locator Tab Short 1 13569 Blue Locator Tab 5 14067 Die Lock Ring 12184 Swage Die Body Part 13483 9 16 x 18 Lock Nut 30 30 Conversion 21052 12075 7 Shellplate 14047 4 Locator Pin 6 12068 1000 1050 30 30 Expander 13587 Powder Funnel B rifle 11005 Super 1050 Adapter 308 Win 13073 Casefeed Plunger Large 17384 Blue Locator Tab Short 1 13569 Blue...

Page 26: ...BHCS 13728 1 8 Hex Wrench 13738 10 Washer for Roller 13746 Actuating Lever Cotter Pin 13756 1050 Bullet Bin 13793 Collar Roller 13799 Strip Nut 13801 Tinnerman Insert 13813 Clutch Spring Washer 13815 Adapter Housing Screw 13818 Powder Bar Insert Small 13827 3 16 Hex Wrench 13840 Hair Pin Cotter 13844 Short Lever Spring 13845 Body Collar Sleeve 13848 Bellcrank Bushing 13853 Powder Bar Insert Large ...

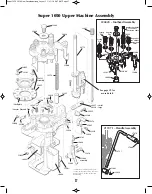
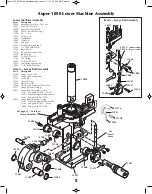
Page 27: ... 12572 13895 13561 Locator Pins and Tabs See page 29 for more detail 12819 powder activator see caliber conversion chart 20320 Seating Die Sizing Die 14067 10999 13161 13896 12486 11688 11688 Crimp Die 11064 assembly 20311 assembly Shellplate 20317 small 20318 large Expander see caliber conversion chart Indicates a caliber specific part see the caliber conversion charts on pages 24 25 for the cali...

Page 28: ...ining Ring 2 13328 1 4 20 Shoulder Bolt 13365 Index Roller 13376 Ratchet Restriction Tab 13475 Journal Key 13685 1 4 20x5 8 BHCS 13738 10 Washer 13895 10 24x3 8 BHCS 13936 Tab Spring Arm Spring 13945 5 16 Bowed Washer Item A Swage Rod Assembly Part Description 13064 Swage Cover 1050 13417 Swage Connecting Rod 13522 Clevis Pin 13581 Grease Fittings 13840 Hair Pin Cotter 13896 1 4 20 3 8 BH Ejector ...

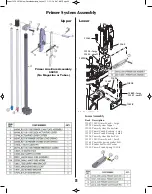
Page 29: ...System Tappet 13058 Primer System Rocker Arm 13130 Primer Punch Bushing Large 13222 Primer Punch Bushing Small 13296 Primer System Rocker Bolt 13307 1050 Primer Punch Small 13363 Primer Magazine Socket Bolt 13607 Rocker Bolt Lock Washer 13858 Primer Punch Spring 1050 2 29 Super 1050 2018 New Casefeeder qxp_Layout 1 1 31 18 6 47 AM Page 29 Primer Arm Cam Assembly 66050 No Magazine or Tubes Upper ...

Page 30: ...tch 13859 Casefeed Tube Clip 13895 10 24 BH Screw Not Shown 13954 Micro Switch Mount Screw Not Shown 14022 Casefeed Motor Roll Pin Not Shown 14023 10 24 5 8 Buttonhead Screw Not Shown 14026 8 32x1 2 Bowl Motor Screw Not Shown 15433 Casefeed Port Cuff Not Shown 20533 Casefeed Tube small black label 20534 Casefeed Tube large red label 20641 Casefeed Mounting Post Assembly Super 1050 Casefeeder Assem...

Page 31: ...embly 13005 Powder Activator Pistol 13089 Return Rod Eye Bolt 13426 Powder Funnel A Rifle 13644 Small Powder Bar Spacer 13793 Collar Roller 13799 Blue Strip Nut 13801 Tinnerman Insert 13818 Powder Bar Insert Small 13845 Collar Sleeve 13848 Bellcrank Bushing 13853 Powder Bar Insert Large 13871 Bellcrank Cube 13882 Powder Measure Lid 13893 Powder Bar Post Large 13904 Bellcrank Bolt 13921 Powder Meas...

Page 32: ...5 WSM MAGNUM RIFLE 4 UP LOW 40 S W LARGE PISTOL 3 DOWN HIGH 6 5 Creedmoor LARGE RIFLE 5 DOWN HIGH 338 Win 340 Wby MAGNUM RIFLE 1 UP LOW 41 Mag LARGE PISTOL 3 DOWN HIGH 6 5 Grendel SMALL RIFLE 6 DOWN HIGH 338 Rem Ultra Mag MAGNUM RIFLE 1 UP LOW 44 Special 44 Magnum LARGE PISTOL 3 DOWN HIGH 6 5 Rem Mag LARGE RIFLE 3 DOWN HIGH 350 Rem Mag LARGE RIFLE 1 UP LOW 45 ACP LARGE PISTOL 3 DOWN HIGH 6 5x55 LA...

Reviews: