17
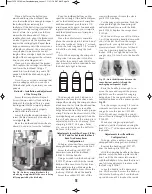
during the seating process - see the il-
lustration (above) example “B”.
Note: If you screw the die down too
far, the case will look like example "C" in
the illustration (right). You must then dis-
card this case, back the powder die off,
by turning it counter clockwise, and con-
tinue with a new sized case.
You’ll soon learn to judge the correct
amount of bell by simply looking at it. In
the meantime, you might want to use
your dial calipers to check it. Twenty
thousandths of an inch greater (at the
mouth of the case) than its original diam-
eter, should about do it.
Once you’ve achieved the desired
amount of bell – with the case in Station
5, raise the toolhead. Run the lock ring
down hand tight.
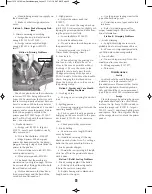
Insure the bellcrank and the return rod
bolt (in the frame)
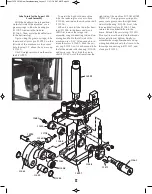
FIG 54
are aligned.
Using a 5/32" Allen wrench, snug the
collar clamp screws.
While holding the powder measure in
place, snug the lock ring using a 1-1/8”
wrench.
Station 7 - General Information on
Bullet Seating
The purpose of the seating die is to in-
sert the bullet into the case and to push it
down into the case the proper amount.
How far the bullet is pushed into the
case will determine the overall length
(OAL). Several factors go into determin-
ing the proper OAL – such as, the maxi-
mum recommended OAL, listed in the
reloading manual, and the type of bullet
being loaded. The type of bullet can de-
termine the OAL in one of two ways.
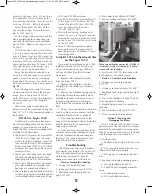
If the bullet has what is called a can-
nelure, or crimping groove
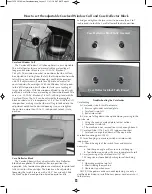
Fig. 55 & 56
,
this will determine the proper OAL. If
the bullet you’re using doesn’t have a
cannelure or a crimping groove, then
you’ll need to refer to your reloading
manual for the suggested OAL. The pur-
pose of the cannelure and crimping
groove is to secure the bullet by giving
the mouth of the case a place to go
(without deforming the bullet) when
being crimped. When the bullet is prop-
erly seated, the mouth of the cartridge
case should be near the top of the can-
nelure/crimping groove.
Refer to your reloading manual. Under
the section specified for the caliber
you’re loading, you’ll find a schematic of
the cartridge. For example, .38 Special
lists a maximum OAL of 1.55" (Lyman
Reloading Handbook). If you’re seating
the bullet to the cannelure/crimping
groove, the OAL should be well within
the maximum OAL listed, however, use a
set of dial calipers to check it. (Dial
calipers are available from Dillon Preci-
sion). If the bullet you’re using doesn’t
have a cannelure/crimping groove, refer
to the specific type of bullet you’re using
in the reloading manual. For example – if
you’re loading a 158 gr. .38 Sp. JHP and
it doesn’t have a cannelure/ crimping
groove, use the suggested OAL of 1.480
(Lyman Reloading Handbook).
Station 7 - Installation and Adjustment
of the Seating Die
Take the seating die from the die box
and screw it into Station 7. Screw the die
down until the bottom of the die is flush
with the bottom of the toolhead. Note: At
this point the die will not be screwed
down far enough to begin seating the
bullet, but it will give you a place to
start.
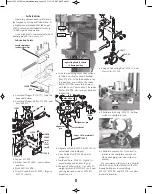
Place a case (with a belled case
mouth) into Station 7.
Fig. 57
Fig. 55 & 56 - Shown are several examples of
a cannelure or crimping groove.
Fig. 54 - Make sure the bellcrank and return
rod bolt are aligned.
Please note that every die set includes
seating stems to fit most common bullet
types. Select the appropriate seating stem
for the bullet type you are loading.
Fig. 57 - Place the bullet on the case
mouth at Station 7.
Super 1050 2018 New Casefeeder.qxp_Layout 1 1/31/18 6:47 AM Page 17


