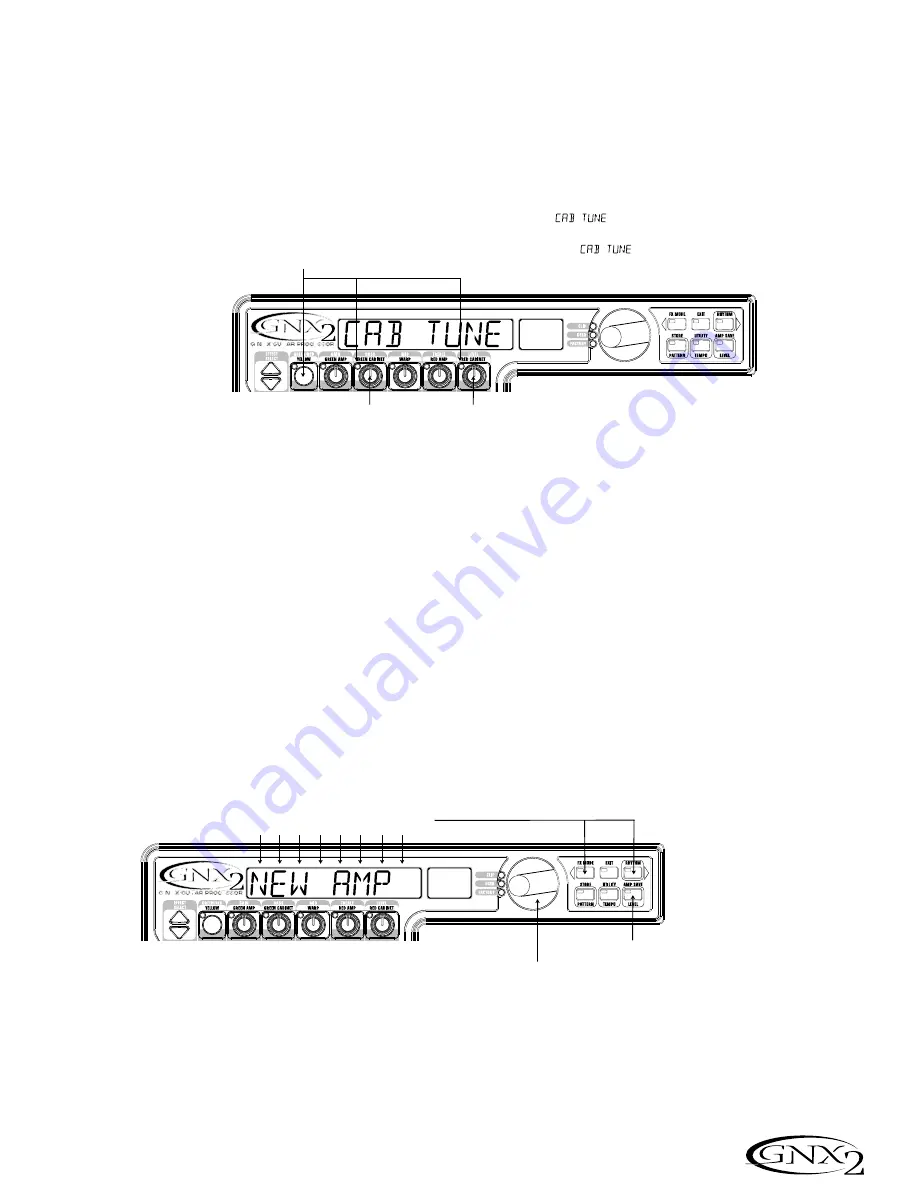
Tune the Cabinets (optional)
You may also want to adjust the resonance for the American 2x12 and the
British 4x12 Cabinets. To access the Cabinet tuning for both Red and
Green Channels, press and hold the
STATUS
button until the display
reads
CAB TUNe
(Cabinet Tuning). Release the Status button and rotate
the Number 2 knob to adjust the tuning for the Green Cabinet (
gtune
º0
) and the Number 5 knob to adjust the tuning for the Red Cabinet
(
rtune º0
). Once the tuning of both Cabinets has been adjusted, press
the
STATUS
button to return to Performance mode.
Warp the Green and Red Channels
Together
When the Amps and Cabinets in our Green and Red Channels are dialed
in to suit our taste, we can Warp their characteristics together to create a
new HyperModel™. Make sure your GNX2 is in yellow mode (indicated
by the yellow lit Status LED). If it is not in yellow mode, press the Status
button until the Status LED turns yellow. Then rotate the Number 3
(Warp) knob to blend the Amps and Cabinets in our Green and Red
Channels.
Save the HyperModel™
Now that we have designed our own Amp/Cabinet HyperModel™, we
need to save it to one of the 9 User HyperModel™ locations. This allows
us to use it in presets. Press the
AMP SAVE
button until the display
reads
NEW AMP
and the first letter (
N
) is flashing. For this example, let’s
name the HyperModel™ “Rectweed” (Rectified Tweed). Rotate the
DATA WHEEL
to select R as the first letter.Then press the
RHYTHM
button to select the next character in the display. Continue using the
Data Wheel and Rhythm button until the display reads
RECTWeeD
.
When the display reads
RECTWeeD
, press the
AMP SAVE
button again.
Now we need to choose one of the 9 User HyperModel™ locations.The
alpha-numeric display should read
EMPTY
(Empty) and the red numeric
display should read
U1
if this is the first HyperModel™ stored to your
GNX2. Press the
AMP SAVE
button again to save to this Amp location.
The display briefly reads
AMP SaVD
(Amp Saved) and then returns to
the name of the selected preset.
Afinación de los recintos acústicos (opcional)
También puede que quiera ajustar la resonancia de los recintos acústicos
American 2x12 y British 4x12. Para acceder a la afinación de recinto para
ambos canales, mantenga pulsado el botón
STATUS
hasta que aparezca
CAB TUNe
(afinación de recinto). Deje de pulsar el botón Status y gire
el mando 2 para ajustar la afinación del recinto acústico del canal verde
(
gtune º0
) y el mando 5 para ajustar el del canal rojo (
rtune º0
).
Una vez que haya ajustado la afinación de los recintos de ambos canales,
pulse de nuevo el botón
STATUS
para volver al modo de ejecución.
Enlace de los canales rojo y verde
Cuando ya haya ajustado a su gusto los amplificadores y recintos del canal
verde y el rojo, puede enlazarlos juntos para crear un nuevo
HyperModel™. Asegúrese de que su GNX2 esté en el modo amarillo
(indicado por el LED de Status iluminado en amarillo). Si no está en ese
modo, pulse el botón Status hasta que el piloto de este botón se ilumine
en amarillo. Gire después el mando 3 (Warp) para conseguir mezclar los
amplificadores y recintos de nuestros canales verde y rojo.
Almacenamiento del HyperModel™
Ahora que hemos diseñado nuestro propio HyperModel™ de
amplificador / recinto, tenemos que almacenar nuestra creación en una de
las 9 posiciones de HyperModel™ de usuario. Esto nos permitirá usarlo
luego en Presets. Pulse una vez el botón
AMP SAVE
hasta que en la pan-
talla aparezca
NEW AMP
y parpadee la primera letra del nombre (
N
).
Para este ejemplo, vamos a poner a nuestro HyperModel™ el nombre
“Rectweed” (Rectified Tweed). Gire la rueda
DATA
para elegir R como
primera letra. Pulse después el botón
RHYTHM
para elegir el siguiente
carácter de la pantalla. Continúe usando el dial Data y el botón Rhythm
hasta que en la pantalla quede
RECTWeeD
.
Cuando en la pantalla aparezca
RECTWeeD
, pulse de nuevo el botón
AMP SAVE
.
Ahora tendrá que elegir una de las 9 posiciones de HyperModel™ de
usuario. En la pantalla alfanumérica debería aparecer
EMPTY
(vacío) y en
la pantalla numérica roja debería ver
U1
si ese es el primer
HyperModel™ almacenado en su GNX2. Pulse de nuevo el botón
AMP
SAVE
para guardar su nueva creación en esa posición de amplificador. En
la pantalla aparecerá brevemente
AMP SaVD
(Amplificador guardado) y
después volverá a aparecer el nombre del preset elegido en ese momento.
31
Tutorial / Tutorial
Rotate Knob 5 to Adjust Red Cabinet Tuning
Gire el mando 5 para ajustar la afinación del recinto acústico rojo
Rotate Knob 2 to Adjust Green Cabinet Tuning
Gire el mando 2 para ajustar la afinación del recinto acústico verde
Mantenga pulsado el botón Status hasta que aparezca
en pantalla y el piloto del mando 2 se ilumine en verde y el del mando 5 se ilumine en rojo
Press and Hold Status Button Until Display Reads
and Knob 2 LED Lights Green and Knob 5 LED Lights Red
1 Press Amp Save
1 Pulse Amp Save
2 Use Data Wheel to Change Characters
2 Use la rueda Data para cambiar los caracteres
3 Use FX Mode and Rhythm Buttons to Select Character Locations
3 Use los botones FX Mode y Rhythm para elegir las posiciones de los caracteres


