background image

Appendix #3 - DC Auto Iris Lens Installation


SECTION 5

34

HARDWARE MANUAL | 

Copyright 

©

 2007 Digimerge Technologies Inc.

Appendix #3 - DC Auto Iris Lens Installation

Lenses for this IP product are sold separately. DC Auto Iris and CS-Mount lenses are compatible 
with this product. Please note that:

• Use of an auto iris lens is recommended to achieve the best results for operating this product 

effectively under a wide range of lighting conditions. Auto Iris Lenses are perfect for locations, 
where light is constantly changing, such as outside parking lot, and building entrances. Auto 
Iris Lenses are powered through cameras power supply. The iris for these lenses automatically 
opens and closes according to the changes of the light conditions. If the light level is low, the 
lens iris opens up to allow enough light for optimum picture quality, and when the light level 
is high, it closes the iris so that incoming light does not overwhelm the camera and blur out 
the picture.

• Please keep the lens clean.

• Any foreign objects and finger marks on the lens will cause inferior image quality in low light 

level conditions.

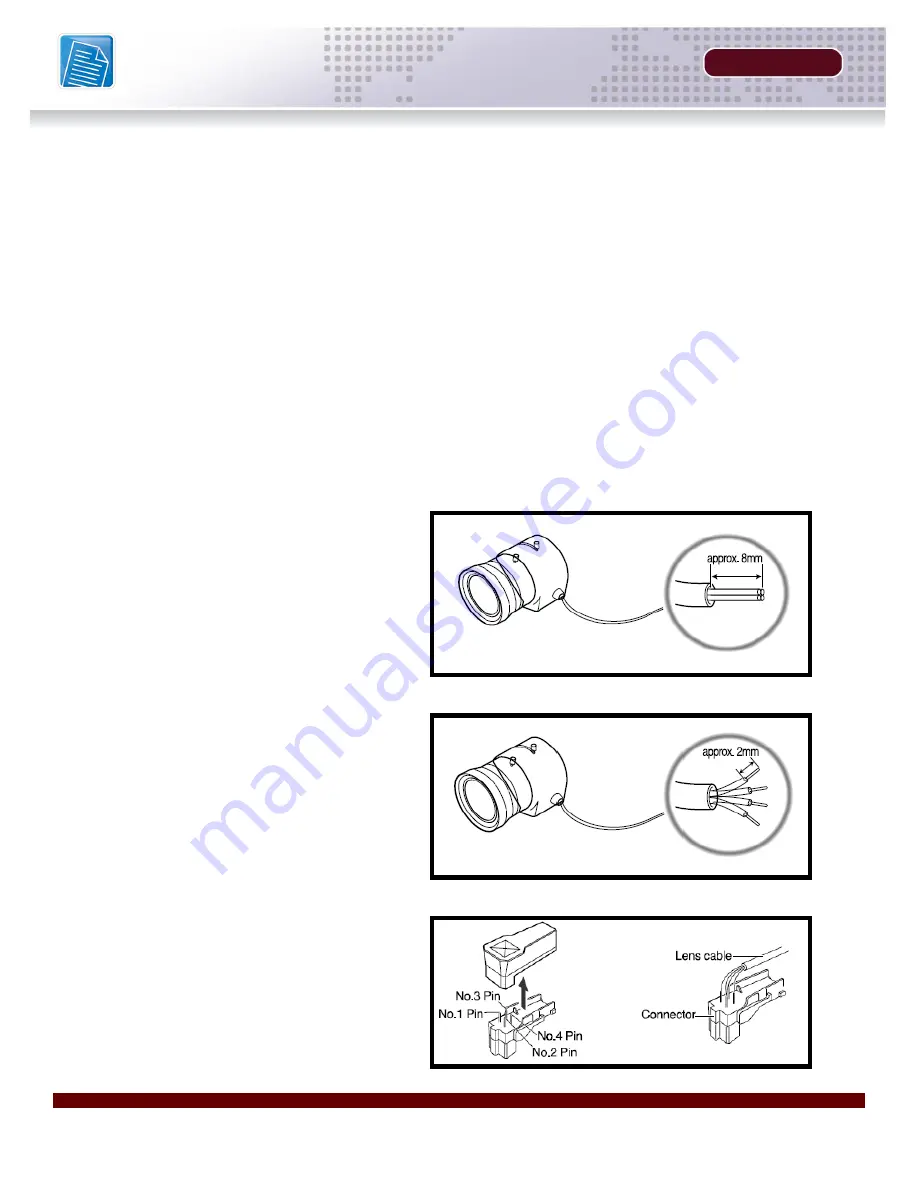
1. Peel off about 8mm of the outer 

plastic wire cover (of the auto iris lens 
cable).

2. Peel off about 2mm of the outer skin 

of the insulated conductor inside the 
lens cable.

3. Remove the cover of the DC Auto Iris 

lens connection plug, and solder the 
lens cable to the connector pin in the 
plug.

Summary of Contents for DNP5220E

Page 1: ...Copyright 2007 Digimerge Technologies Inc HARDWARE MANUAL English version 1 0 DNP5220E DNP5220E Networkable Camera ...

Page 2: ...n equilateral triangle is intended to alert the user to the presence of important operating and maintenance servicing instructions in the literature accompanying the appliance WARNING TO PREVENT FIRE OR SHOCK HAZARD DO NOT EXPOSE THIS UNIT TO RAIN OR MOISTURE CAUTION TO PREVENT ELECTRIC SHOCK MATCH WIDE BLADE OF PLUG TO WIDE SLOT FULLY INSERT The Digimerge DNP5220E network camera captures high res...

Page 3: ...dicates damage or deteriorated insulation have it replaced by your service technician 7 Power Cord Protection Power supply cords should be routed so that they are not likely to be walked on or pinched by items placed upon or against them paying particular attention to cords at plugs convenience receptacles and the point where they exit from the video product 8 Ventilation Slots and openings in the...

Page 4: ...he video product manufacturer can prevent fire electric shock or other hazards 16 Safety Check Upon completion of any service or repairs to this video product ask the service technician to perform safety checks recommended by the manufacturer to determine that the video product is in safe operating condition 17 Wall or Ceiling Mounting The cameras provided with this system should be mounted to a w...

Page 5: ...onnected z Consult the dealer or an experienced radio or television technician for assistance DIGIMERGE TECHNOLOGIES INC http www digimerge com NOTE This equipment has been certified and found to comply with the limits regulated by FCC EMC and LVD Therefore it is designated to provide reasonable protection against interference and will not cause interference with other appliance usage However it i...

Page 6: ... Full D1 resolution 720 x 480 at up to 30 fps Video out for connecting to monitors DVRs etc Power over ethernet 802 3af Built in Supports DC auto iris lenses with a CS Mount Lens not included Advanced Features Built in HTTP Web Server IP address assignment via DHCP Provides recording functions on remote host storage devices DDNS support for dynamic IP application Remotely upgradeable firmware Prov...

Page 7: ...ress 21 Router Port Forwarding 22 Setting Up Your DDNS Account 23 24 DigiViewer DDNS Setup 25 Remote Access with Internet Explorer 26 Internet Explorer Security Warnings 26 Internet Explorer Security Warnings Program Installation 27 Internet Explorer Security Warnings Windows Firewall 27 Section 5 APPENDICES 29 Appendix 1 Camera Specifications 30 Hardware 30 Network 31 Management 31 Other 31 Appen...

Page 8: ...tallation 34 AES Lens Cable Pin Configuration 35 Appendix 4 Changing the Camera Network Settings 36 Menu Edit Network Parameters 36 Appendix 5 Power Over Ethernet PoE 37 PoE Midspan 37 PoE Enabled Camera Setup 38 Appendix 6 Hardware Reset 39 DigiViewer Reset 39 Hardware Reset 39 Digimerge IP Products 40 Digimerge Limited Warranty 41 ...

Page 9: ...GETTING STARTED SECTION 1 Package Contents 10 ...

Page 10: ...omes with the following components CHECK YOUR PACKAGE TO CONFIRM THAT YOU HAVE RECEIVED THE COMPLETE SYSTEM INCLUDING ALL COMPONENTS SHOWN ABOVE Software CD Quick Installation Guide DNP5220E Camera Lens not included 12V DC Power Supply 3ft Ethernet Cable Mini DIN to Terminal Block BNC Female Adapter Cable Mounting Stand ...

Page 11: ...PRODUCT OVERVIEW SECTION 2 DNP5220E Back 12 DNP5220E Front Side 13 ...

Page 12: ...o the RJ 45 Ethernet port to connect the Camera to the network NOTE This camera is PoE Enabled If using PoE Equipment the Ethernet Port will also power the camera 3 PWR NET LED INDICATORS The Red PWR LED indicates the Power state of the camera ON OFF The Green NET LED indicates the Network state of the camera The LED will blink when network communication occurs 4 POWER INPUT PORT Provides power to...

Page 13: ...UTO IRIS LENS CONNECTOR This is the connection terminal for an auto iris lens which does not have an internal circuit to control the Iris DC Type 2 LENS MOUNT CS TYPE Supports a CS Mount type lens Not Included with this Camera NOTE See Appendix 3 for Lens Mount Instructions 1 2 ...

Page 14: ......

Page 15: ...INSTALLATION SECTION 3 Installation Overview 16 Hardware Installation 16 Software Installation 17 ...

Page 16: ...unt to the Camera See Appendix 3 for DC Auto Iris Lens installation Leave lens cap on until the end of the install Connect camera to the base confirm that the camera is the right side up by screwing the bottom onto the mounted stand 2 Network Connect the provided CAT 5 Ethernet Network cable to the Camera network connector A longer CAT 5 cable can be used if desired not included NOTE CAT 5 Etherne...

Page 17: ...you with the following Web links to various resources and documentation Discovery of all the Digimerge IP devices on the network Network configuration of IP Devices Installs DigiConsole and Surveillance application on your local PC Warranty information and DDNS registration DigiViewer Stored on the IP Device This application resides on the IP Product and is loaded into the default browser when a c...

Page 18: ......

Page 19: ...ng the MAC and IP Address 21 Router Port Forwarding 22 Setting Up Your DDNS Account 23 24 DigiViewer DDNS Setup 25 Remote Access with Internet Explorer 26 Internet Explorer Security Warnings 26 Security Warnings Program Installation27 Security Warnings Windows Firewall 27 ...

Page 20: ...hernet Cable and power on the Camera NOTE The Camera must be connected to the router prior to connecting the power to the IP Device 2 Locate the MAC and IP address of your Camera using the provided DigiConsole Setup Utility See next page for details 3 Run the DigiConsole Software from the provided CD optional installation to PC and configure the DigiViewer to allow DDNS connectivity Refer to page ...

Page 21: ...reen display NOTE You may need to press the Find Devices button several times as some devices may not respond immediately If you do not see a snapshot image please check that all cables running to the Camera are connected properly A camera must be connected and networked to view live images A username and password may be required when connecting to the Camera if configured on a previous installati...

Page 22: ...rom the Internet the information is sent to the Router When a computer on the Internet needs to send data to your internal network it sends this data to the external IP address of the Router The Router then needs to decide where this data is to be sent to This is where setting up Port Forwarding becomes important Port Forwarding tells the router which device on the internal network to send the dat...

Page 23: ...ra A DDNS account allows you to set up a web site address that points back to your Local Network The following outlines how to set up your free DNS account 3 Complete the Account Information fields with your personal information 1 Navigate to http DDNS digimerge net 2 Select the Create Account option from the list on the left side of the screen ...

Page 24: ...e _______________________________________________ User Name _________________________________________________ Password __________________________________________________ Domain name User name Password tomsmith tomsmith1 1234 Product Code Select your product model from the Product Code drop down menu Product Code MAC Address Locate the MAC address of your System by pressing the Info button on the R...

Page 25: ...cation will load in the default Web Browser A Click on the SETTINGS link B Click on the NETWORK SERVICES link C Enter the DDNS information received in the DDNS Confirmation Email z Check Enable Digimerge Dynamic DNS Service z Enter the DDNS Domain name you chose during the DDNS Registration process z Enter the Account Name you setup during the DDNS Registration Process The information is automatic...

Page 26: ...inside the Local Network the Remote IP i e http 72 154 89 164 or DDNS Address http myurl digimerge net for the remote IP Device Internet Explorer Security Warnings Several security warnings may appear based on your Internet Explorer settings The applications requesting security clearance are required to view live video on your system Right Click on the Yellow Security Bar and select Install http m...

Page 27: ...n information to be installed to your PC Click the Install button to allow the ActiveX controls to be setup on the PC Internet Explorer Security Warnings Windows Firewall The Digimerge IP Devices require connectivity across the network and may be flagged by the Windows Firewall when a connection to your PC is made Select UNBLOCK to use the DigiConsole and Apple Quicktime applications ...

Page 28: ......

Page 29: ...Appendix 2 COM GPIO Terminal Block Appendix 3 DC Auto Iris Lens Installation Appendix 4 Changing the Camera Appendix 5 Power Over Ethernet PoE Appendix 6 Hardware Reset Other Digimerge IP Products Digimerge Limited Warranty APPENDICES ...

Page 30: ...utput Video Out For connecting to a CCTV monitor DVR etc 1 x Internal Microphone 1 x 12V DC Jack 1 x DC Iris Power Connector 2 x LEDs to indicate network and power system status Lens Standard package Accepts CS mount type lenses Supports Direct drive lenses Built in VR for DC level adjustment CCD Adjustment White Balance WB AWB Auto gain Control GC AGC On Off Electronic Shutter ES AES On Off Image...

Page 31: ...Operating Humidity 20 80 RHG Network Network Interface 10 100 Base T Ethernet Protocols TCP UDP IP IMCP HTTP FTP SMTP DHCP NTP DNS DDNS RTSP RTP TCP UDP Network Management Other Power Consumption 8 Watts Unit Dimensions W x D x H 3 0 x 6 2 x 2 2 Body Only 75mm x 153mm x 53mm Input Voltage DC 12V 1A Unit Net Weight 0 53 kg 1 2 lbs Body Only Gross Weight including packaging accessories 1 25 kg 2 8lb...

Page 32: ...h when opening the connection input low when sinking more than 10mA or shorting to pin 5 GND 2 RXD COM Port Receive Data 3 TXD COM Port Transmit Data 4 RS485 A Connect an external PTZ or Alarm device For PTZ control both pins 4 8 must be used 5 GND System Ground The System Ground is also connected to the chassis as frame ground 6 GPOUT Automatic Relay When the DigiViewer is configured to use the G...

Page 33: ...erse Voltage Continuous Forward Current Peak Forward Current Power Dissipation Derate Linearly from 5 0V 50mA 1A 100mW 25 C 1 3mW C Emitter Input Output Breakdown Voltage Continuous Load Current Power Dissipation 350V 130mA 500mW General Characteristics Isolation Test Voltage Isolation Resistance Total Power Dissipation Derate Linerly from Storage Temperature Range Operating Temperature Range Junc...

Page 34: ...redthroughcameraspowersupply Theirisfortheselensesautomatically opens and closes according to the changes of the light conditions If the light level is low the lens iris opens up to allow enough light for optimum picture quality and when the light level is high it closes the iris so that incoming light does not overwhelm the camera and blur out the picture Please keep the lens clean Any foreign ob...

Page 35: ...connection plug cover and remove the lens protection cap Attach the auto iris lens to the camera by screwing it in clockwise 5 Please insert the connection plug connected to the auto iris lens cable into the auto lens connector port located on the side of the IP Camera AES Lens Cable Pin Configuration ...

Page 36: ...his information can be changed however incorrect changes to these settings will prevent access to the device and a Hardware Reset will be required 1 IP Address Port The IP address and port assigned to the IP Device 2 Subnet Mask The Subnet Mask assigned by the Network Router 3 Gateway Address The Gateway Address is the address of the Router This information is automatically assigned by the Network...

Page 37: ...sions over a single Ethernet cable PoE into a separate Date using RJ45 connector and power stream using power barrel connector for use strictly with non PoE devices NOTE PoE allows devices to be powered with a power rating of up to 12 9W Devices that con sume more then 12 9W but less than 39W require use of High Power PoE IEEE 802 3at devices High Power PoE devices like the 8000 series from Micros...

Page 38: ...Negligible downtime PoE investment is protected z Switch technology changes z Why pay for PoE every time you upgrade your switch Gain flexibility to power also pre standard terminals Examples of PoE installations using PoE Endspan Endspan IP camera PoE enabled Endspan Active Splitter IP Camera non PoE PoE Midspan Non PoE Ethernet Switch Midspan IP Camera PoE enabled Non PoE Ethernet Switch Midspan...

Page 39: ...s Restore Close the browser To access the device again refresh the browser after 30 seconds NOTE This will not reset Networking and Account Settings Hardware Reset To Restore Factory Defaults from the Hardware Unplug the power jack to turn off the device Uncurl a paperclip about 2cm long insert it into the Factory Default Hole and push the button behind the hole Hold this and do not release Plug i...

Page 40: ...Digimerge IP Products SECTION 5 40 HARDWARE MANUAL Copyright 2007 Digimerge Technologies Inc Digimerge IP Products ...

Page 41: ...pment date or the remainder of the warranty term whichever is longer Repairs are warranted for 90 days outside the original warranty period Products and parts at Digimerge s sole discretion may be replaced with new or refurbished items and the products and parts replaced become the property of Digimerge The customer is responsible for all ship ping costs associated with the return of the defective...

Page 42: ...ation of the applicable written warranty and if damages may not be limited then the above limitations on damages apply but only to the greatest extent permitted by local law Warranty and Non Warranty Service Warranty service can be received by contacting your Digimerge dealer during the warranty period The dealer is re quired to first contact Digimerge Technical Support for assistance In the event...

Page 43: ...It s all on the web Product Information User Manuals Quick Start Guides Specification Sheets Software Upgrades Firmware Upgrades Digimerge Technologies Inc VISIT www digimerge com www digimerge com ...

Page 44: ......

Reviews: