English
10
Cold Weather Operation
When operating tools at temperatures below freezing:
1. Keep tool as warm as possible prior to use.
2. Actuate the tool 5 or 6 times into scrap timber
before using.
Hot Weather Operation
Tool should operate normally. However, keep tool out of
direct sunlight as excessive heat can deteriorate bumpers
and other rubber parts resulting in increased maintenance.
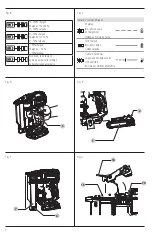
Tool Operation Check (Fig. A)
WARNING:
Remove all fasteners from tool before
performing tool operation check.
Trigger Operation with a
Secondary Trigger
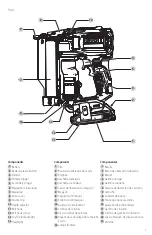
The primary trigger
4
can actuate the tool only if the
secondary trigger
5
has already been pulled.
The secondary trigger is located under the primary trigger.
1. Place the nose of the tool against a workpiece for all of
the following operation checks.
2. With hand on rear end of the handle, further back away
from the secondary trigger, and not squeezing the
secondary trigger, use finger to pull the primary trigger.
ThE TOOl MUsT nOT CYClE.
3. With hand on handle, and squeezing the secondary
trigger, use finger to pull the primary trigger.
ThE TOOl MUsT CYClE.
WARNING:
While the secondary trigger remains
squeezed, the tool will cycle each time the
primary trigger is pulled.
Tool-Free Jam Release (Fig. A, G)
WARNING:
Always turn unit off and remove the
battery pack before clearing a jammed pin
.
Your pin nailer features a tool-free jam release for clearing
jammed pins.
To Clear a Jammed Pin
1. Remove the battery pack from the tool.
2. Depress the magazine release lever
6
and pull the
magazine
7
back to stop pin feeding.
3. Remove the no-mar tip
9
.
4. Grab the small tabs on each side of the nose cover
8
and pull up as shown in Figure G.
5. With the nose cover lifted, slide the inner nose cover
15
forward and lift up to clear the jammed pin.
6. Push the pinch lever
16
down to lock the mechanism
back to operating position after the jam is cleared as
shown in Figure G.
7. Attach the no-mar tip.
8. Close the magazine and reconnect the battery pack.
Continuous satisfactory operation depends upon proper
tool care and regular cleaning.
Belt Hook (Fig. A)
WARNING:
Remove pins from magazine before
making any adjustments or servicing this tool. Failure
to do so may result in serious injury.
WARNING:
Disconnect the power source from the
tool before making any adjustments, changing
accessories, servicing, or moving the tool. Such
preventative safety measures reduce the risk of
actuating the tool accidentally.
Your
D
e
WALT
pin nailer includes an integrated belt
hook
11
and can be attached to either side of the tool to
accommodate left- or right-handed users.
If the belt hook is not desired at all, it can be removed from
the tool.
Removing and Reattaching the
Belt Hook
1. Remove the battery pack from the tool.
2. To switch the tool from right- to left-hand usage simply
remove the screw
12
from the opposite side of the tool
and reattach the belt hook
11
on the other side.
Trigger Operation with a Secondary
Trigger (Fig. A, D)
WARNING:
Never inadvertently pull or grasp the
secondary trigger when moving about, changing
work location, when holstering or hanging tool, or
when preparing work surface for fastening operation.
WARNING:
The operator must not hold the secondary
trigger pulled except during fastening operation as
serious injury could result if the trigger accidentally
contacts someone or something, causing the tool
to cycle.
The tool will actuate each time the primary trigger
4
is
pulled until the secondary trigger
5
under the hand grip
is released. This trigger operated tool is operated by first
pulling or grasping the secondary trigger under the hand
grip, followed by pulling the primary trigger as shown.
The depth that the fastener is driven can be adjusted using
the depth adjustment wheel
10
The depth of drive is
factory adjusted to a nominal setting. Test fire a fastener and
check depth. If a change is desired:
1. To drive the nail deeper, rotate the depth adjustment
wheel to the right.
2. To drive a nail shallower, rotate the depth adjustment
wheel to the left.
Test drive another fastener and check depth. Repeat as
necessary to achieve desired results.
MAINTENANCE
WARNING: To reduce the risk of serious personal
injury, turn unit off and remove the battery pack
before making any adjustments or removing/
installing attachments or accessories.
An
accidental start‑up can cause injury.
Your
D
e
WALT
power tool has been designed to operate
over a long period of time with a minimum of maintenance.
Summary of Contents for DCN623
Page 43: ......


