background image

9

English

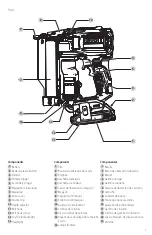
Dry Fire Lock Out (Fig. A)

The tool will detect when there are about 10 pins left, and 
shut off. The dry fire light 

 13 

 will light red when the trigger 

is actuated. When additional pins are loaded, the light will 
turn off and the tool will return to normal function.

Adjusting Depth (Fig. A)


WARNING: To reduce risk of serious injury from 
accidental actuation when attempting to adjust 
depth,


ALWAYS:

•  Remove battery pack.
•  Engage trigger lock‑off.
•  Always point the nose of the nailer away 

from you.

•  Avoid contact with trigger during adjustments.

Loading the Tool (Fig. F)

NOTICE:

 Use only pins recommended for use in your 

pin nailer which meet the 

D

e

WALT

 specifications. Refer 

to 

Pin specifications

.

1.  Depress the magazine release lever 

 6 

.

2.  Pull sliding portion of magazine 

 7 

 back.

3.  Load the stick of pins with the arrow pattern pointing 

to the left as shown. If pins have black dots instead of 
arrows, the dots should be positioned up.

4.  Close magazine until it latches. The tool is now ready 

for use.

Preparing the Tool

nOTE:

 The battery pack is not fully charged out of 

the carton. Follow instructions outlined (refer to 

Charging a Battery

).

1.  Read the 

Nailer Safety Warnings

 section of 

this manual.

2.  Wear eye and ear protection.
3.  Remove battery from tool.
4.  Ensure magazine is empty of all fasteners.
5.  Check for smooth and proper operation of pusher 

assemblies. Do not use the tool if pusher assembly is not 
functioning properly.

6.  Keep tool pointed away from yourself and others.
7.  Insert fully charged battery pack.

Installing and Removing the Battery Pack 
(Fig. E)


WARNING:

 Ensure  the tool/appliance is in the off 

position before inserting the battery pack.

nOTE:

 For best results, make sure your battery pack is 

fully charged.
To install the battery pack 

 1 

 into the tool handle, align the 

battery pack with the rails inside the tool’s handle and slide 
it into the handle until the battery pack is firmly seated in 
the tool and ensure that it does not disengage.
To remove the battery pack from the tool, press the release 
button 

 2 

 and firmly pull the battery pack out of the tool 

handle. Insert it into the charger as described in the charger 
section of this manual.

Proper hand position requires one hand on the handle 

 3 


as shown.

Proper Hand Position (Fig. D)


WARNING:

 To reduce the risk of serious personal 

injury, 

ALWAYS

 use proper hand position as shown.


WARNING:

 To reduce the risk of serious personal 

injury, 

ALWAYS

 hold securely in anticipation of a 

sudden reaction.

OPERATION


WARNING: To reduce the risk of serious personal 
injury, turn unit off and remove the battery pack 
before making any adjustments or removing/
installing attachments or accessories.

 An 

accidental start‑up can cause injury.

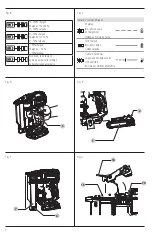
PIN SPECIFICATIONS

Model

DCn623

Pins

D

e

WALT DWPN23xxx

PORTER‑CABLE PPN23xxx, PN23PP

BOSTITCH PT‑23xx‑3M, BTPN23PP

Gauge

23

Headless pin range

5/8"–1 1/2" (16 mm–38 mm)

Magazine capacity

110 nails 

TOOL SPECIFICATIONS

Model

DCn623

Length

9.21" (234 mm)

Height

8.30" (211 mm)

Width

3.15" (80 mm)

Weight

4.1 lbs (1.85 kg)

Wall Mounting

Some 

D

e

WALT


chargers are designed to be wall mountable 

or to sit upright on a table or work surface.  If wall mounting, 
locate the charger within reach of an electrical outlet, 
and away from a corner or other obstructions which may 
impede air flow. Use the back of the charger as a template 
for the location of the mounting screws on the wall. Mount 
the charger securely using drywall screws (purchased 
separately) at least 1” (25.4 mm) long, with a screw head 
diameter of 0.28–0.35” (7–9 mm), screwed into wood to an 
optimal depth leaving approximately 7/32” (5.5 mm) of the 
screw exposed. Align the slots on the back of the charger 
with the exposed screws and fully engage them in the slots.

SAVE THESE INSTRUCTIONS FOR 

FUTURE USE

Charger Cleaning Instructions


WARNING: 

Shock hazard. Disconnect the charger 

from the AC outlet before cleaning. Dirt and grease 
may be removed from the exterior of the charger using 
a cloth or soft non‑metallic brush. Do not use water or 
any cleaning solutions.

Summary of Contents for DCN623

Page 1: ...ute question ou tout commentaire nous contacter Si tiene dudas o comentarios contáctenos 1 800 4 DeWALT DCN623 23 GA Pin Nailer Clous de calibre 23 GA Pistola de Clavos de Pasador Calibre 23 Instruction Manual Guide D utilisation Manual de instrucciones ...

Page 2: ...English original instructions 3 Français traduction de la notice d instructions originale 14 Español traducido de las instrucciones originales 27 ...

Page 3: ...lo secundario 6 Palanca de liberación de cartucho 7 Cartucho 8 Cubierta de punta 9 Punta que no causa daños 10 Ajustador de profundidad 11 Gancho de cinturón 12 Tornillo de gancho de cinturón 13 Luz de bloqueo de disparo en seco 14 Linterna Composants 1 Pile 2 Bouton de libération de la pile 3 Poignée 4 Gâchette principale 5 Gâchette secondaire 6 Levier de libération du magasin 7 Magasin 8 Capucho...

Page 4: ...ged Chargé de 50 50 cargada Pack needs to be charged Le bloc piles doit être rechargé La batería tiene que cargarse Indicators Témoin Indicador Charging Bloc piles en Cours de Chargement Unidad en Proceso de Carga Fully Charged Bloc piles Chargé Unidad Cargada Hot Cold Pack Delay Suspension de Charge Contre le Chaud Froid Restraso por Unidad Caliente Fría 3 ...

Page 5: ... Do not wear loose clothing or jewelry Keep your hair clothing and gloves away from moving parts Loose clothes jewelry or long hair can be caught in moving parts g If devices are provided for the connection of dust extraction and collection facilities ensure these are connected and properly used Use of dust collection can reduce dust related hazards GENERAL POWER TOOL SAFETY WARNINGS WARNING Read ...

Page 6: ...Tool Use and Care a Do not force the power tool Use the correct power tool for your application The correct power tool will do the job better and safer at the rate for which it was designed b Do not use the power tool if the switch does not turn it on and off Any power tool that cannot be controlled with the switch is dangerous and must be repaired c Disconnect the plug from the power source and o...

Page 7: ...or triggering options Keep hands and body parts away from the discharge area of the tool While in use NEVER grasp the tool by the magazine or canister a mis driven nail can exit the nose causing injury Hold tool by insulated gripping surfaces when performing an operation where the cutting tool may contact hidden wiring Contact with a live wire will make exposed metal parts of the tool live and sho...

Page 8: ...The battery pack is not fully charged out of the carton Before using the battery pack and charger read the safety instructions below and then follow charging procedures outlined When ordering replacement battery packs be sure to include the catalog number and voltage The label on your tool may include the following symbols The symbols and their definitions are as follows V volts Hz hertz min minut...

Page 9: ...ing labeled Use Example battery pack label USE 120 Wh SHIPPING 3 x 40 Wh In this example the battery pack is three batteries with 40 Watt hours each when using the cap Otherwise the battery pack is one battery with 120 Watt hours Shipping the DeWALT FLEXVOLT Battery Pack The DeWALT FLEXVOLT battery pack has a battery cap that should be used when shipping the battery pack Attach the cap to the batt...

Page 10: ...tery pack and charger to your local service center 4 You may charge a partially used pack whenever you desire with no adverse effect on the battery pack plugged together and nameplate ampere rating If in doubt use the next heavier gauge Minimum Gauge for Cord Sets Volts Total Length of Cord in Feet meters 120V 25 7 6 50 15 2 100 30 5 150 45 7 Ampere Rating American Wire Gauge More Than Not More Th...

Page 11: ...mly seated in the tool and ensure that it does not disengage To remove the battery pack from the tool press the release button 2 and firmly pull the battery pack out of the tool handle Insert it into the charger as described in the charger section of this manual Proper hand position requires one hand on the handle 3 as shown Proper Hand Position Fig D WARNING To reduce the risk of serious personal...

Page 12: ...fore making any adjustments or servicing this tool Failure to do so may result in serious injury WARNING Disconnect the power source from the tool before making any adjustments changing accessories servicing or moving the tool Such preventative safety measures reduce the risk of actuating the tool accidentally Your DeWALT pin nailer includes an integrated belt hook 11 and can be attached to either...

Page 13: ...ury only DeWALT recommended accessories should be used with this product Recommended accessories for use with your product are available at extra cost from your local dealer or authorized service center If you need assistance in locating any accessory please contact DeWALT call 1 800 4 DeWALT 1 800 433 9258 or visit our website www dewalt com Cleaning the Driver Path Fig A G Glue from the pin stri...

Page 14: ...enter Tool does not actuate when secondary and primary triggers are depressed Dryfire lockout is engaged red indicator light is on Load pins into magazine Tool has timed out if triggers are held on for 10 20 seconds and tool will power down Release primary and secondary triggers for automatic electronic reset Damaged or dirty internal electronics See authorized service center Headlights flash afte...

Page 15: ...ins firing pins Worn or damaged mechanism See authorized service center Driver blade continues to get stuck in down position Dirty drive path Clean nose driver path and underside of door Jammed pin Clean magazine and or nose area and watch closely for small pieces of broken pins stuck in the nail channel Damaged driver blade Worn or damaged seals Lack of internal lubrication See authorized service...

Page 16: ...cher l outil dans une prise ou sur un circuit d alimentation dotés d un disjoncteur de fuite à la terre GFCI L utilisation de ce type de disjoncteur réduit les risques de choc électrique AVERTISSEMENTS GÉNÉRAUX SUR LA SÉCURITÉ DES OUTILS AVERTISSEMENT lisez tous les avertissements de sécurité toutes les instructions les illustrations et les caractéristiques fournis avec cet outil électrique Ne pas...

Page 17: ...incendie d En cas d utilisation abusive le liquide peut gicler hors du bloc piles éviter tout contact avec ce liquide Si un contact accidentel se produit laver 3 Sécurité personnelle a Être vigilant surveiller le travail effectué et faire preuve de jugement lorsqu un outil électrique est utilisé Ne pas utiliser d outil électrique en cas de fatigue ou sous l influence de drogues d alcool ou de médi...

Page 18: ... libre Une décharge incontrôlée pourrait en résulter Inspectez l outil avant toute utilisation Ne pas utiliser l outil si une portion quelconque de l outil de la gâchette ou du verrouillage de gâchette est inopérante déconnectée modifiée ou ne fonctionne pas correctement Toute pièce endommagée ou Consignes de sécurité propres aux cloueurs Assumer systématiquement que l outil est chargé L utilisati...

Page 19: ...déclenchement manquante doit être réparée ou remplacée avant nouvel usage Se reporter à la rubrique Réparations Ne jamais modifier ni altérer l outil Toujours présumer que l outil contient des attaches Ne jamais pointer l outil sur des collègues ou sur soi même Pas de bousculades Travailler en toute sécurité Traiter l outil comme un instrument essentiel de travail Éloigner les curieux les enfants ...

Page 20: ...clabousser ou immerger dans l eau ou tout autre liquide NE PAS laisser l eau ou tout liquide entre dans le bloc piles Ne pas entreposer ou utiliser l outil et le bloc piles dans des endroits où la température peut atteindre ou excéder 40 C 104 F comme les remises extérieures ou les édifices en métal durant l été Pour une meilleure durée de vie entreposez le bloc piles dans un endroit frais et sec ...

Page 21: ...trolyte des piles est composé d un mélange organique liquide et de sels de lithium Le contenu des piles peut causer une irritation respiratoire Faites circuler de l air frais Si les symptômes persistent consultez un médecin Le liquide des piles peut être inflammable s il est exposé aux étincelles ou aux flammes Ne jamais tenter d ouvrir le bloc piles pour quelque raison que ce soit Si le boîtier d...

Page 22: ...arche chaque fois que le bloc piles aura besoin de se refroidir N utilisez jamais le chargeur si le ventilateur ne fonctionne pas correctement ou si ses fentes d aération sont bloquées Tirez la fiche au lieu du cordon lorsque vous débranchez le chargeur Cela réduira le risque d endommager la fiche et le cordon électriques Assurez vous de ne pas placer le cordon là où il pourrait faire trébucher le...

Page 23: ...harge une surchauffe et une importante décharge L outil s éteint automatiquement et le bloc piles doit être rechargé Remarques importantes sur la charge 1 Pour augmenter la durée de vie du bloc piles et optimiser son rendement le recharger à une température ambiante de 18 C à 24 C 65 F à 75 F NE PAS charger lorsque le bloc piles est en dessous de 4 5 C 40 F ou au dessus de 40 C 104 F C est importa...

Page 24: ...tion dans votre cloueuse à tiges qui correspondent aux caractéristiques DeWALT Consultez Caractéristiques de tiges 1 Appuyez sur le levier de libération du magasin 6 2 Tirez la section coulissante du magasin 7 vers l arrière 3 Chargez la barrette de goupilles la flèche pointant vers le bas Si les goupilles présentent des points noirs au lieu de flèches ces points doivent être orientés vers le haut...

Page 25: ...re utilisez un doigt pour tirer sur la gâchette principale L OUTIL NE DOIT PAS FONCTIONNER 3 Avec une main sur la poignée et en appuyant sur la gâchette secondaire utilisez un doigt pour tirer sur la gâchette principale L OUTIL DOIT FONCTIONNER AVERTISSEMENT la gâchette secondaire demeurant pressée l outil effectue un cycle à chaque traction sur la gâchette principale Déblocage sans outils Fig A G...

Page 26: ...ns de votre achat Enregistrez votre produit maintenant pour SERVICE DE GARANTIE L enregistrement de votre produit en ligne vous aide à obtenir un service de garantie efficace au cas où vous auriez un problème avec votre produit CONFIRMATION DE PROPRIÉTÉ En cas de pertes liées aux assurances telles qu un incendie une inondation ou un vol votre enregistrement de propriété servira de preuve de votre ...

Page 27: ...l ne se déclenche pas lorsque les gâchettes secondaire et primaire sont enfoncées Le verrouillage de marche à vide est engagé le voyant rouge est allumé Chargez les tiges dans le magasin L outil s est arrêté si les gâchettes sont maintenues enfoncées pendant 10 à 20 secondes et l outil s éteint Relâchez les gâchettes primaire et secondaire pour une réinitialisation électronique automatique Électro...

Page 28: ...mence à tirer des tiges Mécanisme usé ou endommagé Consultez un centre de services autorisé La lame d entraînement continue à rester coincée en position basse Chemin d entraînement sale Nettoyez le chemin d entraînement de l embout et le dessous de la porte Tige coincée Nettoyez le magasin et ou l embout et observez attentivement les petits morceaux de tige cassée coincés dans le canal du clou Lam...

Page 29: ...nta eléctrica No utilice una herramienta eléctrica si está cansado o bajo el efecto de drogas alcohol o medicamentos Un momento de descuido mientras se opera una herramienta eléctrica puede provocar lesiones personales graves ADVERTENCIAS GENERALES DE SEGURIDAD PARA HERRAMIENTAS ELÉCTRICAS ADVERTENCIA Lea todas las advertencias de seguridad instrucciones ilustraciones y especificaciones incluidas ...

Page 30: ...d En condiciones abusivas el líquido puede ser expulsado de la batería Evite su contacto Si b Utilice equipos de protección personal Siempre utilice protección para los ojos En las condiciones adecuadas el uso de equipos de protección como máscaras para polvo calzado de seguridad antideslizante cascos o protección auditiva reducirá las lesiones personales c Evite el encendido por accidente Asegúre...

Page 31: ...ilice la herramienta si cualquier parte de la misma el gatillo o el botón de bloqueo del gatillo ha dejado de funcionar está desconectado alterado o no funciona bien Las piezas dañadas o que falten deben ser reparadas o cambiadas antes de usar la herramienta Consulte la sección Reparaciones Advertencias de Seguridad de la Clavadora Suponga siempre que la herramienta contiene clavos El manejo descu...

Page 32: ...isparo es importante Verifique las opciones de disparo en el manual No altere ni modifique la herramienta de ninguna forma Siempre dé por sentado que la herramienta contiene elementos de fijación No apunte la herramienta hacia sus compañeros de trabajo ni hacia usted en ningún momento No la use a modo de juego Trabaje en forma segura Respete la herramienta como un elemento de trabajo Mantenga a es...

Page 33: ...eWALT NO salpique ni sumerja en agua u otros líquidos NO permita que agua o ningún otro líquido entre al paquete de batería No almacene ni use la herramienta y el paquete de baterías en lugares donde la temperatura pueda alcanzar o exceder los 40 C 104 F como cobertizos exteriores o edificios de metal en verano Para obtener la mejor vida útil guarde los paquetes de baterías en un lugar fresco y se...

Page 34: ... electrólito de la batería está compuesto por una mezcla de carbonatos orgánicos líquidos y sales de litio El contenido de las celdas de batería abiertas puede causar irritación respiratoria Proporcione aire fresco Si los síntomas persisten busque atención médica El líquido de la batería puede ser inflamable si se expone a chispas o llamas Nunca intente abrir el paquete de baterías por ninguna raz...

Page 35: ...ador interno diseñado para enfriar el paquete de batería El ventilador se encenderá automáticamente cuando el paquete de batería se necesite enfriar Jale por el enchufe en lugar del cable cuando desconecte el cargador Esto reducirá el riesgo de daños al enchufe y cable eléctricos Asegúrese que el cable esté ubicado de forma que no se pueda pisar provoque tropiezos o de otra forma esté sujeto a dañ...

Page 36: ...a de tornillo de 0 28 0 35 7 9 mm atornillados en madera L appareil s arrêtera automatiquement dès que le système électronique de protection sera activé Si c était le cas placez le bloc piles au lithium ion sur son chargeur jusqu à ce qu il soit complètement rechargé Sistema de Protección Electrónica Las herramientas de ion de litio están diseñadas con un Sistema de Protección Electrónica que prot...

Page 37: ...o de Disparo en Seco Fig A La herramienta detectará cuando queden aproximadamente 10 pasadores y se apagará La luz de disparo en seco 13 se iluminará en rojo cuando se active el gatillo Cuando se carguen pasadores adicionales la luz se apagará y la herramienta regresará a la función normal Carga de la Herramienta Fig F AVISO Utilice sólo los pasadores recomendados para su pistola de clavos de pasa...

Page 38: ...6 y jale el cargador 7 hacia atrás para detener la alimentación del pasador 3 Retire la punta de protección 9 4 Tome las lengüetas pequeñas en cada lado de la cubierta de la punta 8 y jale hacia arriba como se muestra en la Fig G 5 Con la cubierta de la punta levantada deslice la cubierta de la punta interna 15 hacia adelante y levante para despejar el pasador atascado 6 Empuje la palanca de presi...

Page 39: ...P Av Universidad 1525 Col San Luis 444 814 2383 TORREON COAH Blvd Independencia 96 Pte Col Centro 871 716 5265 VERACRUZ VER Prolongación Díaz Mirón 4280 Col Remes 229 921 7016 VILLAHERMOSA TAB Constitución 516 A Col Centro 993 312 5111 PARA OTRAS LOCALIDADES Si se encuentra en México por favor llame al 55 5326 7100 Si se encuentra en U S por favor llame al 1 800 4 DeWALT 1 800 433 9258 o visite nu...

Page 40: ...e su producto ahora para SERVICIO EN GARANTÍA Si completa esta tarjeta podrá obtener un servicio en garantía más eficiente en caso de que exista un problema con su producto CONFIRMACIÓN DE PROPIEDAD En caso de una pérdida que cubra el seguro como un incendio una inundacíon o un robo el registro de propiedad servirá como comprobante de compra PARA SU SEGURIDAD Si registra el producto podremos comun...

Page 41: ...ionan los gatillos secundario y primario El bloqueo de disparo en seco está activado la luz indicadora roja está encendida Cargue los pasadores en el cargador El tiempo de operación de la herramienta se agota si los gatillos se mantienen activados durante 10 20 segundos y la herramienta se apagará Libere los gatillos primario y secundario para un reinicio electrónico automático Componentes electró...

Page 42: ...sparar los pasadores Mecanismo desgastado o dañado Consulte a un centro de servicio autorizado La cuchilla de accionador continúa atorándose en posición descendente Trayectoria de inserción sucia Limpie la trayectoria del accionador de la punta y debajo de la puerta Pasador atascado Limpie el cargador y o el área de la punta y observe de cerca si hay pequeños trozos de pasadores rotos atascados en...

Page 43: ......
Page 44: ... ou 120 volts La tension nominale est de 18 54 ou 108 120 V max se base sur l utilisation combinée de 2 blocs piles au lithium ion DeWALT de 60 V max El máximo voltaje inicial de la batería medido sin carga de trabajo es 20 o 60 voltios El voltaje nominal es de 18 54 o 108 V 120 V Máx se basan en el uso de 2 baterías de iones de litio DeWALT de 60 V Máx combinadas BT Bluetooth NOTE The Bluetooth w...

Reviews: