8. Click
OK
and inspect channel 6. It is now configured to read type T copper-
constantan thermocouples.
9. We do not need channel 62 configured as a Data Trigger. Select the
Ch 61-62
tab.
Highlight Channel 62 and click
Delete
(on your keyboard).
10. We also do not need channel 64 as a Warm-up channel. Select the
Ch 63-64
tab.
Highlight channel 64 and delete this also.
11. Return to the
Ch
1-15
tab, highlight channel 6. Note that the
Recording Actions
column has changed.
12. Enter a
Program Name
of up to 8 characters.
13. Select
File, Save As
and save your new
logging program with a unique
File name.
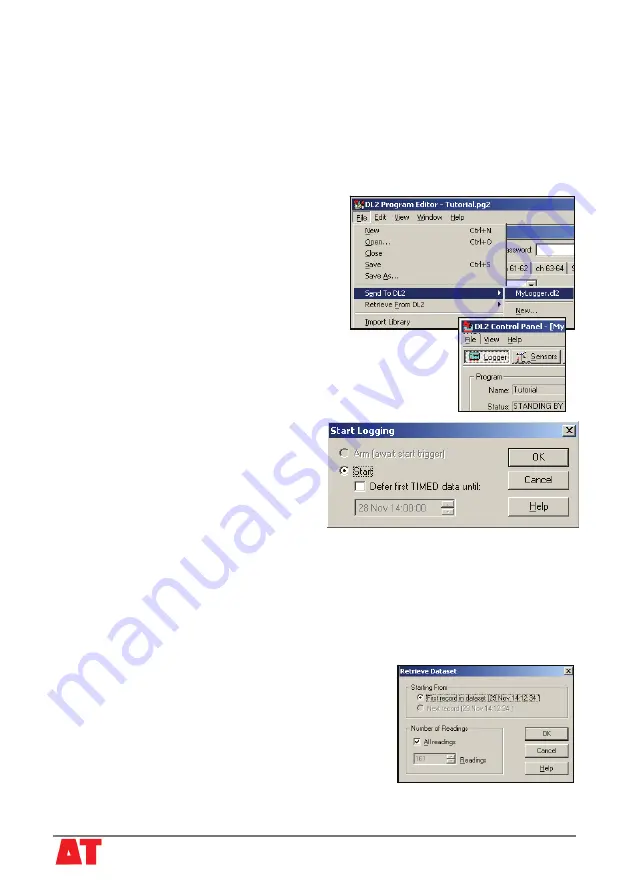
14. Select
File, Send to DL2
to display a
choice of DL2 Control Panels.
15. Select the name of your current DL2
Control Panel, e.g. My Logger.
Your chosen Control Panel should then open
and the logging program will be sent to your
logger.
16. Check your new program name appears on the
Logger
panel
7) Start Logging
1. Open the
DL2 Control Panel
by double
clicking on the
My Logger
icon on your
desktop.
On the
Logger
panel click on
Start
to
display the
Start Logging
dialog. The
start can be deferred until a set time or
until a logic condition is met on the counter
channels 61 or 62.
2. Click OK to start immediately.
Note: you can click on the
Sensors
panel and check your sensor readings even when
the logger is logging.
8) Retrieve Logged Datasets
1. Leave your logger logging for a few minutes to create some data
2. On the
Dataset
panel click
Refresh
to update the display showing how many
readings are stored.
3. On the
Dataset
panel click
Retrieve
to display the
Retrieve Dataset
dialog.
4. Click
OK
to retrieve all the data.
5. A
Save As
dialog appears. Select a suitable folder
and file name and type.
Note the default binary format is quickest (with .bin
after the filename)
6. Click
Save
to copy the dataset to your PC
© 2006 Delta-T Devices Ltd
v1.1 Page 8


