background image

- 28 -

- 29 -

EN

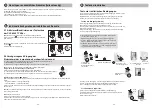
Testing the installation

6

Test under operating conditions

Test your installation under actual operating conditions by triggering an alarm 
with each of your detectors.
During this test, you must take the “exit timer” into account to achieve effective 
surveillance (up to 90 seconds).

Test the motion detectors

The motion detector stores each passage in the detection 
zone for 90 seconds (whether or not the system is on).
For the test, enable the surveillance from a point where you will not be detected.
Wait for 2 minutes before entering the detection zone 
(irrespective of the exit timer).

Whenever the system is activated or deactivated, the alarm control unit sends a 
series of beeps indicating that an event (motion detection in this case) has
occurred. You can view this on a touch screen keypad.

To clear the event:

Press and hold the remote control's OFF button for 5 seconds. 

The control unit emits beeps when pressed, then a series of beeps after 5 sec-
onds. 

Release.

The event is cleared.

• If the detector is in delayed triggering mode, 

the control unit will only set off the alarm after 45 seconds.
During this time, it will emit warning beeps.

• If the alarm control unit does not sound, take another look at 

the installation or association of the detector.

• If the installation is equipped with a transmitter, check that the 

detection triggers a call cycle to the programmed numbers.

OFF

ON

2'

Activate the 
surveillance system
outside of the
detection zone

Enter the detection
zone

Wait for 2 minutes

Stop the 
alarm

Beep, 
Beep

The alarm control unit 
sets off the ren

The siren

 wails

OFF

5s

Beep, 
Beep

Beep, Beep,..
Beep

Personalising the installation and the products

5

5.1 Activating-deactivating 
CLS 8000 TYXAL+ button beeps

Ê

 Enter the installer code (default: 123456).

Press and hold the   button for 5 seconds until 
the green LED comes on. 

Ë

 To enable the beeps again, press the   button for 5 seconds. 

The LED changes to green.

5.2 Entry timer on intruder detectors
(immediate/delayed triggering)

Ê

 Set the control unit to OFF, then Maintenance mode,

Example: from a TL 2000 TYXAL+ remote control

- Press the ON and OFF buttons simultaneously for 5 seconds. 

The LED changes from red to green to confi rm the action.
The alarm control unit beeps and its LED fl ashes. 

Release.

Ë


On the DMB  TYXAL+ motion detector

Open the detector unit, then press the button of the detector for 5 seconds, until 
the LED fl ashes:
  - slowly -> delayed triggering 

- rapidly -> immediate triggering.

Briefl y press the detector button to switch from one fl ashing rate to the other. Close the unit.

Ì

 The entry timer setting mode is automatically exited after 10 seconds 

if no buttons are pressed.

Í

 Exit the Maintenance mode.

Press and hold the remote control's OFF button.

The LED changes from red to green to confi rm the action. The alarm control unit beeps and its LED switches off.

Immediate/delayed triggering can be confi gured directly on the detectors.
By default, triggering is immediate. 
If you choose to switch to delayed mode, the delay will be 45 seconds.

>5s

ON OFF

>5s

>5s

Adding additional products (if necessary)

4

 Products that are not part of the TYXAL+ Compact Pack must be associated with the system: 
- intruder detectors and technical detectors,
- keypad, badge reader, remote controls, etc.,
- indoor siren, telephone transmitter, etc.,
To do this, refer to the "Adding products" chapter of the system guide.

Summary of Contents for Pack TYXAL+ Compact

Page 1: ...www deltadore com Pack TYXAL Compact IT Guida di installazione semplificata 2 EN Quick installation guide 17 DE Vereinfachte Installationsanleitung 33 ...

Page 2: ...guida di installazione semplificata indica le raccomandazioni di installazione di base dei vostri prodotti Per una installazione avanzata del vostro Pacchetto vi preghiamo di consultare il manuale di istruzioni del sistema Il Pacchetto TYXAL Compact è composto da 1 centrale sirena CS 2000 TYXAL 2 telecomandi TL 2000 TYXAL 2 rilevatori di movimento DMB TYXAL 1 tastiera semplice CLS 8000 TYXAL 1 Web...

Page 3: ...TYXAL deve essere accessibile all utilizzatore e può essere fissata alla parete a un altezza di circa 1 50 m evitate la vicinanza con superfici metalliche o un quadro elettrico Attenzione se la tastiera semplice è protetta da un rilevatore apertura o movimento è necessario fare attenzione a selezionare un attivazione ritardata del rilevatore nel momento della sua messa in servizio Fissaggio 1 50 m...

Page 4: ...a nella zona A2 È un cane a pelo corto genererà un rilevamento 0 5m 4 m 7 m 12 m 2 30m H 12m 10m 8m 6m 4m 2m 0m 0m 2m 4m 6m 2m 4m 6m 90 2m 4 m 7 m 10 m 2 30m H 10 m 8 m 6 m 4 m 2 m 0 m 0 m 2 m 4 m 6 m 2 m 4 m 6 m 90 N 1 N 2 N 2 2m 4 m 7 m 10 m 2 30m H 10 m 8 m 6 m 4 m 2 m 0 m 0 m 2 m 4 m 6 m 8 m 2 m 4 m 6 m 8 m 90 A B 30 kg 20 kg 10 kg 0 kg 0 cm 10 cm 20 cm 30 cm 40 cm 50 cm 60 cm 40 kg 50 kg A1 A...

Page 5: ...DOM 1 0 in base al vostro impianto Fase 2 download dell applicazione TYDOM In base al vostro apparecchio Collegatevi a Google play o App Store Cercate e scaricate l applicazione gratuita TYDOM Attivate la connessione WIFI del vostro smartphone o del vostro tablet Fase 3 configurazione dell applicazione TYDOM Prendete nota degli ultimi 6 caratteri dell indirizzo MAC del TYDOM 1 0 Aprite l applicazi...

Page 6: ...o ON La spia si accende di colore rosso e poi verde per confermare l azione 5s 1 2 3 OK OK 4 OK Quando la spia lampeggia di colore verde significa che la tastiera sta effettuando un aggiornamento con la centrale Attendete fino all arresto del lampeggiamento poi ricominciate dalla fase Ê Importante il nuovo codice deve essere inserito meno di 10 secondi dopo l inserimento del vecchio codice altrime...

Page 7: ...cchetto TYXAL Compact devono essere associati al sistema rilevatori di intrusione e tecnici tastiera lettore di transponder telecomandi ecc sirena interna trasmettitore telefonico ecc Per questo consultate il Capitolo Aggiungere dei prodotti del manuale di istruzioni del sistema Testare l impianto 6 Test in condizioni reali Testate il vostro impianto nelle condizioni di utilizzo reali attivando un...

Page 8: ...ezione contro l apertura e gli atti di vandalismo Indice di protezione IP30 IK04 Temperatura di funzionamento da 10 C a 55 C Temperatura di immagazzinaggio da 10 C a 70 C Intervallo di umidità 75 Dimensioni 67 8 x 77 3 x 45 3 mm Peso con pile 90 g Telecomando TL 2000 TYXAL Alimentazione pila Litio CR2430 3V Isolamento classe III Consumo in stand by 0 6 μA max Consumo medio in modalità emissione 23...

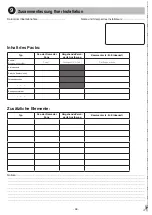
Page 9: ...iata ritardata Commento es localizzazione Esempio Rilevatore di movimento Zona 1 Ritardata 45 sec Corridoio pianterreno Centrale Tastiera semplice Telecomandi Rilevatori di movimento Elementi complementari Tipo N o nome di zona Attivazione immediata ritardata Commento es localizzazione Note Riepilogo del vostro impianto 9 English ...

Page 10: ...ation guide provides you with the basic installation instructions for your products Refer to the system guide for an advanced installation of your Pack The TYXAL Compact Pack comprises CS 2000 TYXAL 1 siren control unit TL 2000 TYXAL 2 remote controls DMB TYXAL 2 motion detectors 1 simple CLS 8000 TYXAL keypad 1 TYDOM 1 0 home automation box Siren control unit The control unit is the heart of the ...

Page 11: ...installed on a flat surface with enough space all around for installation and opening the battery cover in the centre of the system and fitted in a high position to obtain the best radio link avoid basements in an open area to obtain the best dispersion of sound for the inte grated siren in an area that is difficult for an intruder to locate but accessible to the user in an area protected by an in...

Page 12: ...hot body nearby convector fireplace the field of detection must be clear of any obstacles curtain cupboard etc the detector must not be pointing at an opening to the outside window you can cross the beams of 2 detectors the detector must be installed between 2 20 m and 2 40 m from the floor For a greater height use a RO DMB ball joint unless with the animal immunity lens Field of detection Restric...

Page 13: ... 001A25xxxxxx Identifiant _ Mot de passe Connecter ON C 1 1 2 BOX ADSL BOX ADSL 1 2 3 Android and Google play are Google Inc trademarks IOS is a Cisco Systems Inc trademark WiFi is a Wireless Ethernet Compatibility Alliance trademark 1 1 2 OFF ON Etage Marche Garage Arrêt Alarme 1 Alarme 5s ON OFF 5s ON Installing and mounting the products 1 1 4 Configuring a TL 2000 TYXAL remote control Buttons 1...

Page 14: ...eans that the keypad is being updated with the alarm control unit Wait until the flashing stops then begin again at step Ê Important the new code must be entered within 10 seconds after entering the old one otherwise the code remains the same 5s 1 2 3 4 OK OK You have 1 installer code 123456 on activation It is strongly recommended that you create your own code 10 user codes with 6 digits which en...

Page 15: ... siren wails OFF 5s Beep Beep Beep Beep Beep Personalising the installation and the products 5 5 1 Activating deactivating CLS 8000 TYXAL button beeps Ê Enter the installer code default 123456 Press and hold the button for 5 seconds until the green LED comes on Ë To enable the beeps again press the button for 5 seconds The LED changes to green 5 2 Entry timer on intruder detectors immediate delaye...

Page 16: ...r removed Degree of protection IP30 IK04 Operating temperature 10 C to 55 C Storage temperature 10 C to 70 C Humidity range 75 Dimensions 67 8 x 77 3 x 45 3 mm Weight with batteries 90 gr TL 2000 TYXAL remote control Power supply Lithium battery CR2430 3 V Class III insulation Cons idle 0 6 μA max Average cons in use 23 mA max 10 year life depending on use Radio frequencies 868 95 MHz and 868 30 M...

Page 17: ...te delayed triggering Comment e g location Example Motion detector Zone 1 Delayed 45s Ground floor corridor Control unit Simple keypad Remote controls Motion detectors Additional items Type No or name of zone Immediate delayed triggering Comment e g location Notes Overview of your installation 9 Deutsch ...

Page 18: ...ngsmelder Die an der Wand montierten Melder erfas sen die sich in diesem Raum aufhaltenden und sich bewegenden Personen und mel den dies der Alarmzentrale Die Standardlinse kann durch die tierim mune Linse im Lieferumfang enthalten ersetzt werden DMB TYXAL CS 2000 TYXAL CLS 8000 TYXAL TL 2000 TYXAL Inbetriebnahme Die wichtigen Schritte Installieren und befestigen der Produkte Reihenfolge für die I...

Page 19: ...ebenen Oberfläche mit ausreichend Freiraum für die Instal lation und das Öffnen des Batteriefachs Im geografischen Mittelpunkt des Systems und für die optimale Funkverbindung möglichst hoch möglichst nicht im Kellergeschoss An einem unverstellten Ort für eine optimale Ausbreitung der Sire nenakustik An einem für Eindringlinge schwer auffindbaren für den Benutzer jedoch gut zugänglichen Ort An eine...

Page 20: ...ereich muss hindernisfrei sein Vorhang Schrank usw Der Melder darf nicht auf einen Außenzugang Fenster gerichtet sein Die Erfassungsstrahlen von 2 Meldern können sich kreuzen Der Melder muss zwischen 2 20 und 2 40 m Höhe über dem Boden installiert werden Bei größeren Höhen muss ein Drehmodul RO DMB verwendet werden außer bei der tierimmunen Linse Erfassungsbereich Einschränkungen Der nachstehend b...

Page 21: ...xx Identifiant _ Mot de passe Connecter ON C 1 1 2 BOX ADSL BOX ADSL 1 2 3 Android und Google Play sind eingetragene Markenzeichen von Google Inc IOS ist ein eingetragenes Markenzeichen von Cisco Systems Inc WiFi ist ein eingetragenes Markenzeichen von Wireless Ethernet Compatibility Alliance 1 1 2 OFF ON Etage Marche Garage Arrêt Alarme 1 Alarme 5s ON OFF 5s ON Installieren und befestigen der Pro...

Page 22: ...e Kontrollleuchte grün bedeutet dies dass sich die Bedieneinheit über die Alarmzentrale aktualisiert Bitte warten Sie bis die Kontrollleuchte nicht mehr blinkt und beginnen Sie erneut mit dem Schritt Ê Wichtig Der neue Code muss maximal 10 Sekunden nach der ersten Eingabe bestätigt werden Andernfalls wird der Code nicht geändert 5s 1 2 3 4 OK OK Sie verfügen über 1 Installateurcode Werkseinstellun...

Page 23: ...töne der CLS 8000 TYXAL Ê Geben Sie den Installateurcode ein Werkseinstellung 123456 Halten Sie die Taste 5 Sekunden lang gedrückt bis die Kontrollleuchte grün leuchtet Ë Um die Pieptöne wieder zu aktivieren drücken Sie erneut 5 Sekunden lang die Taste Die Kontrollleuchte leuchtet grün 5 2 Verzögerungszeit Eingang der Einbruchmelder umgehende verzögerte Auslösung Ê Schalten Sie die Alarmzentrale a...

Page 24: ...und gewaltsames Entfernen Schutzart IP30 IK04 Betriebstemperatur 10 C bis 55 C Lagertemperatur 10 C bis 70 C Feuchtigkeitsbereich 75 Abmessungen 67 8 x 77 3 x 45 3 mm Gewicht mit Batterien 90 g Fernbedienung TL 2000 TYXAL Spannungsversorgung Lithium Batterie CR2430 3 V Schutzklasse III Verbrauch im Standby Modus 0 6 µA Durchschnittlicher Verbrauch bei Übertragung 23 mA max Lebensdauer der Batterie...

Page 25: ... gerte Auslösung Kommentar z B Einbauort Beispiel Bewegungsmelder Zone 1 Verzögert 45 Sek Flur Erdgeschoss Alarmzentrale Einfache Bedieneinheit Fernbedienungen Bewegungsmelder Zusätzliche Elemente Typ Nr oder Name der Zone Umgehende Verzö gerte Auslösung Kommentar z B Einbauort Notizen Zusammenfassung Ihrer Installation 9 ...

Reviews: