background image

6.

Remove the display panel from the display assembly.

Installing the Display Panel

1.

Install the screws that secure the display brackets to the display panel.

2.

Attach the display panel to the display assembly.

3.

Align the display panel in its original position in the computer.

4.

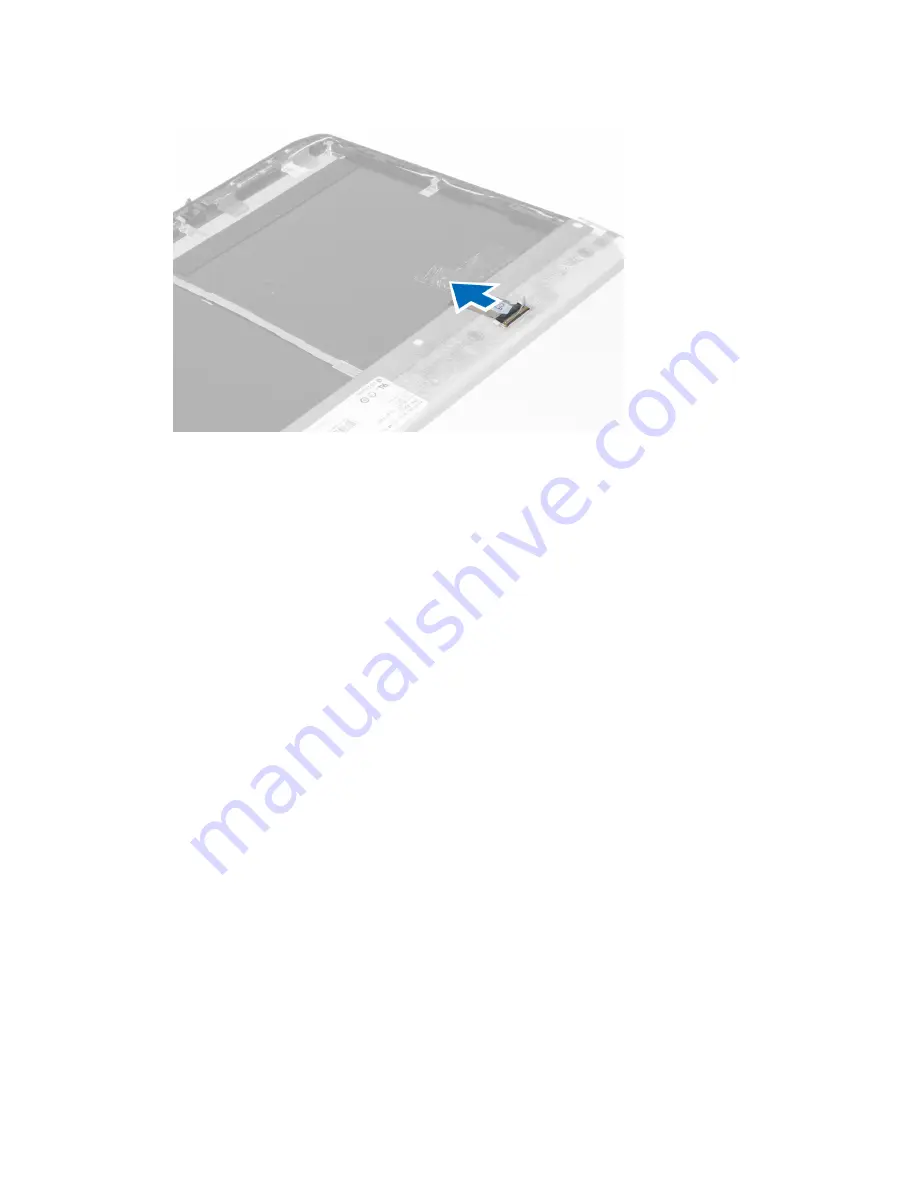
Connect the low-voltage differential signaling (LVDS) cable to the display panel and attach the tape.

5.

Flip the display panel over and install the screws that secure the display panel.

6.

Install:
a) display bezel
b) battery

7.

Follow the procedures in 

After Working Inside Your Computer

.

Removing the Keyboard Trim

1.

Follow the procedures in 

Before Working Inside Your Computer

.

2.

Remove the battery.

17

Summary of Contents for Latitude E5530

Page 1: ...Dell Latitude E5530 Owner s Manual Regulatory Model P28G Regulatory Type P28G001 ...

Page 2: ...MD Phenom and AMD Sempron are trademarks of Advanced Micro Devices Inc Microsoft Windows Windows Server Internet Explorer MS DOS Windows Vista and Active Directory are either trademarks or registered trademarks of Microsoft Corporation in the United States and or other countries Red Hat and Red Hat Enterprise Linux are registered trademarks of Red Hat Inc in the United States and or other countrie...

Page 3: ... the Display Bezel 14 Removing the Camera 14 Installing the Camera 15 Removing the Display Panel 15 Installing the Display Panel 17 Removing the Keyboard Trim 17 Installing the Keyboard Trim 19 Removing the Keyboard 20 Installing the Keyboard 22 Removing the Access Panel 23 Installing the Access Panel 24 Removing the Optical Drive 24 Installing the Optical Drive 26 Removing The Hard Drive 26 Insta...

Page 4: ...alling the Modem Card 42 Removing the Left Support Frame 43 Installing the Left Support Frame 43 Removing the System Board 44 Installing the System Board 47 Removing the Coin Cell Battery 48 Installing the Coin Cell Battery 48 Removing the Input Output I O Board 49 Installing the Input Output I O Board 50 Removing the Power Connector 51 Installing the Power Connector 52 Removing the System Fan 53 ...

Page 5: ...Entering System Setup 69 System Setup Options 69 7 การวินิจฉัยระบบ 79 Diagnostics 79 8 Contacting Dell 81 ...

Page 6: ...6 ...

Page 7: ...ollow the safety instructions that came with the product CAUTION To avoid electrostatic discharge ground yourself by using a wrist grounding strap or by periodically touching an unpainted metal surface such as a connector on the back of the computer CAUTION Handle components and cards with care Do not touch the components or contacts on a card Hold a card by its edges or by its metal mounting brac...

Page 8: ... board you must remove the main battery before you service the computer 7 Remove the main battery 8 Turn the computer top side up 9 Open the display 10 Press the power button to ground the system board CAUTION To guard against electrical shock always unplug your computer from the electrical outlet before opening the display CAUTION Before touching anything inside your computer ground yourself by t...

Page 9: ...automatically turn off when you shut down your operating system press and hold the power button for about 4 seconds to turn them off หลังจากทำงานกับส วนประกอบภายในของคอมพิวเตอร หลังจากที คุณดำเนินการเปลี ยนชิ นส วนใด ๆ เสร จสิ นแล ว ตรวจสอบว าคุณได ต ออุปกรณ ต อพ วง การ ด และสายใด ๆ ให เรียบร อยก อนที จะเปิดเครื องคอมพิวเตอร ของคุณ ข อควรระวัง เพื อป องกันความเสียหายต อคอมพิวเตอร ให ใช เฉพาะแบตเตอ...

Page 10: ...10 ...

Page 11: ...screwdriver 0 Phillips screwdriver 1 Phillips screwdriver Small plastic scribe Removing the SD Card 1 Follow the procedures in Before Working Inside Your Computer 2 Press in on the SD card to release it from the computer 3 Slide the SD card out of the computer Installing the SD Card 1 Push the SD card into the compartment until it clicks into place 2 Follow the procedures in After Working Inside Y...

Page 12: ...side Your Computer 2 Slide the battery release latches into the unlock position 3 Remove the battery from the computer Installing the Battery 1 Slide the battery into its slot until it clicks into place 2 Follow the procedures in After Working Inside Your Computer 12 ...

Page 13: ...4 Slide the SIM card from the computer Installing the Subscriber Identity Module SIM Card 1 Insert the subscriber identity module SIM card into the slot 2 Install the battery 3 Follow the procedures in After Working Inside Your Computer Removing the Display Bezel 1 Follow the procedures in Before Working Inside Your Computer 2 Remove the battery 3 Pry up the bottom edge of the display bezel 13 ...

Page 14: ...nd work around the entire bezel until it snaps onto the display assembly 3 Install the battery 4 Follow the procedures in After Working Inside Your Computer Removing the Camera 1 Follow the procedures in Before Working Inside Your Computer 2 Remove a battery b display bezel 3 Perform the following steps a Remove the screw that secures the camera and microphone module b Disconnect the camera cable ...

Page 15: ...ew to secure the camera and microphone module 4 Install a display bezel b battery 5 Follow the procedures in After Working Inside Your Computer Removing the Display Panel 1 Follow the procedures in Before Working Inside Your Computer 2 Remove a battery b display bezel 3 Remove the screws that secure the display panel 15 ...

Page 16: ...4 Flip the display panel over 5 Lift the Mylar tape and disconnect the LVDS cable from the back of the display panel 16 ...

Page 17: ...in its original position in the computer 4 Connect the low voltage differential signaling LVDS cable to the display panel and attach the tape 5 Flip the display panel over and install the screws that secure the display panel 6 Install a display bezel b battery 7 Follow the procedures in After Working Inside Your Computer Removing the Keyboard Trim 1 Follow the procedures in Before Working Inside Y...

Page 18: ...3 Remove the screws at the back of the computer 4 Pry up the keyboard trim starting from the bottom edge 5 Work your way around the sides and the top edge of the keyboard trim 18 ...

Page 19: ...m from the computer Installing the Keyboard Trim 1 Align the keyboard trim to its place 2 Press along the sides of the keyboard trim until it snaps in place 3 Install the battery 4 Follow the procedures in After Working Inside Your Computer 19 ...

Page 20: ...yboard 1 Follow the procedures in Before Working Inside Your Computer 2 Remove a battery b keyboard trim 3 Remove the screw at the back of the computer 4 Lift the clip to release the keyboard trim from the computer 20 ...

Page 21: ...5 Remove the keyboard trim from the computer 6 Remove the screws that secure the keyboard in place 21 ...

Page 22: ...ling the Keyboard 1 Attach the keyboard flat flex cable to the keyboard 2 Affix the adhesive tape securing the keyboard flat flex cable to the keyboard 3 Slide the keyboard into its compartment until all the metal tabs fit into their positions 4 Fasten the keyboard cable clip 5 Press down on the keyboard to the left and right side ensuring that all the snaps are fully engaged with the computer 6 I...

Page 23: ... the procedures in After Working Inside Your Computer Removing the Access Panel 1 Follow the procedures in Before Working Inside Your Computer 2 Remove the battery 3 Remove the screws that secure the access panel 4 Slide and then lift the access panel upwards and remove it from the computer 23 ...

Page 24: ...crews that secure the access panel to the computer 3 Install the battery 4 Follow the procedures in After Working Inside Your Computer Removing the Optical Drive 1 Follow the procedures in Before Working Inside Your Computer 2 Remove a battery b access panel 3 Remove the screw that secures the optical drive 24 ...

Page 25: ...drive bay 5 Remove the optical drive from the computer 6 Remove the screws that secure the optical drive bracket 7 Remove the optical drive bracket 8 Disengage the optical drive bezel tabs to separate the optical drive bezel from the optical drive 9 Remove the optical drive bezel 25 ...

Page 26: ... drive bracket 4 Insert the optical drive into the computer 5 Install the screw that secures the optical drive in place 6 Install a access panel b battery 7 Follow the procedures in After Working Inside Your Computer Removing The Hard Drive 1 Follow the procedures in Before Working Inside Your Computer 2 Remove a battery b access panel 3 Remove the screws that secure the hard drive bracket in plac...

Page 27: ...4 Use the tab to pull the hard drive bracket and release the hard drive from its connector 5 Remove the hard drive from the computer 27 ...

Page 28: ... 4 Install the screw that secures the hard drive bracket in place 5 Install a base panel b battery 6 Follow the procedures in After Working Inside Your Computer Removing the WLAN Card 1 Follow the procedures in Before Working Inside Your Computer 2 Remove a battery b base cover 3 Perform the following steps a Disconnect the antennae cables from the WLAN card b Remove the screw that secures the WLA...

Page 29: ...dures in Before Working Inside Your Computer 2 Remove a battery b base cover 3 Pry the retention clips away from the memory module until it pops up 4 Lift up the memory module and remove it from the computer Installing the Memory Module 1 Insert the memory into the memory socket 2 Press the clips to secure the memory module to the system board 3 Install a base cover b battery 4 Follow the procedur...

Page 30: ...cation at the bottom of the computer 2 Install the screws that secure the right base panel to the bottom of the computer 3 Install a access panel b battery 4 Follow the procedures in After Working Inside Your Computer Removing the Thermal Module 1 Follow the procedures in Before Working Inside Your Computer 2 Remove a SD memory card b battery c access panel d right base panel 30 ...

Page 31: ... it from the computer Installing the Thermal Module 1 Place the thermal module in its compartment 2 Install the screws that secure the thermal module to the computer 3 Install a right base panel b access panel c battery d SD memory card 4 Follow the procedures in After Working Inside Your Computer 31 ...

Page 32: ...stalling the Processor 1 Place the processor in its socket on the computer 2 Rotate the processor cam lock in a clockwise direction to secure the processor 3 Install a thermal module b access panel c right base panel d battery e SD memory card 4 Follow the procedures in After Working Inside Your Computer Removing the Palmrest 1 Follow the procedures in Before Working Inside Your Computer 2 Remove ...

Page 33: ...ews that secure the bottom of the computer 4 Disconnect the a LED board flat flex cable b media button flat flex cable c touchpad flat flex cable d fingerprint scanner flat flex cable e power button flat flex cable 33 ...

Page 34: ...mrest from the computer Installing the Palmrest 1 Align the palmrest assembly to its original position in the computer and snap it into place 2 Connect the following cables to the system board a power button flat flex cable b fingerprint scanner flat flex cable c touchpad flat flex cable d media button flat flex cable e LED board flat flex cable 3 Install the screws on the palmrest 34 ...

Page 35: ...eyboard trim e keyboard f optical drive g right base panel h palmrest 3 Remove the screws that secure the ExpressCard reader cage in place 4 Remove the ExpressCard reader cage from the computer Installing the ExpressCard Reader Cage 1 Align the ExpressCard reader cage to its original position in the computer and snap it into place 2 Install the screws that secure the ExpressCard reader cage 3 Inst...

Page 36: ...e the Bluetooth module from the computer 5 Disconnect the Bluetooth cable from the Bluetooth module Installing the Bluetooth module 1 Connect the Bluetooth cable to the Bluetooth module 2 Place the Bluetooth module into its compartment on the computer 3 Install the screw that secures the Bluetooth module 4 Connect the Bluetooth cable to the system board 5 Install a palm rest b right base panel c o...

Page 37: ...ard and remove the screw that secures the audio board in place 4 Remove the audio board from the computer Installing the Audio Board 1 Place the audio board in the computer 2 Tighten the screw to secure the audio board to the computer 3 Connect the audio board cable to the system board 4 Install a Bluetooth module b palmrest c right base panel d optical drive e keyboard f keyboard trim g access pa...

Page 38: ...edures in Before Working Inside Your Computer 2 Remove a SD memory card b battery c access panel d keyboard trim e keyboard f optical drive g hard drive h right base panel i palmrest 3 Disconnect and remove any antennas from the routing channels 38 ...

Page 39: ...4 Disconnect the low voltage differential signaling LVDS cable 5 Pull the antennas through the opening to the top of the computer 6 Lift up the connector indicated on the system board 39 ...

Page 40: ...ge differential signaling LVDS cable and wireless antenna cables through the holes on the chassis 3 Route the LVDS cable along its compartment and connect the connector to the system board 4 Connect the antenna cables to their connectors 5 Install a palmrest b right access panel c optical drive d keyboard e keyboard trim f access panel g battery h SD memory card 6 Follow the procedures in After Wo...

Page 41: ...re the right support frame to the computer 4 Lift the right support frame away from the computer Installing the Right Support Frame 1 Place the right support frame on the computer 2 Tighten the screws to secure the right support frame to the computer 3 Install a display assembly b palmrest c right base panel d hard drive e optical drive f keyboard g keyboard trim h access panel i battery j SD memo...

Page 42: ... back of the card 5 Disconnect the network connector cable from the modem card 6 Lift the modem card from the computer Installing the Modem Card 1 Place the modem card on the Input Output I O board in the computer 2 Connect the network connector cable to the modem card 3 Engage the modem card to the connector located at the back of the computer 4 Tighten the screw to secure the modem card to the c...

Page 43: ... access panel d keyboard trim e keyboard f optical drive g hard drive h right base panel i palmrest j display assembly 3 Remove the screws that secure the left support frame to the computer 4 Lift the left support frame away from the computer Installing the Left Support Frame 1 Place the left support frame on the computer 2 Tighten the screws to secure the left support frame to the computer 43 ...

Page 44: ... in After Working Inside Your Computer Removing the System Board 1 Follow the procedures in Before Working Inside Your Computer 2 Remove a SD memory card b battery c access panel d keyboard trim e keyboard f optical drive g hard drive h WLAN card i right base panel j thermal module k palmrest l ExpressCard reader cage m display assembly n left support frame o thermal fan cable 44 ...

Page 45: ...3 Disconnect a thermal fan cable b DC in cable c Bluetooth cable 4 Disconnect the speaker cable and the audio board flex cable from the system board 45 ...

Page 46: ...5 Remove the screws that secure the system board 6 Lift the right edge of the system board assembly and raise it to a 45 degree angle 46 ...

Page 47: ...he computer 3 Route and connect the following cables the system board a audio board flat flex cable b Bluetooth cable c speaker cable d DC in cable e thermal fan cable 4 Install a left support frame b display assembly c ExpressCard reader cage d palm rest e thermal module f right base panel g hard drive h optical drive i keyboard j keyboard trim k access panel l battery m SD memory card 5 Follow t...

Page 48: ...i right base panel j thermal module k palmrest l ExpressCard reader cage m display assembly n left support frame o system board 3 Disconnect the coin cell battery from the system board 4 Pry the coin cell battery from the adhesive and remove it Installing the Coin Cell Battery 1 Place the coin cell battery on the system board with adhesive side downwards 2 Connect the coin cell battery cable to th...

Page 49: ...s in After Working Inside Your Computer Removing the Input Output I O Board 1 Follow the procedures in Before Working Inside Your Computer 2 Remove a SD memory card b battery c access panel d keyboard trim e keyboard f optical drive g hard drive h WLAN card i right base panel j thermal module k palmrest l ExpressCard reader cage m display assembly n right support frame o left support frame p syste...

Page 50: ...e Input Output I O board to the computer 3 Install a system board b left support frame c right support frame d display assembly e ExpressCard reader cage f palmrest g thermal module h right base panel i WLAN card j hard drive k optical drive l keyboard m keyboard trim n access panel o battery p SD memory card 4 Follow the procedures in After Working Inside Your Computer 50 ...

Page 51: ...a SD memory card b battery c access panel d keyboard trim e keyboard f optical drive g hard drive h WLAN card i right base panel j thermal module k palmrest l ExpressCard reader cage m display assembly n left support bracket o system board 3 Remove the power connector cable from the routing channels 51 ...

Page 52: ...le in the routing channel 3 Install a system board b left support bracket c display assembly d ExpressCard reader cage e palmrest f thermal module g right base panel h WLAN card i hard drive j optical drive k keyboard l keyboard trim m access panel n battery o SD memory card 4 Follow the procedures in After Working Inside Your Computer 52 ...

Page 53: ... panel d keyboard trim e keyboard f optical drive g hard drive h WLAN card i right base panel j thermal module k palmrest l ExpressCard reader cage m display assembly n right support frame o left support frame p modem card q network connector r system board s power connector 3 Remove the system fan cable from the routing channel 53 ...

Page 54: ...he computer 3 Install a power connector b system board c network connector d modem card e left support frame f right support frame g display assembly h ExpressCard reader cage i palmrest j thermal module k right base panel l WLAN card m hard drive n optical drive o keyboard p keyboard trim q access panel r battery s SD memory card 4 Follow the procedures in After Working Inside Your Computer 54 ...

Page 55: ...al drive g hard drive h right base panel i palmrest j display assembly k right support frame l left support frame m modem card 3 Remove the network connector cables from the routing channels 4 Remove the network connector jack Installing the Network Connector Jack 1 Install the network connector jack in the computer 2 Thread the network connector cable in the routing channel 55 ...

Page 56: ...w the procedures in After Working Inside Your Computer Removing the Speakers 1 Follow the procedures in Before Working Inside Your Computer 2 Remove a SD memory card b battery c access panel d keyboard trim e keyboard f optical drive g hard drive h WLAN card i right base panel j thermal module k palmrest l ExpressCard reader cage m Bluetooth module n audio board o display assembly p left support f...

Page 57: ...r cables from the routing channels 5 Lift the speaker out from the computer Installing the Speakers 1 Place the speakers in the computer 2 Tighten the screws to secure the speakers to the computer 3 Connect the speaker cables and secure it in the routing channels 57 ...

Page 58: ... board e Bluetooth module f ExpressCard reader cage g palmrest h thermal module i right base panel j WLAN card k hard drive l optical drive m keyboard n keyboard trim o access panel p battery q SD memory card 5 Follow the procedures in After Working Inside Your Computer 58 ...

Page 59: ...ure Specification Chipset Intel HM77 QM77 Express Chipset DRAM bus width 64 bit Flash EPROM SPI 32 Mbits PCIe Gen1 bus 100 MHz External Bus Frequency DMI 5GT s Table 2 Processor Feature Specification Types Intel Celeron Intel Core i3 series Intel Core i5 series Intel Core i7 series L3 cache up to 8MB Table 3 Memory Feature Specification Memory connector two SoDIMM slots Memory capacity 2 GB 4 GB o...

Page 60: ...grated on system board Controller Intel HD Graphics Table 6 Communications Feature Specification Network adapter 10 100 1000 Mb s Ethernet RJ 45 Wireless internal wireless local area network WLAN and wireless wide area network WWAN Table 7 Ports and Connectors Feature Specification Audio optional one microphone stereo headphone speakers connector Video one 15 pin VGA connector 19 pin HDMI connecto...

Page 61: ...Width 324 mm 12 75 inches Diagonal 355 60 mm 14 00 inches Active ares X Y 309 40 mm x 173 95 mm Maximum resolution 1366 x 768 pixels 1600 x 900 pixels Maximum Brightness 200 nits Latitude E5530 Height 210 mm 8 26 inches Width 360 mm 14 17 inches Diagonal 394 24 mm 15 60 inches Active area X Y 344 23 mm x 193 54 mm Maximum resolution 1366 x 768 pixels 1920 x 1080 pixels Maximum Brightness 220 nits ...

Page 62: ...ted States 86 keys United Kingdom 87 keys Brazil 87 keys and Japan 90 keys Layout QWERTY AZERTY Kanji Table 10 Touchpad Feature Specification Active Area X axis 80 00 mm Y axis 45 00 mm Table 11 Battery Feature Specification Type 4 6 or 9 cell smart lithium ion Dimensions Height 4 6 and 9 cell 20 00 mm 0 79 inch Width 4 and 6 cell 208 00 mm 8 18 inches 9 cell 214 00 mm 8 43 inches Depth 4 and 6 ce...

Page 63: ...um coin cell Table 12 AC Adapter Feature Latitude E5430 Latitude E5530 Type 65 W 90 W adapter Input voltage 100 VAC to 240 VAC 100 VAC to 240 VAC Input current maximum 1 7 A 1 5 A Input frequency 50 Hz to 60 Hz 50 Hz to 60 Hz Output power 65 W 90 W Output current 3 34 A continuous 4 62 A continuous Rated output voltage 19 5 1 0 VDC 19 5 1 0 VDC Temperature range Operating 0 C to 40 C 32 F to 104 F...

Page 64: ...ecification Temperature Operating 0 C to 35 C 32 F to 95 F Storage 40 C to 65 C 40 F to 149 F Relative humidity maximum Operating 10 to 90 non condensing Storage 5 to 95 non condensing Altitude maximum Operating 15 24 m to 3048 m 50 ft to 10 000 ft Non Operating 15 24 m to 10 668 m 50 ft to 35 000 ft Airborne contaminant level G1 as defined by ISA 71 04 1985 64 ...

Page 65: ...4 Docking Port Information The docking port is used for connecting the laptop to a docking station optional 1 SIM card slot 2 Docking Port 65 ...

Page 66: ...66 ...

Page 67: ...5 Additional Information This section provides information for the additional features that are part of your computer 67 ...

Page 68: ...68 ...

Page 69: ...hen press F2 If you press F2 before you are prompted this keystroke will be lost 4 If you wait too long and the operating system logo appears continue to wait until you see the Microsoft Windows desktop Then shut down your computer and try again System Setup Options NOTE Depending on the computer and its installed devices the items listed in this section may or may not appear Table 15 General Opti...

Page 70: ...l HDD USB Storage Device CD DVD CD RW Drive Onboard NIC Boot List Option Allows you to change the boot list option Legacy UEFI Date Time Allows you to change the date and time Table 16 System Configuration Option Description Integrated NIC Allows you to configure the integrated network controller The options are Disabled Enabled Enabled w PXE This option is enabled by default System Management All...

Page 71: ... Monitoring Analysis and Reporting Technology specification This option is disabled by default Enable SMART Reporting USB Controller This field configures the integrated USB controller If Boot Support is enabled the system is allowed to boot any type of USB Mass Storage Devices HDD memory key floppy If USB port is enabled device attached to this port is enabled and available for OS If USB port is ...

Page 72: ...n Description Admin Password Allows you to set change or delete the administrator admin password NOTE You must set the admin password before you set the system or hard drive password Deleting the admin password automatically deletes the system password and the hard drive password NOTE Successful password changes take effect immediately Default Setting Not set System Password Allows you to set chan...

Page 73: ...e allowed when an Administrator Password is set If disabled the setup options are locked by the admin password TPM Security Allows you to enable the Trusted Platform Module TPM during POST Default Setting The option is disabled Computrace Allows you to activate or disable the optional Computrace software The options are Deactivate Disable Activate NOTE The Activate and Disable options will permane...

Page 74: ...ult Setting Enable Intel TurboBoost Hyper Thread Control Allows you to enable or disable the HyperThreading in the processor Default Setting Enabled Table 20 Power Management Option Description AC Behavior Allows you to enable or disable the computer from turning on automatically when an AC adapter is connected Default Setting Wake on AC is not selected Auto On Time Allows you to set the time at w...

Page 75: ...lect the charging mode for the battery The options are Standard Charge Express Charge Predominately AC use Auto Charge This option is enabled by default Custom Charge If Custom Charge is selected you can also configure Custom Charge Start and Custom Charge Stop NOTE All charging modes may not be available for all the batteries Battery Slice Configuration Allows you to select the type of charge for...

Page 76: ...tel Virtualization Technology Default Setting Enable Intel Virtualization Technology VT for Direct I O Enables or disables the Virtual Machine Monitor VMM from utilizing the additional hardware capabilities provided by Intel Virtualization technology for direct I O Enable VT for Direct I O This option is enabled by default Trusted Execution This option specifies whether a Measured Virtual Machine ...

Page 77: ...on Description Service Tag Displays the Service Tag of your computer Asset Tag Allows you to create a system asset tag if an asset tag is not already set This option is not set by default Table 25 System Logs Option Description BIOS Events Allows you to view and clear the System Setup BIOS POST events 77 ...

Page 78: ...78 ...

Page 79: ... on steadily or blinks to indicate battery charge status Turns on when wireless networking is enabled If the computer is connected to an electrical outlet the battery light operates as follows Table 27 Battery Status Lights Alternately blinking amber light and blue light An unauthenticated or unsupported non Dell AC adapter is attached to your laptop Alternately blinking amber light with steady bl...

Page 80: ...Table 28 Keyboard Status Lights Turns on when the numeric keypad is enabled Turns on when the Caps Lock function is enabled Turns on when the Scroll Lock function is enabled 80 ...

Page 81: ...ed support and service options Availability varies by country and product and some services may not be available in your area To contact Dell for sales technical support or customer service issues 1 Visit dell com support 2 Select your support category 3 Verify your country or region in the Choose a Country Region drop down menu at the top of page 4 Select the appropriate service or support link b...

Reviews: