


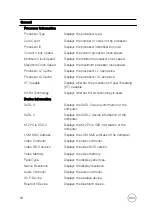


Security
Password Change
Enable or disable changes to the System and Hard
Disk passwords when an administrator password is
set.
Non-Admin Setup Changes Enable or disable changes to the setup options
when an administrator password is set.
UEFI Capsule Firmware
Updates
Enable or disable BIOS updates through UEFI
capsule update packages.
PTT Security
Enable or disable Platform Trust Technology (PTT)
visibility to the operating system.
Computrace(R)
Enable or disable the BIOS module interface of the
optional Computrace(R) Service from Absolute
Software.
CPU XD Support
Enable or disable the Execute Disable mode of the
Processor.
Admin Setup Lockout
Enable to prevent users from entering Setup when
an Admin Password is set.
Master Password Lockout
Enable to disable master password support.
NOTE: Hard Disk passwords need to be
cleared before the setting can be changed.
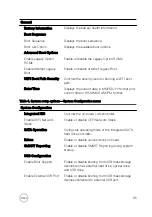
Table 7. System setup options—Secure Boot menu
Secure Boot
Secure Boot Enable
Enable or disable the secure boot feature.
Expert Key Management
Expert Key Management
Enable or disable Expert Key Management.
Custom Mode Key
Management
Select the custom values for expert key
management.
87
Summary of Contents for Inspiron 13 7000 Series
Page 19: ...3 Lift the battery off the palm rest assembly 19 ...
Page 22: ...2 Peel the coin cell battery off the keyboard bracket 22 ...
Page 25: ...2 Lift the heat sink off the system board 25 ...
Page 28: ...4 Lift the fan off the keyboard bracket 28 ...
Page 31: ...5 Lift the right speaker off the palm rest assembly 31 ...
Page 34: ...3 Lift the power adapter port off the palm rest assembly 34 ...
Page 42: ...7 Gently lift the display assembly off the palm rest assembly 42 ...
Page 46: ...5 Lift the I O board off the palm rest assembly 46 ...
Page 54: ...14 Lift the system board off the palm rest assembly 54 ...
Page 62: ...5 Slide and lift the touchpad from the slot on the palm rest assembly 62 ...
Page 70: ...5 Lift the keyboard off the palm rest assembly 70 ...
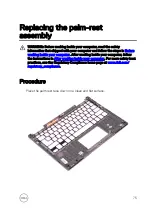
Page 74: ...Procedure After performing all the prerequisites we are left with the palm rest 74 ...