


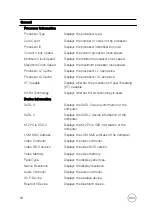


System Configuration
USB PowerShare
Enable or disable charging external devices through
the USB PowerShare port.
Audio
Enable or disable the integrated audio controller.
Keyboard Illumination
Configures operating mode of the keyboard
illumination feature.
Keyboard Backlight with
AC
Enable or disable Keyboard Backlight with AC.
NOTE: This option does not affect Keyboard
Illumination.
Miscellaneous Devices
Enable or disable various onboard devices.
Enable Camera
Enable or disable the camera.
Enable Secure Digital (SD)
Card
Enable or disable the SD card.
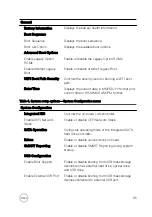
Table 5. System setup options—Video menu
Video
LCD Brightness
Set the panel brightness independently for battery
and AC power.
Table 6. System setup options—Security menu
Security
Admin Password
Set, change, or delete the administrator password.
System Password
Set, change, or delete the system password.
Internal HDD-2 Password
Set, change, or delete the system’s internal hard-
disk drive password.
Strong Password
Enable or disable strong passwords.
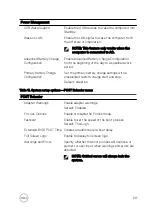
Password Configuration
Control the minimum and maximum number of
characters allowed for Admin and System
passwords.
Password Bypass
Bypass the System (Boot) Password and the
internal HDD password prompts during a system
restart.
86
Summary of Contents for Inspiron 13 7000 Series
Page 19: ...3 Lift the battery off the palm rest assembly 19 ...
Page 22: ...2 Peel the coin cell battery off the keyboard bracket 22 ...
Page 25: ...2 Lift the heat sink off the system board 25 ...
Page 28: ...4 Lift the fan off the keyboard bracket 28 ...
Page 31: ...5 Lift the right speaker off the palm rest assembly 31 ...
Page 34: ...3 Lift the power adapter port off the palm rest assembly 34 ...
Page 42: ...7 Gently lift the display assembly off the palm rest assembly 42 ...
Page 46: ...5 Lift the I O board off the palm rest assembly 46 ...
Page 54: ...14 Lift the system board off the palm rest assembly 54 ...
Page 62: ...5 Slide and lift the touchpad from the slot on the palm rest assembly 62 ...
Page 70: ...5 Lift the keyboard off the palm rest assembly 70 ...
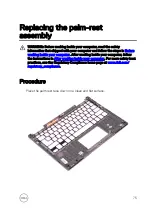
Page 74: ...Procedure After performing all the prerequisites we are left with the palm rest 74 ...