background image

10  


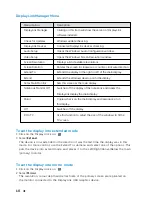
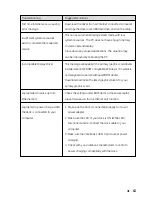
DisplayLink Manager Menu

Menu Option

DisplayLink Manager

Check for Updates

DisplayLink Devices

Audio Setup

Video Setup

Screen Resolution

Screen Rotation

Extend To

Extend

Set as Main Monitor

Notebook Monitor Off

Mirror

Off

Fit to TV

Description

Clicking on this item will show the version of DisplayLink 

software installed.

Windows update checking.

Connected DisplayLink devices checking.

Opens the Windows Audio Configuration window.

Opens the Windows Screen Resolution window.

Displays a list of available resolutions.

Rotates the screen in clockwise or counter-clockwise direction.

Extends the display to the right or left of the main display.

Extends the Windows desktop onto the display.

Sets this screen as the main display.

Switches off the display of the notebook and makes the 

DisplayLink display the main display.

Copies what is on the main display and reproduces it on 

this display.

Switches off the display.

Use this function to adjust the size of the windows to fit the 

TV screen.

To set the display into extended mode

1. Click on the DisplayLink icon.
2. Select 

Extend

.

    The device is now extended in the direction it was the last time the display was in this       
    mode. For more control, use the Extend To submenu and select one of the options. This 
    puts the device into extend mode, and places it to the Left/Right/Above/Below the main 
    (primary) monitor.

To set the display into mirror mode

1. Click on the DisplayLink icon.
2. Select 

Mirror

.

    The resolution, colour depth and refresh rate of the primary screen are replicated on 
    the monitor connected to the DisplayLink USB Graphics device.

Summary of Contents for D6000

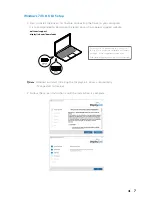
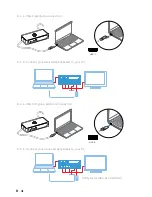
Page 1: ...D6000 User Guide DellTM Universal Dock ...

Page 2: ...arks of Dell Inc Intel Centrino Core and Atom are either trademarks or registered trademarks of Intel Corporation in the U S and other countries Microsoft Windows and Windows start button logo are either trademarks or registered trademarks of Microsoft Corporation in the United States and or other countries Bluetooth is a registered trademark owned by Bluetooth SIG Inc and is used by Dell under li...

Page 3: ...x USB C front Data only and PowerShare 1 x HDMI 2 x DisplayPort Gigabit Ethernet Combo Audio Headphone Mic Audio Line out Supports USB 3 1 Gen1 Product capability product signals at 5 Gbps Marketing name SuperSpeed USB Note USB 3 1 Gen1 and USB 3 0 terms are synonymous Power LED Indication Normal working mode White light Platform standby Amber light Power Off Light Off LAN port LED Indication Conn...

Page 4: ... Maximum resolution and refresh rate supported for your display Note Maximum Resolution Refresh Rate will also depend on EDID table of monitors If without DisplayLink driver HDMI out will be from Alt mode and 4K 30Hz DP 1 DP 2 HDMI DP 1 DP 2 HDMI Output Inputs plug in DP 1 DP 1 DP 1 DP 1 DP 1 DP 2 DP 2 DP 2 DP 2 DP 2 HDMI HDMI HDMI HDMI HDMI 4K 60Hz 4K 60Hz 4K 60Hz 4K 60Hz 4K 60Hz 4K 60Hz 4K 60Hz ...

Page 5: ... 5 Product Overview Front View Audio Combo USB 3 0 USB 3 0 USB C HDMI Ethernet DP DP Power in USB 3 0 Audio line out USB 3 0 Back View ...

Page 6: ...tter Memory 8GB Video Card Intel HD 4000 ATI Radeon HD 8650 NVidia GeForce 7xxM or better with drivers released specifically for the Windows version USB USB 3 0 Disk 7200RPM or SSD If playing UHD content 4K the system must be capable of decoding the 4K video in the GPU Operating System Wins OS Win 7 8 8 1 10 32 64 bits with DisplayLink Driver version 8 2 onwards Ubuntu OS 14 04 2 or greater Chrome...

Page 7: ... 8 1 10 Setup 1 Start to install the drivers first before connecting the Dock to your computer It is recommended to download the latest drivers from below support website For network IT administrators please visit this link for a corporate installation software package User registration required http www displaylink com corporateinstall dell com support displaylink com downloads ...

Page 8: ... USB 3 0 Type A platform connection USB A 3 1 b Connect your dock and peripherals to your PC 3 2 b Connect your dock and peripherals to your PC Only two video at one time 3 1 a USB C platform connection USB C ...

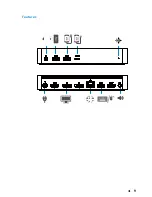
Page 9: ... 9 Features ...

Page 10: ... Sets this screen as the main display Switches off the display of the notebook and makes the DisplayLink display the main display Copies what is on the main display and reproduces it on this display Switches off the display Use this function to adjust the size of the windows to fit the TV screen To set the display into extended mode 1 Click on the DisplayLink icon 2 Select Extend The device is now...

Page 11: ...een The red border shows the size of the new Windows desktop Use the and controls on the Fit to TV GUI to change the size of the red border until it fits on the TV screen Note Finer configuration of the size of the border can be achieved by holding down the CTRL key and clicking the and 3 Once the red border is at the edges of the TV screen click Apply to resize the Windows desktop ...

Page 12: ...he power wait 10 seconds and then reconnect Update to the latest USB 3 0 host controller driver HDCP content support is currently not available Get the driver by either Downloading the latest driver from the Displaylink website or Connect to Windows Update with dock by using Wi Fi or Ethernet port of the laptop Remove all USB devices connected to the dock some unqualified boot devices may cause lo...

Page 13: ...iled to wake up from Ethernet port Laptop fail to power charge when the dock is connected to your computer Check the settings under BIOS Items to make sure laptop supports wake up from Ethernet port function This can occur when entering extend mode with low system resources The PC does not have enough memory to start an extend display Close down any unused applications The situation may also be im...

Page 14: ...pport higher resolutions than what the dock is able to support Refer to the Display Resolution Table in the User Guide of your dock for more information on maximum resolution capacity 3 Make sure the video cable HDMI or DisplayPort is connected properly to the monitor and the dock Ensure to select the correct video source on your monitor refer to your monitors documentation for more information ab...

Reviews: