


Wireless
Option
Description
Wireless Device
Enable
Allows you to enable or disable the internal wireless devices.
●
WLAN
●
Bluetooth
All the options are enabled by default.
Maintenance screen
Option
Description
Service Tag
Displays the Service Tag of your computer.
Asset Tag
Allows you to create a system asset tag if an asset tag is not already set. This option is not set by default.
BIOS Downgrade
This controls flashing of the system firmware to previous revisions. Option 'Allow BIOS downgrade' is
enabled by default.
Data Wipe
This field allows users to erase the data securely from all internal storage devices. Option 'Wipe on Next
boot' is not enabled by default. The following is list of devices affected:
●
Internal SATA HDD/SSD
●
Internal M.2 SATA SDD
●
Internal M.2 PCIe SSD
●
Internal eMMC
BIOS Recovery
This field allows you to recover from certain corrupted BIOS conditions from a recover file on the user
primary hard drive or an external USB key.
●
BIOS Recovery from Hard Drive—enabled by default
●
Always perform integrity check—disabled by default
First Power On
Date
This option lets you set Ownership date.
●
Set Ownership Date—disabled by default
System logs
Option
Description
BIOS Events
Allows you to view and clear the System Setup (BIOS) POST events.
Thermal Events
Allows you to view and clear the System Setup (Thermal) events.
Power Events
Allows you to view and clear the System Setup (Power) events.
Updating the BIOS
Updating the BIOS in Windows
About this task
CAUTION:
If BitLocker is not suspended before updating the BIOS, the next time you reboot the system it
will not recognize the BitLocker key. You will then be prompted to enter the recovery key to progress and the
system will ask for this on each reboot. If the recovery key is not known this can result in data loss or an
unnecessary operating system re-install. For more information on this subject, see Knowledge Article:
www.dell.com/support/article/sln153694
BIOS setup
125
Summary of Contents for 5500 Series
Page 17: ...Major components of your system 1 Base cover 2 Heatsink 3 Major components of your system 17 ...
Page 22: ...3 Lift and remove the base cover away from the computer 22 Disassembly and reassembly ...
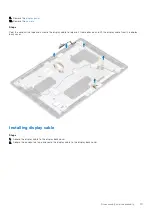
Page 51: ...4 Reroute the WLAN antenna cables Disassembly and reassembly 51 ...
Page 67: ...3 Lift and remove the speakers away from the palmrest Disassembly and reassembly 67 ...
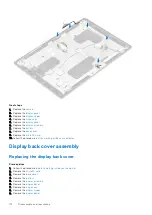
Page 94: ...3 Seat the system chassis on the display assembly 94 Disassembly and reassembly ...
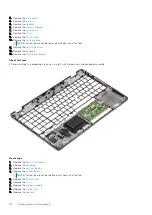
Page 99: ...Disassembly and reassembly 99 ...
Page 102: ...102 Disassembly and reassembly ...