6.
To replace the hard drive, check the documentation for the drive to verify that it is configured for your computer.
7.
Slide the hard drive into the hard drive bay.
8.
Align the four screw holes in the hard drive with the screw holes in the hard drive bay.
9.
Replace the four screws that secure the hard drive to the chassis.
10.
Connect the power and data cables to the hard drive.
11.
Ensure that all the cables are properly connected and firmly seated.
12.
Replace the computer cover (see
Replacing the Computer Cover
).
13.
Connect your computer and devices to electrical outlets, and then turn them on.
Replacing a CD/DVD Drive
1.
Follow the procedures in
Before You Begin
.
2.
Remove the computer cover (see
Replacing the Computer Cover
).
3.
Remove the front panel (see
Replacing the Front Panel
).
4.
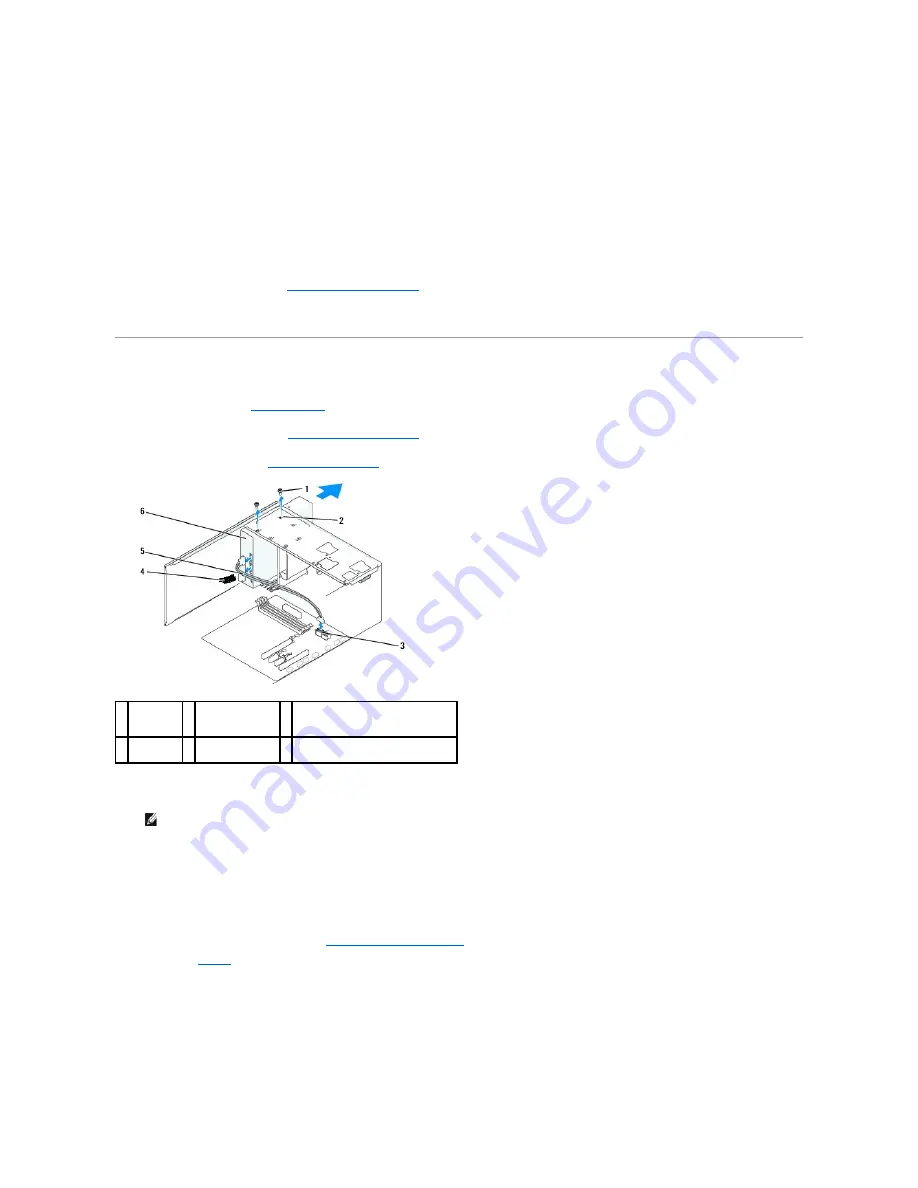
Disconnect the power cable and the data cable from the back of the CD/DVD drive.
5.
Remove the two screws securing the CD/DVD drive to the chassis.
6.
Push and slide the CD/DVD drive out through the front of the computer.
7.
If you are not replacing the drive:
a.
Replace the drive panel insert (see
Replacing the Drive Panel Insert
).
b.
Go to
step 12
.
8.
If you are replacing the CD/DVD drive or installing a new one, slide the drive into place.
9.
Align the screw holes in the CD/DVD drive with the screw holes in the CD/DVD drive bay.
10.
Replace the two screws securing the CD/DVD drive to the chassis.
11.
Connect the power and data cables to the CD/DVD drive.
1 custom
screws (2)
2 screw holes in
the CD/DVD drive
bay
3 system board connector (any
available connector SATA0, SATA1,
SATA4, and SATA5)
4 power
cable
5 data cable
6 CD/DVD drive
NOTE:
If you are uninstalling the only CD/DVD drive in your computer and will not replace it at this time, disconnect the data cable from the system
board and set it aside.
Summary of Contents for 540 - USB Photo Printer 540
Page 11: ......
Page 25: ...Back to Contents Page ...


