


3.
Remove the Ethernet cables (
▌4▐
and
▌5▐
) and the USB cable (
▌3▐
), if present. (An Expansion Module
does not have Ethernet or USB ports. See Figure 69 on page 118).
4.
Loosen the two blue captive thumbscrews (
▌1▐
) on the controller.
5.
Using the thumbscrews, slowly remove the controller from the module.
Installing the Base or Expansion controller card
Important:
Base and Expansion Module controller cards are keyed to fit in their respective modules only.
A Base Module controller card does not fit into an Expansion Module, and vice versa. If you encounter
resistance when the controller card is installed, make sure that you are installing the controller card into
the appropriate module.
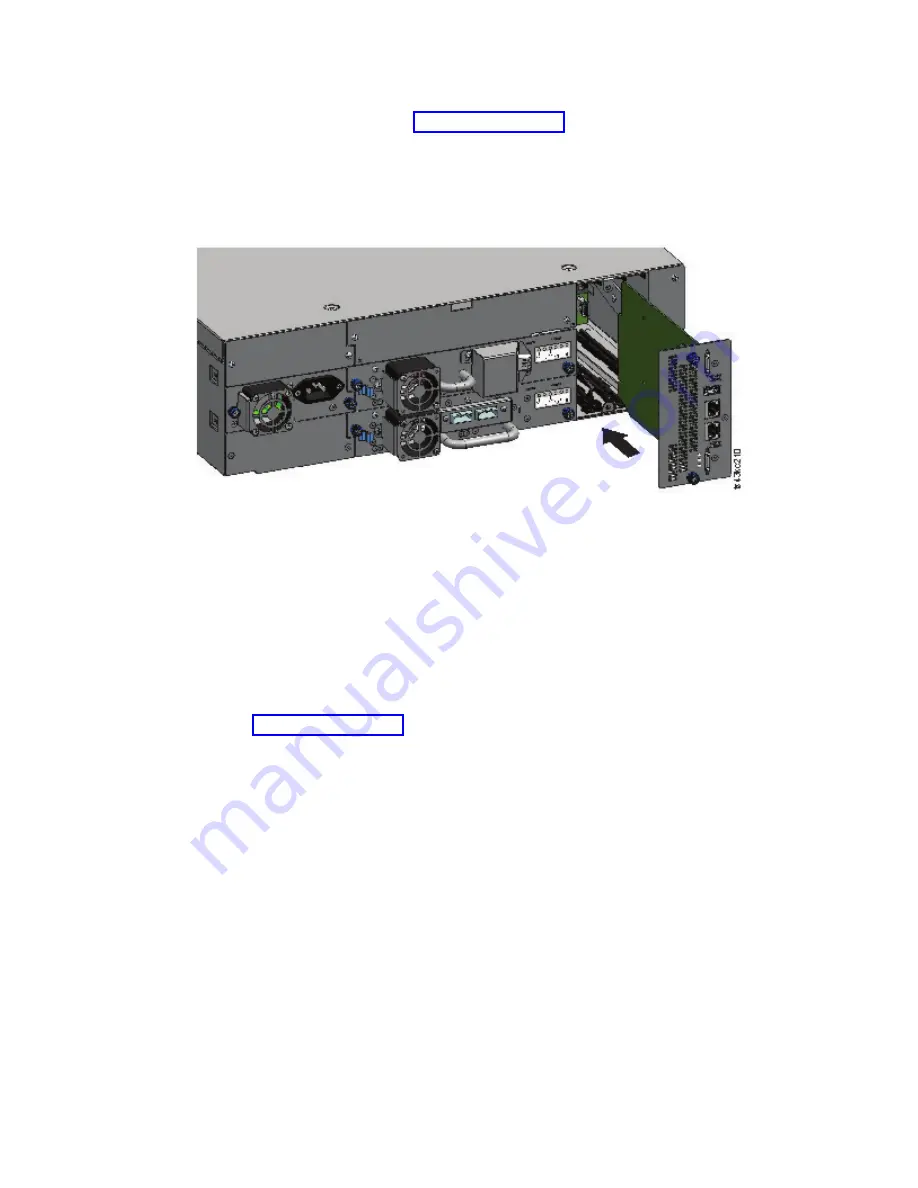
1.
Position the new controller card on the alignment rails.
2.
Slide the controller card slowly into the module until it is flush with the back panel of the module.
3.
Tighten the blue captive thumbscrews (
▌1▐
) with your fingers to secure it to the module.
4.
Replace the expansion interconnect cables (
▌2▐
and
▌6▐
), the Ethernet cable or cables (
▌4▐
and
▌5▐
),
and the USB cable (
▌3▐
) that were removed previously. (An Expansion Module does not have Ethernet
or USB ports. See Figure 69 on page 118).
5.
Plug in the AC power cables.
Powering on the library
Power on the library by pressing Power on the Base Module just below the Operator Panel. The green
light illuminates. When the library is powered on, it inventories the tape cartridges in the magazines,
checks the firmware version on all modules, configures the tape drives, confirms the presence of the
existing modules, and searches for any new modules.
Verifying the Base or Expansion controller card
1.
Verify that the library has the most up-to-date firmware revision. To find the version of firmware that
is installed on the library, check the Library Properties page of the Management GUI or the Status >
Library
page of the Operator Panel.
2.
If the Base Module controller is replaced, upgrade the firmware if necessary. Update the firmware
from the Management GUI at Library > Actions > Update Library Firmware.
Important:
If you are asked whether to retain the serial number, always select Yes.
3.
Check the Attention light on the front panel and login to web interface and check the dashboard for
any alerts.
Figure 70. Installing a Controller card
Upgrading and servicing
119
Summary of Contents for 3555-E3A
Page 1: ...Dell EMC ML3 Tape Library User s Guide ...
Page 2: ......
Page 4: ...iv Dell EMC ML3 Tape Library User s Guide ...
Page 8: ...viii Dell EMC ML3 Tape Library User s Guide ...
Page 10: ...x Dell EMC ML3 Tape Library User s Guide ...
Page 20: ...xx Dell EMC ML3 Tape Library User s Guide ...
Page 22: ...xxii Dell EMC ML3 Tape Library User s Guide ...
Page 44: ...22 Dell EMC ML3 Tape Library User s Guide ...
Page 54: ...32 Dell EMC ML3 Tape Library User s Guide ...
Page 94: ...72 Dell EMC ML3 Tape Library User s Guide ...
Page 126: ...104 Dell EMC ML3 Tape Library User s Guide ...
Page 153: ...Figure 81 Unlocked spooling mechanism enlarged view Upgrading and servicing 131 ...
Page 164: ...142 Dell EMC ML3 Tape Library User s Guide ...
Page 174: ...152 Dell EMC ML3 Tape Library User s Guide ...
Page 176: ...154 Dell EMC ML3 Tape Library User s Guide ...
Page 195: ...XRA External register address register Glossary 173 ...
Page 196: ...174 Dell EMC ML3 Tape Library User s Guide ...
Page 200: ...178 Dell EMC ML3 Tape Library User s Guide ...
Page 201: ......
Page 202: ...Printed in USA ...


