


Delitek Waste Compactors – user -/service manual-rev 1.2
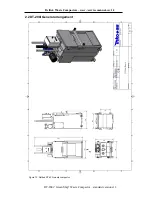
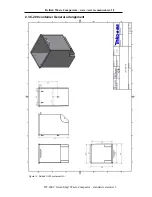
DT-200i “Green Ship” Waste Compactor – standard versions 4
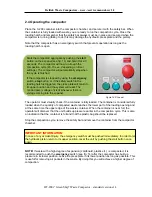
1.0 INSTALLATION INSTRUCTIONS
1.1 Installation of the compactor to steel or wooden deck.
Before installation: Note that the compactor must be placed in an environment with operating
temperatures between minimum –25 degrees Celsius to maximum 60 degrees Celsius
(minimum -13 to maximum 140 degrees Fahrenheit). Ensure that the control panel and the area
around the compactor have sufficient lighting according to working environment law at site. In
addition, each country’s legislation and Health, Environment & Safety regulations regarding
operation of this kind of products must be followed.
Installation:
If the compactor is installed on board a ship or offshore installation, the mounting brackets must
be welded to a steel surface or alternatively mounted to wooden deck with 8mm bolts.
WARNING:
It is very important to cover up the stainless steel surface on the waste compactor in
order to avoid spatter from the welding onto the steel. Welding and work with angle grinders
nearby the waste compactor must always be avoided as this will damage the protective oxidizing
coating on the waste compactor. This again will cause surface corrosion.
Lifting of the waste compactor must be done with certified lifting straps around the compactor
house only. Do not attempt to lift the compactor by using holes on the compactor house or other
parts of the compactor that is not suited for a lifting operation.
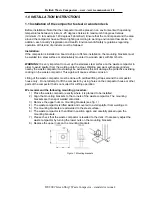
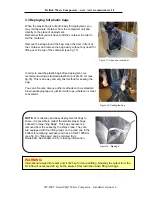
We recommend the following mounting procedure:
1) Place the waste compactor exactly where it is planned to be installed.
2) Align the mounting brackets to the corners of the waste compactor. The mounting
brackets are then spot welded onto deck.
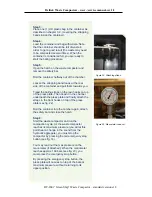
3) Remove the upper nuts on mounting brackets (see fig. 1)
4) The waste compactor is lifted aside and covered to avoid splatter from welding etc.
5) The mounting brackets are all welded to the steel surface.
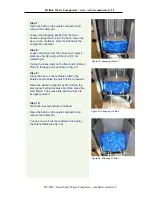
6) The waste compactor is then lifted in position again and carefully placed upon the
mounting brackets.
7) Please check that the waste compactor is levelled to the deck. If necessary adjust the
waste compactor by turning the lower nuts on the mounting brackets.
8) Replace the upper nuts on the mounting brackets.
Figure 1. Mounting brackets


