Delitek AS DT-200i User & Service Manual Download Page 34

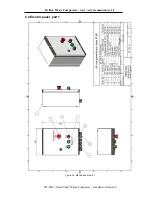
Delitek Waste Compactors – user -/service manual-rev 1.2 


DT-200i “Green Ship” Waste Compactor – standard versions 34 
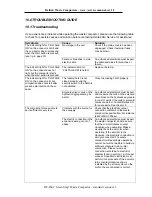
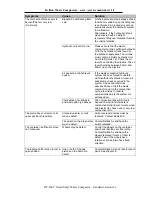
Symptoms 

Cause 

Solution 

The compaction force seems to 
be insufficient or very low 
(continued). 

Blocked air-vent/wrong filler 
cap. 

On the hydraulic oil tank: please check 
that the air vent/airing on the filling cap 
is not blocked. A blocked air vent can 
eventually cause the hydraulic system 
to malfunction. 
Alternatively, if the hydraulic oil tank 
was delivered with an airtight 
temporary filling cap; Replace this with 
the original dipstick.


Hydraulic oil level is to low 

Please ensure that the waste 
compactor contains sufficient hydraulic 
oil in the hydraulic oil tank found on 
the hydraulic aggregate. The oil tank 
must contain 3,2 liters hydraulic oil or 
be 3/4 full (Univis 32). Check the oil 
level by controlling the dipstick. The oil 
level should be between 55mm and 
65mm up on the dipstick. 


Air pockets in the hydraulic 
system 

If the waste compactor/hydraulic 
system has been forced to operate 
with insufficient hydraulic oil level, air 
pockets may have occurred in the 
system. Check and refill oil as 
described above. Start the waste 
compactor and run the compaction 
cycle a few times in order to 
automatically empty the system for 
entrapped air. 


Compaction of solid waste 
and waste with high density.    


The compaction ratio will strongly 
depend on what kind of waste is 
compacted. Solid items of metal, wood 
and plastic may have none or very low 
compaction ratio. 

The piston does not return to its 
upper position (0-position) 

Solenoid valve(s) or coils 
may be defect 

Coils or solenoid valves must be 
replaced. Contact Delitek AS.  


The switch on the press-plate 
may be defect. 

Contact Delitek As and have the 
switch replaced. 

The container is difficult to move 
and maneuver. 

Wheels may be defect 

Control the wheels on the container, 
and check that they are free rolling. 
Contact Delitek As and have the 
wheels replaced if some of them is 
defect. Two of the wheels have 
rotating action and two have fixed 
direction.  


The loading hatch refuse to rest in 
open position 

One or both of the gas 
pistons on the hatch are 
defect 

Contact Delitek AS and order for spare 
parts. See chapter. 8. 

Summary of Contents for DT-200i

Page 1: ...n Ship Waste Compactor standard versions 1 Model DT 200i Waste Compactor STANDARD VERSION User service manual Delitek AS Moloveien N 8432 ALSVAAG NORWAY Tel International 47 76 13 47 00 Fax Internatio...

Page 2: ...les on the compactor house or other parts of the compactor that is not suited for a lifting operation 11 WARNING The safety distance for the compactor operator should be at least 1 meter No persons mu...

Page 3: ...3 0 USING HD PLASTIC BAGS IN THE CONTAINER 15 3 1 Plastic bags 15 3 2 Installing the HD Plastic bag in the container 15 3 3 Deploying full plastic bags 16 3 4 Using the bailing option 17 3 5 Container...

Page 4: ...Welding and work with angle grinders nearby the waste compactor must always be avoided as this will damage the protective oxidizing coating on the waste compactor This again will cause surface corrosi...

Page 5: ...to electric supply Connection of el supply must de done by a qualified electrician Be sure to check that the voltage specified for the waste compactor complies with the el supply at site Check the vol...

Page 6: ...ne to the other option This procedure must always be performed by a qualified electrician WARNING Be sure to completely disconnect the el supply to the waste compactor before rewiring starts Two impor...

Page 7: ...ansformer must be bypassed Fig 6 shows a bypassed transformer The el supply to the el panel is parallel connected to the input el supply I e the voltage is not passing through the transformer at all T...

Page 8: ...ing hydraulic oil level Check the oil level in the hydraulic oil tank The oil level should normally be between 55mm and 65mm up on the dipstick in the hydraulic oil tank Start the waste compactor and...

Page 9: ...r pack see fig 8 4 Attach the manometer firmly on the screw thread coupling see fig 9 5 Switch on the main power supply to the waste compactor and run a few compaction tests with a fully loaded contai...

Page 10: ...Do not attempt to lift the compactor by using any holes on the compactor house or other parts of the compactor that is not suited for a lifting operation Place the compactor on the exact mounting pos...

Page 11: ...DT 200i waste compactor is not designed to handle solid materials such as metal bars timbre or wooden pallets etc This may lead to severe damages on the waste compactor It is also recommended to try...

Page 12: ...Delitek Waste Compactors user service manual rev 1 2 DT 200i Green Ship Waste Compactor standard versions 12 2 2 DT 200i General arrangement Figure 12 Delitek DT 200i waste compactor...

Page 13: ...Delitek Waste Compactors user service manual rev 1 2 DT 200i Green Ship Waste Compactor standard versions 13 2 3 C 200 container General arrangement Figure 13 Delitek C 200 container GA...

Page 14: ...d Stop the compaction cycle remove the safety bar and remove the container from the compactor chamber IMPORTANT INFORMATION In case of any accident injury the emergency switch must be pushed immediate...

Page 15: ...ardous waste category must never be deployed in the waste compactor The HD Plastic bags are specially designed for the C 200 containers and can be ordered from Delitek AS See chapter 8 0 for ordering...

Page 16: ...s is an easy and very fast method for sealing the bag You can of course also use other methods such as standard brown packaging tape or just tie it with rope whatever is most convenient NOTE For colle...

Page 17: ...steps 1 2 below you will also need one similar piece to put on top of the bale right before strapping This in order to keep the waste collected after the strapping procedure is finished You may then...

Page 18: ...ing straps on the rear hooks on top of the press plate Then tread it in the channel underneath the press plate and finally attach the straps in the front hooks on top of the press plate see fig 22 Rol...

Page 19: ...rds you Pull up the loose ends on the floor and knit them firmly to the loop ends as shown in fig 25 Step 9 Close the door on the container attach the safety bar and close the hatch of the compactor R...

Page 20: ...n open deck the cover will avoid that the waste will be spread out of the container by wind and heavy weather 3 Covers on all containers will seal the waste inside strongly reduce the fire hazard onbo...

Page 21: ...rpm Rated current 220V 6 5A 380V 3 7A 440V 2 8A 690V 2 0A Starting torque 2 4M A Starting current 5 3 I A Net weight 15 3 Kg Pump HPI 2 ccm gear pump Adjustable safety valve 0 315 bar Hydraulic oil re...

Page 22: ...Delitek Waste Compactors user service manual rev 1 2 DT 200i Green Ship Waste Compactor standard versions 22 4 2 Hydraulic piping diagram Figure 28 Hydraulic piping diagram...

Page 23: ...Delitek Waste Compactors user service manual rev 1 2 DT 200i Green Ship Waste Compactor standard versions 23 5 0 ELECTRIC DIAGRAMS 5 1 400 480V Figure 29 Electric diagram 400 480V...

Page 24: ...Delitek Waste Compactors user service manual rev 1 2 DT 200i Green Ship Waste Compactor standard versions 24 5 2 220 240V Figure 30 Electric Diagram 220 240V...

Page 25: ...Delitek Waste Compactors user service manual rev 1 2 DT 200i Green Ship Waste Compactor standard versions 25 5 3 660 690V Figure 31 Electric Diagram 660 690V...

Page 26: ...Delitek Waste Compactors user service manual rev 1 2 DT 200i Green Ship Waste Compactor standard versions 26 5 4 Electric panel part 1 Figure 32 Electric panel part 1...

Page 27: ...Delitek Waste Compactors user service manual rev 1 2 DT 200i Green Ship Waste Compactor standard versions 27 5 5 Electric panel part 2 Figure 33 Electric panel part 2...

Page 28: ...0i Green Ship Waste Compactor standard versions 28 5 6 Wiring diagram 400V 230V Y or configuration Figure 34 Wiring diagram for el motor Note see chapter 1 3 for more information regarding changing of...

Page 29: ...il similar or in conformance with Nuto Nuto H32 Esso Univis N32 Check the hydraulic pump while in operation Observe whether there are any unusual sounds vibrations problems or leaks Check the hydrauli...

Page 30: ...TIONS 7 1 DT 200i Volume 0 2 m container volume 180 litres Loading opening 650 mm x 260 mm Total height incl plunger 1958 mm External dimensions W x D x H 680 mm x 705 mm x 1958 mm Length of stroke 60...

Page 31: ...parts for Delitek waste compactors can be ordered from Delitek AS or any of our agents Address Delitek AS Moloveien N 8432 ALSVAAG NORWAY Tel 47 76 13 47 00 Fax 47 76 13 42 77 E mail mail delitek no U...

Page 32: ...description of the problem and the serial number of the unit this is engraved on the nameplate found on the right side of the waste compactor Proof of purchase must be presented in the form of an ori...

Page 33: ...rity switch in the hatch is not activated Close the loading hatch properly Solenoid valve or coils on the hydraulic aggregate may be defect An authorized electrician must inspect and measure the coils...

Page 34: ...orced to operate with insufficient hydraulic oil level air pockets may have occurred in the system Check and refill oil as described above Start the waste compactor and run the compaction cycle a few...

Page 35: ...Delitek Waste Compactors user service manual rev 1 2 DT 200i Green Ship Waste Compactor standard versions 35 11 APPENDIX 1 11 1 DnV Certification Figure 35 DNV Certificate...

Page 36: ...tic coils DT 100 14 12 00 Contactor LCID09P99A DT 100 14 11 Control lamp DT 100 01 05 06 Magnetic coil ATOS 17 7 DT 100 01 05 02 Magnetic coil Diplomatic 20 5 DT 100 01 Hydraulic acregate complete DT...

Page 37: ...Delitek Waste Compactors user service manual rev 1 2 DT 200i Green Ship Waste Compactor standard versions 37...

Reviews: