23
www.degometal.com
ANNUALLY
(or every 500,000 cycles whichever is the soonest)
Annually or every 500,000 cycles the tool should be completely dismantled and new
components should be used where worn, damaged or recommended. All 'O' rings and seals
should be renewed and lubricated with Moly Lithium grease EP 3753 before assembling.
For an easy complete service, we are offering a complete service kit.
IMPORTANT
Read Safety Instructions.
The employer is responsible for ensuring that tool maintenance instructions are given to the
appropriate personnel.
The operator should not be involved in maintenance or repair of the tool unless properly
trained.
The tool must be disconnected before any servicing or dismantling is attempted unless
specifically instructed otherwise . It is recommended that any dismantling operation be carried
out in clean conditions.
Before proceeding with dismantling, empty the oil from the tool following the first three steps
of the 'Priming Procedure'. Prior to dismantling the tool it is necessary to remove the nose
equipment. For instructions see the nose equipment section.
For a complete service of the tool, we advise that you proceed with dismantling of sub-
assemblies in the order shown. After any dismantling REMEMBER to prime the tool and to fit
an appropriate nose assembly or swivel head.
HEAD ASSEMBLY
•
Unscrew retaining nut
22
and pull off stem collector assembly, items
18,19,20,21,45,63,64
and 'Q' ring
17
.
•
Pull off stem collector adaptor
13
.
•
Using the T spanner* remove end cap
23
together with seal
15
, 'O' ring
14
and lip seal
24
.
•
Remove buffer
25
.
•
Loosen locknut
3
with a spanner* then unscrew jaw spreader housing
1
and 'O' ring
2
.
•
Remove locknut
3
together with 'O' rings
65
and
66
.
•
Push head piston 7 to the rear and out of head assembly
4
taking care not to damage
the cylinder bore.
•
Using circlip pliers*remove seal retainer
26
. Push lip seal
8
to the rear and out
of head assembly
4
taking care again not to damage the cylinder bore.
•
Remove seal retainer
26
. Push lip seal
8
to the rear and out of head assembly
4 taking care again not to damage the cylinder bore.
•
Remove seal housing
5
and lip seal
6
.
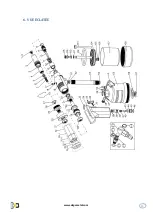
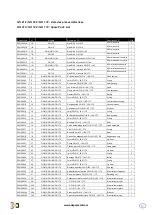
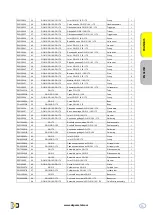
Item numbers in bold refer to the general assembly drawing and parts list.
Summary of Contents for GO 182
Page 13: ...13 www degometal com 6 VUE ÉCLATÉE ...
Page 27: ...27 www degometal com 6 EXPLODED DRAWING ...
Page 31: ...31 www degometal com ...

