Defender Security 82-12150 Installation Manual Download Page 14


User’s Manual 4CH DVR


- 12 - 


6.2 Stop Recording


Press the “  Stop” button to stop recording.  If PASSWORD SEPUT (see section 5.7 on page 7) 
is set to “ON”, the system will prompt the user for a password. Only the correct password can stop 
the recording process (note: it is necessary to stop recording before entering the Main Setup menu). 
 

6.3 Recording Length 

The estimated record times (hours) in Table #1 below are based on a 120GB hard 
drive, and a “QUAD” Recording Mode setting: 


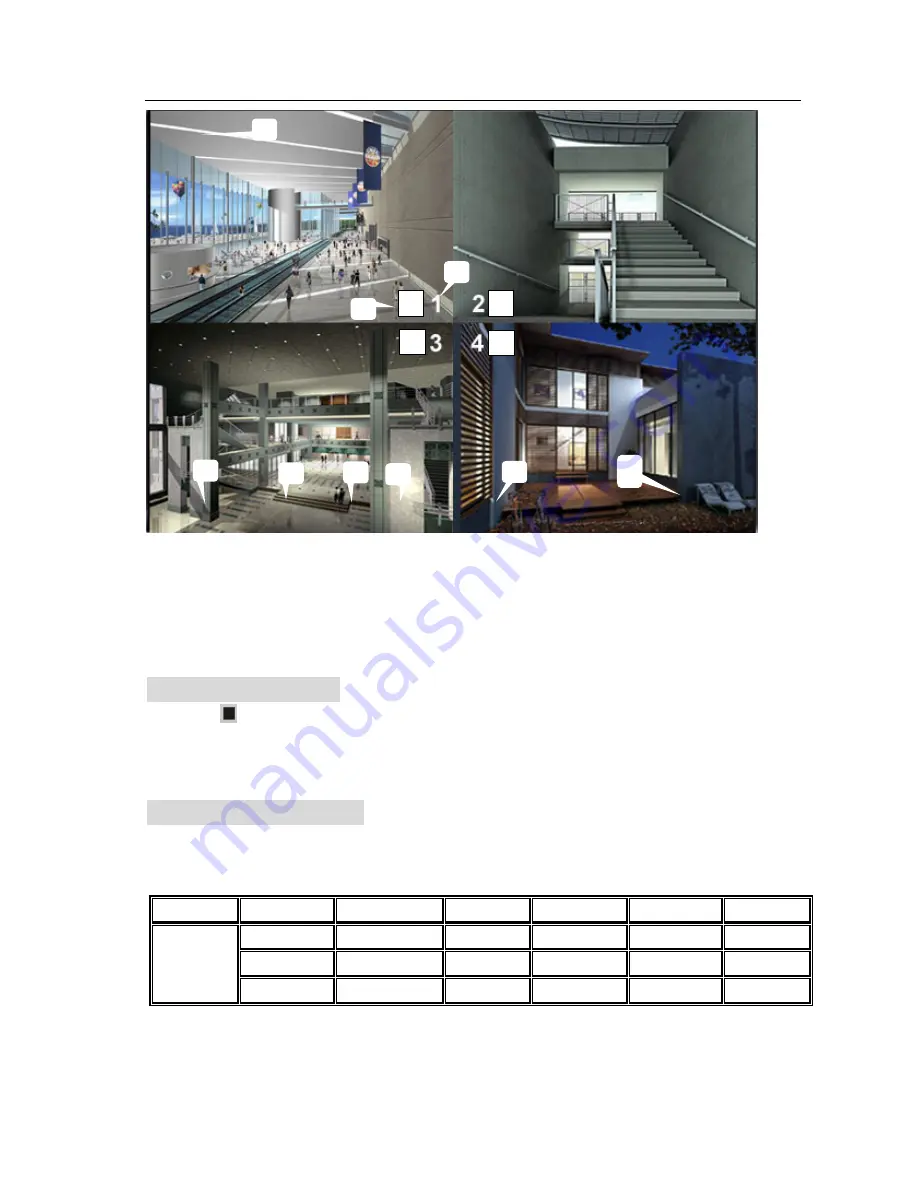
QUAD REC [M] (T)    2008/07/01    16:22:30 

10% 

R

R

R

R

3

7

8

1.) Hard drive percentage used     

    5.) Status (REC, Play, FF1, FF2, FF3, REW, PAUSE).

2.) “Recording” symbol indicates channel      6.) HDD Info ([M] Master disk [S] Slave disk). 
        is currently recording                                      7.) Record Schedule:

 (T) Continuous (A) Motion (

) No Record 

3.) Channel number indicator               8.) Current Date setting 
4.) Recording Mode (EACH or QUAD)            9.) Current Time setting 

9

Format


Quality 

Frame Rate

30 

15 

HIGH 

20 

58 

117 

251 

1748 

NORMAL 

15 

78 

155 

333 

2330 


 NTSC 


LOW 

12 

97 

194 

416 

2913 

Table #1 

Summary of Contents for 82-12150

Page 1: ...Installation Manual Model 82 12150 www mcmelectronics com 4 Channel Simplex DVR ...

Page 2: ...Record Select 6 5 3 Record Mode 6 5 4 Record Frame Rate 7 5 5 Video Recording Quality 7 5 6 Record Schedule 7 5 7 Sub Menu Functions 7 5 8 Hard Drive Setup 7 5 9 Motion Record and Alarm Duration 7 5 10 Motion Detection Setup 7 5 11 Video Output Selection 8 5 12 Restore Factory Defaults 9 6 Record 11 6 1 Start Recording 11 6 2 Stop Recording 12 6 3 Recording Length 12 7 Playback 13 8 USB Connection...

Page 3: ...se the power cord provided with this unit If replacing a power cord ensure power cord replacement meets or exceeds the specifications on the power cord shipped with the unit Before initial operation or configuration refer to hard drive installation instructions Use a standard ATA 100 hard drive max 250GB and refer to the hard drive manual for setting the hard drive to Master Set the TIME DATE afte...

Page 4: ...d up to 30fps Search on time date or event Password protection 3 Hardware Installation 3 1 Install Hard Disk WARNING 1 Disconnect power cord before installing hard drive 2 Do not attempt to remove cover to install hard drive To install the hard drive use the security key included to unlock the removable tray Slide the tray out of the housing by unlatching and pulling on the integrated drive tray h...

Page 5: ...VDC adapter to the DC power input jack on the rear panel of the DVR then plug the 3 prong power plug into a 110VAC receptacle This will power on the DVR Power Input 100 240V AC 50 60Hz Output 12V DC 3A 3 3 IR Remote Control Features Definitions Button Definition CH1 Select or enlarge CH1 CH2 Select or enlarge CH2 CH3 Select or enlarge CH3 CH4 Select or enlarge CH4 QUAD Quad View REW Rewind PLAY Pl...

Page 6: ...cation and setting before the power loss When the DVR successfully completes boot up it first displays all connected cameras if no cameras are connected the DVR displays OFF for each channel in a the quad view Press the Menu button on the front panel to enter the setup screen Press the Stop button first if cameras are currently recording Use the Up and Down buttons on the front panel to scroll thr...

Page 7: ...o cameras selected Use the Select button to cycle through and activate the camera channels the DVR will recognize activate note that by default the Record Select option will also be populated with the same camera channels as those chosen in Camera Select mode In addition to using the Select button to cycle through and activate channels the individual channel buttons CH1 CH2 CH3 CH4 on the front pa...

Page 8: ...splay in quad view only 5 4 Record Frame Rate After choosing the desired Record Mode setting use the Down button on the front panel to move down to the Record Frame Rate option The default system frame rate is 25 frames per second fps This is a global frame rate setting which means that all cameras in the Record Select option will record at this same rate i e different frame rates for each recorde...

Page 9: ...tic A or No recording Press the Menu button on the front panel to save settings and return to the Main Menu Note the Record Schedule settings are global and therefore apply to all cameras channels Recording options T A or or for each hour in a 24 hour period apply to all cameras Recording schedules cannot be differentiated between cameras 5 DVR Setup cont d 5 7 Sub Menu Functions The Sub Menu opti...

Page 10: ...SETUP 2008 01 18 08 30 00 PRESS UP DOWN THEN SELECT PRESS MENU TO EXIT Used to set a password Note that the DVR understands a combination of buttons as a valid password since there is no way to enter digits For instance the default factory password is the CH1 button pressed six times To change the password start by pressing the CH1 button six times which populates the CURRENT PASSWORD with six mar...

Page 11: ...d video when it reaches capacity If set to OFF the DVR will stop recording when the hard drive reaches capacity 2 HDD SIZE This option simply displays the size of the hard drive installed in the DVR 3 HDD USED This option displays both the amount of hard drive space used and the percentage used 4 HDD FORMAT Use this option to format the hard drive The user will be prompted for a password before th...

Page 12: ... detected Immediately use the Up and Down buttons to move to the next Motion Setup option which saves the final Alarm Duration setting CHANNEL SENSITIVITY Use the Up and Down buttons to move to the desired CHANNEL SENESITIVITY option and press the Select button to choose from 1 9 or turn off sensitivity camera record will not trigger from motion The values of 1 9 are general motion sensitivity set...

Page 13: ...WARNING Choosing the RESTORE FACTORY DEFAULT option by press the Select button will immediately initialize the restoration of factory default settings on the DVR and restart the DVR All current settings will be LOST Please use caution before choosing this option 6 Recording 6 1 Start Recording When DVR Setup settings are complete and the user returns to the DVR display press the Record button on t...

Page 14: ...ble 1 below are based on a 120GB hard drive and a QUAD Recording Mode setting QUAD REC M T 2008 07 01 16 22 30 10 R R R R 1 3 2 4 5 6 7 8 1 Hard drive percentage used 5 Status REC Play FF1 FF2 FF3 REW PAUSE 2 Recording symbol indicates channel 6 HDD Info M Master disk S Slave disk is currently recording 7 Record Schedule T Continuous A Motion No Record 3 Channel number indicator 8 Current Date set...

Page 15: ...hen press Up and Down buttons to move the prompt below each Time and Date value to be modified in the Time Date line Press Select button to cycle through editing each value then use the Up and Down buttons again to move to the next value on the Time Date line After all edits to the Time Date line are complete press Play to playback video for the selected time and date range 1 Start Time 2 End Time...

Page 16: ...icon will be placed on the Desktop 8 2 Launching Software 1 On the Desktop double click on the icon and the interface screen will be displayed Note When the USB cable is connected to the PC the interface software will automatically launch and detect the DVR s HDD If the DVR is not immediately recognized by the PC the follow these steps 1 Close the USB program interface window 2 Press the Play butt...

Page 17: ...User s Manual 4CH DVR 15 8 3 General Software Navigation Buttons ...

Page 18: ...User s Manual 4CH DVR 16 8 4 General Software Functions ...

Page 19: ...User s Manual 4CH DVR 17 8 4 General Software Functions cont d ...

Page 20: ...ch Channel Recording Frame Rate Each Mode PAL Each Channel 25 fps Number of Source Max 25 frames s Each Channel Record Mode Continuous Time Schedule Motion Triggered Display NTSC 720 x 480 PAL 720 x 576 Resolution Record NTSC 320 x 112 640 x 224 PAL 320 x 136 640 x 272 Quad 640 x 224 total Each 640 x 224 Video Compression Format Each Channel Modified Motion JPEG 12 20K bytes frame Low 12K Byte Nor...

Page 21: ...User s Manual 4CH DVR 19 ...

Reviews: