background image


50 

Troubleshooting Guide  


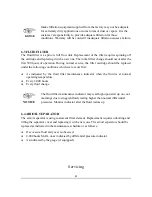
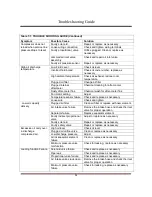
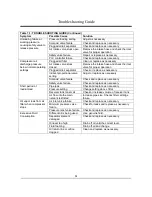
Table 7-1: TROUBLE SHOOTING GUIDE (Continued) 

Symptom 

Possible Cause 

Solution 

Compressor does not 
reload when service line 
pressure drops to reset 

Faulty solenoid 

Repair or replace as necessary 

Loose wiring connection 

Check and tighten wiring terminals 

Faulty proportional  valve 

Orifice plugged. Clean or replace as 
necessary 

Jammed air inlet valve 
assembly 

Check and repair air inlet valve 

Faulty air pressure sensor 

Repair or replace as necessary 

High air discharge 
temperature 

Low Fluid Level  

Check oil level 

Incorrect fluid brand 

Check oil code number, replace as 
necessary 

High ambient temperature 

Check air exhaust, reduce room 
temperature. 

Plugged oil filter 

Change oil filter 

Plugged internal 
aftercooler 

Chemical cleaning for after-cooler 

Dusty after-cooler fins 

Chemical wash for after-cooler fins 

Fan motor setting 

Adjust 

Temperature sensor failure 

Check and replace as necessary 

Loose wire 

Check and tighten 

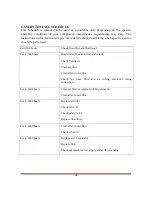
Low air capacity 

delivery 

Plugged air filter 

Clean air filter or replace with new element 

Air Intake valve failure 

Remove the intake hose and check the inlet 
valve for proper operation 

Separator failure 

Replace separator element 

Faulty indirect proportional  
valve 

Adjust or replace as necessary 

Faulty solenoid 

Repair or replace as necessary 

Faulty safety valve 

Repair or replace as necessary 

Excessive oil carry over 
in discharge 
compressed air.  

High oil level 

Check oil level 

Plugged oil orifice valve  

Clean or replace as necessary 

Low discharge pressure 

Adjust 

Air/oil separator element 
failure 

Clean or replace as necessary 

Minimum pressure valve 
malfunction 

Check for leaking,  replace as necessary 

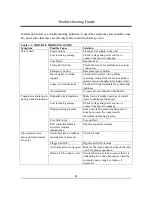
Loading function Failure  

Solenoid valve failure 

Check and replace as necessary 

Pipe leak 

Check and replace as necessary 

Proportional valve failure 

Check and replace as necessary 

Air Intake valve stuck open 

Remove the intake hose and check the inlet 
valve for proper operation 

Minimum pressure valve 
failure 

Check for leaking, replace as necessary 


Summary of Contents for CSST13020

Page 1: ...SCREW AIR COMPRESSOR CSST13020 Instruction Manual Release August 2018 ...

Page 2: ......

Page 3: ...0 2 5 Air end Inlet Valve and Filtration System 11 2 6 Control Panel Layout 12 2 7 Technical Data 14 3 Fluid Information 15 3 1 Fluid Guide 15 3 2 Fluid Change and Recommendations 15 4 Installation 16 4 1 Compressor Mounting Support and Location 16 4 2 Ventilation and Cooling 16 4 3 Piping Connection 18 4 4 Fluid Level Inspection 19 4 5 Electrical 19 4 6 Motor Rotation Inspection 20 4 7 Fan Rotati...

Page 4: ...hutdown and Emergency Shutdown 41 5 10 Early Warning and Prompts 41 5 11 Control Protection 42 5 12 Common Failure Solving 44 5 13 Electrical Control Diagram 46 6 Servicing 47 6 1 Fluid Change 47 6 2 Air Filter 47 6 3 Fluid Filter 48 6 4 Air Oil Separator 48 6 5 Maintenance Schedule 49 7 Troubleshooting Guide 50 8 Standard Terms and Conditions 53 ...

Page 5: ...roughout this manual The level of hazards seriousness is symbolized as follows This symbol identifies immediate hazards which will result in severe personal injury death or substantial properly damage This symbol identifies hazards or unsafe practices which could result in personal injury death or substantial property damage This symbol identifies immediate electrical hazards which will result in ...

Page 6: ...ese statements are generally applicable to all compressors Failure to follow any of these precautions may results in severe personal injury death property damage and or compressor damage 1 3 PRESSURE A properly sized pressure relief valve must be installed in the discharge piping ahead upstream of any shutoff valve block valve heat exchanger orifice or any potential blockage point Failure to insta...

Page 7: ...r attempt to service any compressor part while the compressor is operating 1 6 HOT SURFACES Do not touch any hot surface and parts during the compressor s operation Keep all body parts away from air oil receiver tank steel tubing air end and after cooler Wear personal protective equipment including gloves while servicing the compressor 1 7 PROPER COMPRESSED AIR APPLICATIONS Air from this compresso...

Page 8: ... stop controls and the compressor may start at any time NOTICE Follow all maintenance procedures and check all safety devices on schedule Use the correct compressor fluid at all time Do not rely on the discharge check valve to isolate the compressed air service line Keep panels closed at all times and stay away from hot surfaces to prevent hazards NOTICE These instructions precautions and descript...

Page 9: ...plete unit of following Screw air compressor Dryer optional Filters optional Air tank optional All components are assembled on a structural steel base with enclosure The control panel is located in the front of the enclosure door panel Acoustical enclosure is one of the standard features for all compressors NOTICE Dismantling the compressor s enclosure may void its warranty General Information ...

Page 10: ...arge port The compressed air is then discharged into the air oil separator tank There are five complete compression cycles for each complete rotation of the male rotor When the compressor is operating a partial vacuum is produced at the compressor inlet Fluid is injected into the compressor unit and mixed with the air The fluid has three basic functions As a coolant it controls the rise in air tem...

Page 11: ...mperature is below 70 C 158 F Fluid below 158 F will bypass the thermal valve and inject directly to the airend As the discharge temperature rises above 80 C 176 F due to heat of compression the thermal valve begins to open and fluid will be circulated to the cooler 2 4 COMPRESSOR DISCHARGE SYSTEM Air fluid mixture has been forced into reservoir after compression The reservoir has two basic functi...

Page 12: ...ration and fluid circulation 2 5 AIREND INLETVALVE AND FILTRATION SYSTEM The compressor inlet system consists of a Kerry air filter Kerry inlet valve SKK airend The Kerry inlet valve controls the air intake volume It is also acts as the check valve to prevent the reverse pressure and rotation when compressor is shutting down General Information SKK air end Kerry inlet valve Casing for Kerry air fi...

Page 13: ...ess this to confirm and save modified data When the compressor is running press this button to load or unload under a certain pressure Move up button increase button Data at current position is increased by pressing this button when data are modified Menu is moved upwards when menu is selected Move down button Descending button Data at current position is descended by pressing this button when dat...

Page 14: ...selected Back button Reset button This button services as back button when operate menu to come back parent menu resetting is carried out by pressing this button for a little long time when failure shutdowns Always check power supply before you service the unit The power indication light could be in faulty status General Information ...

Page 15: ... 22 G1 1 2 540 1410 850 1235 GC22 13 1 3 2 7 22 G1 1 2 540 1410 850 1235 GC30 8 0 8 5 0 30 G1 1 2 650 1120 930 1290 GC30 10 1 0 4 4 30 G1 1 2 650 1120 930 1290 GC30 13 1 3 3 6 30 G1 1 2 650 1120 930 1290 GC37 8G 0 8 6 0 37 G1 1 2 740 1530 900 1435 GC37 8 0 8 6 0 37 G1 1 2 730 1530 1030 1435 GC37 10 1 0 5 5 37 G1 1 2 730 1530 1030 1435 GC37 13 1 3 4 6 37 G1 1 2 730 1530 1030 1435 GC45 8 0 8 7 1 45 ...

Page 16: ...ufacturer s recommended quantity of Kerry fluid Inspection of the reservoir fluid level during installation or operation is recommended Figure 3 1 Fluid Fill Locatio Do not use different fluid Using different fluid will void compressor s warranty 3 2 FLUID CHANGE RECOMMENDATIONS LUBRICANT FLUID CHANGE FLUID FILTER CHANGE SEPARATOR CHANGE Kerry 4000 Or equivalence Every 4 000 hours Every 2 000 hour...

Page 17: ...e bottom of the base if floor surface is uneven or irregular A stationary compressor will prevent accidents such as broken piping or electrical connections Do not over tighten the lag bolts because this may cause the frame to twist or bind which could results in possible breakage of fluid coolers piping and the reservoir NOTICE Brand new compressor has Orange Color shipping bracket installed under...

Page 18: ...tal particle free and chemical vapor free in the compressor s room Housing the compressor within a poorly ventilated enclosure will cause higher operating temperature Under no circumstances should a compressor be installed in an area exposed to toxic volatile or corrosive atmosphere nor should toxic volatile or corrosive agents be stored near the compressor All models are intended for indoor insta...

Page 19: ... for maintenance Release system pressure by opening manual pressure relief valve prior to servicing Failure to relieve system pressure could result in death or serious injury and property damage The compressor after cooler comes with an automatic condensate drain The drain line should be installed to remove the condensate during compressor operation A receiver tank should be installed if compresse...

Page 20: ...n mode Fluid level is indicated on the reservoir sight glass see figure 3 1 The maximum fluid level is at the top red mark Add fluid until the top red mark is reached 4 5 ELECTRICAL Before installation the electrical supply should be checked for adequate wire size and capacity User must comply with national local electrical codes The codes specify the surrounding clearance requirement for the elec...

Page 21: ...ped if another hole is used Inspect incoming voltage to match the compressor s specification Inspect motor starter and overload heater sizes Check electrical connections L1 L2 L3 for tightness and cleanliness 4 6 MOTOR ROTATION INSPECTION Motor rotation must be checked after the wiring has been installed Operating the compressor in incorrect rotation will result in severe damage to the compressor ...

Page 22: ...d be made to have the instruction manual readily available to the operator and maintenance personnel If for any reason any parts of the manual become illegible or if the manual is lost have it replaced immediately The instruction manual should be read periodically to refresh one s memory This may prevent a serious accident Before compressor start up inspect fluid level in reservoir After start up ...

Page 23: ...r pull the circuit breaker at the main power terminal Operation CONTROL PANEL LAYOUT Standard compressor is equipped with microprocessor control panel Figure 1 1 1 Start Button Press this button to start the compressor Stop button Press this button to stop the compressor ...

Page 24: ... selected Back button Reset button This button services as back button when operate menu to come back parent menu resetting is carried out by pressing this button for a little long time when failure shutdowns 5 2 OPERATING PROCEDURES ELECTRICAL CONTROL PANEL Control Panel Functions LCD English display All round protection against short circuit locking phase failure overload and imbalance for the m...

Page 25: ... to enter into Menu Selection Interface Level 1 menu screen Level 1 menu screen Run the Parameter Review Press Move down button or Move up button to move the black cursor to RUN PARAMETER press enter button to pop up submenu PRES 0 60MPa SYS STOP C01 TEMP 80 SYS STOP C01 RUN PARAMETER USE PARAMETER FAC PARAMETER MOD PARAMETER MOTOR A A 0 0 B 0 0 C 0 0 ...

Page 26: ... USE PARAMETER menu press the shift button to switch to the following menu In this menu Press shift button Switch to the following interface requirements to enter a user password After showing this interface The first bit data or password started flashing press increase button or descending button to modify the flashing data equal to the first bit of password Press the shift button move the cursor...

Page 27: ...E VALUE UNLOAD PRES Mpa UNLOADING PRESSURE VALUE FAN START TEMP Control the fan starting This value will be set as 120 if there is no fan present or the fan is not required to be protected FAN STOP TEMP Control the stopping of the fan MOTOR DELAY TIME 0008S When using the controller to protect the motor it is required that the time set here will not meet the impulse starting current of the motor t...

Page 28: ...e remote mode is set both the button on the controller and the remote control button can turn on and off the machines When the near mode is set only the button on the controller can turn on and off the machines LOAD MODE AUTO MA NUAL When the manual mode is set the Load Unload function can only be executed by pressing load unload button COM MODE PROHIBIT COMPUTE R SEQUEN CE When this is set as PRO...

Page 29: ...terlocking network during interlocking operation Operation SEQ LOAD PRES MPa The main air compressor searches for one device in the interlocking network for loading or starting when main air compressor s gas supply pressure is less than the value set here during interlocking operation SEQ U L PRES MPa The main air compressor searches for one device in the interlocking network for unloading or stop...

Page 30: ...e O A FILTER SET 9999H Set this value to 0 to disable the O G separator alarm function AIR FILTER SET 9999H Set this value to 0 to disable the alarm function of gas filter Operation LUBE SET 9999H Set this value to 0 to disable the time alarm of lub oil GREASE SET 9999H Set this value to 0 to disable the time alarm of Lub Grease BELT SET 9999H Set this value to 0 to disable the time alarm of belt ...

Page 31: ...of the parameters are as the following table Parameter Initial Value Functions Host rated current MAXIMUM OVERLOAD VAULE OF THE MOTOR 1 2 After the starting delay time when the motor current is greater than 1 2 times of the set value and less than 4 times of the set value the unit will jump as per overload feature Fan rated current Maximum allowable motor overload value 1 2 Same as above Pre alarm...

Page 32: ...an 1 set value the unbalance protection will stop the machine If the set value is greater than 15 the unbalance protection will be unavailable Lack phase protection 005 0S Set the LACK PHASE TIME 20S the Lack phase protection will be disabled PRODUCT DATE The manufacturer input the product date of the unit Operation SERIAL NUMBER The manufacturer input the product No of the unit PHASE PROTECT ON O...

Page 33: ...compressor and alarm If the value set as 0000 the function is disable ALARM LONG STOP 0010H Warning time over here to set compressor report warning too long and stop COM SET PAR DISABLE ENABLE PARAMETER 1 Operation Functions and Technical Parameters 1 Digital input Digital input of 3 circuit digital output of relay of 5 circuit 2 Simulation quantity Pt100 temperature input of 1 circuit 4 20mA inpu...

Page 34: ...it protection when testing current reaches above 8 times of set current response time 0 2s Protection of phase failure in case of phase failure of any one phase operation time equals setup time Operation Unbalance protection when currents of any two phase differ 60 75 operation time equals set time Protection characteristics of reverse time limit of overload time unit second please see following t...

Page 35: ...e is higher than the set temperature the protection activates and the activate time 2s 9 The output relay contactor capacity 250V 5A The life time of the contactors 500000 times of running 10 The current display tolerance 1 0 11 RS 485 communication Operation Specifications 1 Specification Description ...

Page 36: ...ed according to fan s current MAM970 40 16 40 8 20 MAM970 100 30 100 15 50 MAM970 200 80 200 40 100 MAM970 400 160 400 80 200 MAM970 600 5 100 600 50 300 Operation Measurement and Installation 1 Mechanical Installation A Mutual Inductor Installation MAM970 B T V 40 Maximum working current matching with host motor With voltage detection With RS485 communication B pressure sensor K Pressure switch 9...

Page 37: ...be according to the nameplate of the motor The recommended installation sizes are as below Figure 2 CT1 Structure Size ф36 perforations Figure 3 CT1 Installation Size Figure 4 CT2 Structure Size ф10 perforations Figure 5 CT2 Installation Size Operation B The installation of the controller The controller is installed as plate Room should be left around controller for wiring The B A ...

Page 38: ...3 6 specific dimensions are as follows Figure 6 Controller structure dimensions Operation Terminal arrangement diagram ...

Page 39: ... input 24 25 26 terminals are motor mutual inductor CT1 input 27 28 2 terminals are Fan mutual inductor CT2 input 30 31 terminals are Temperature Sensor signal input 19 20 21 terminals Used to detect the phase sequence and voltage 13 terminals is common terminal of output relay 14 terminals controls fan 15 terminals controls load valve 16 terminals controls angle shaped contactor 17 terminals cont...

Page 40: ... without load If air pressure decreases to set lower pressure limits value of load pressure the electromagnetism valve for loading is energized again and electromagnetism valve for discharging is de energized Air compressor operates normally to increase pressure in air tank If the unload run time exceeds the set delay time of non load the compressor will automatically stop motor s operation to ach...

Page 41: ...r in a variety of shutdown state shows 2 Remote Automatic Control Remote automatic control and local automatic control are basically same but the difference is that starting up or stopping of devices can be achieved by means of control of remote switch 3 Local Manual Control Control of starting and stopping are same as automatic control but device is in status of unloading operation after finish s...

Page 42: ... Air compressor only can be started up after failure is eliminated In case of emergency press down emergency stop button to cut off power of controller and contactors 5 10 Early Warning and Prompts 1 Indication of early warning of oil filter Early warning for blockage of oil filter The controller can display the message on the text display to remind the operator that the air filter is blocked by c...

Page 43: ... 970 air compressor controller provides all round protection functions of short circuit locking phase failure overload imbalance for motor Electronic failure Failure Display Reason Short circuit Display failure HOST FAN SHORT Short circuit or rated current is set by mistake Blocked Display failure HOST FAN BLOCK Too large load bearing wear and other mechanical failure Overload Display failure HOST...

Page 44: ...esult the controller cannot start up the motor Then just change any arbitrary two phase power lines leading to check the rotation of motor 4 Overpressure Protection of Pressure Supply When the gas exhaust pressure is higher than the upper limit of set pressure the controller would be stopped for warning the on site failure is displayed as HIGH P 5 Malfunction Protection of Sensor When pressure sen...

Page 45: ...ressure The pressure too high or the pressure sensor failure Check the pressure and the pressure sensor Pressure Sensor Failure Cable off Sensor damaged or the cable connected reversed Check the wiring and sensor transformer Lack Phase Power phase lacking or the Contactor terminal damaged Check the power and contactors Overloaded Voltage too low tubes blocked Bearing Wear off or other mechanical f...

Page 46: ...ring starting process Host start time set to a valueless than the star angel time delay Reset the host starting time to be longer than star angel delay Load delay time Main Contactor activate time to time The emergency button loose Check the wiring Air Exhaust Temperature too high Bad vent condition Oil lacking etc Check the vent condition and lubricant amount etc Temperature Sensor Failure Cable ...

Page 47: ...4 5 Servicing ...
Page 48: ...ve the plug from the fluid fill port and refill the reservoir with the appropriate amount of Kerry 4000 fluid viii Before starting the compressor opens the 1 4 turn valve on the blow down valve to ensure the blow down valve functions correctly NOTICE The 1 4 turn valve on the blow down valve MUST be open for the unit to blow down during regular unit operation 6 2AIR FILTER The standard Kerry air f...

Page 49: ...lowing conditions whichever occurs first As indicated by the fluid filter maintenance indicator when the fluid is at normal operating temperature Every 2 000 hours Every fluid change NOTICE The fluid filter maintenance indicator may read high upon start up on cool mornings due to sluggish fluid creating higher than normal differential pressures Monitor indicator after the fluid warms up 6 4AIR OIL...

Page 50: ...and fluid level Every 500 hours Drain water from air oil separator tank Check fluid level Clean air filter Clean after cooler fins Check for loose fluid and air tubing electrical wiring connection Every 1000 hours Clean air filter or replace with new element Clean after cooler fins Every 2000 hours Replace air filter Check oil level Check safety valve Replace fluid filter Every 4000 hours Clean af...

Page 51: ...ghtness Air end failure Contact a local authorized distributor Compressor shuts down during loaded condition High ambient temperature Make fresh air intake openings or install ducts to discharge the hot air Low incoming voltage Check voltage and power source or contact local power company High operating pressure Reset check line pressure and ensure it does not exceed the compressor s maximum opera...

Page 52: ...lace as necessary Loose wire Check and tighten Low air capacity delivery Plugged air filter Clean air filter or replace with new element Air Intake valve failure Remove the intake hose and check the inlet valve for proper operation Separator failure Replace separator element Faulty indirect proportional valve Adjust or replace as necessary Faulty solenoid Repair or replace as necessary Faulty safe...

Page 53: ...lace as necessary Indirect proportional valve setting Adjust or replace as necessary Solenoid valve failure Check and replace as necessary Safety valve failure Check and replace as necessary Short period of load unload Pipe leak Check and replace as necessary Pressure setting Change setting above 1Bar Receiver tank too small Check or increase volume of receiver tank Air flow into the main network ...

Page 54: ...ts without a Return Material Authorization RMA number RMA s valid for 30 days from the date issued Standard Warranty Buyer will honor Product warranties and indemnities authorized by the manufacturer including any transferable 90 days warranty is given for service parts from receipt date Seller warrants to Buyer that Products purchased hereunder will conform to the applicable manufacturer s specif...

Page 55: ...epted Order or for delays in delivery due to causes beyond Seller s reasonable control including but not limited to acts of God natural or artificial disaster riot war strike delay by carrier shortage of Product acts or omissions of other parties acts or omissions of civil or military authority Government priorities changes in law material shortages fire strikes floods epidemics quarantine restric...

Page 56: ...5 4 We reserve the right to amend on the manual May the manual would have difference to the real products please take the real products as standard or check with us by mail ...

Reviews: