background image


Chapter 4 – Menu System


39


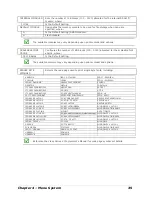
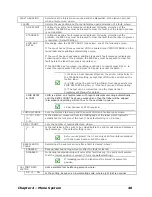
COLUMN 

EMULATION 

Allows the column dots per inch to be adjusted (153 - 203 dots), so that numbers 

smaller than the printhead resolution reduce the printed output from right to left, 
where: 

XXX Dots 


ROW EMULATION 

Allows the row dots per inch to be adjusted (103 - 303), so that numbers smaller 
than the printhead resolution enlarge the height of the printed output and numbers 

larger reduce it, where: 

XXX Dots 


SOP EMULATION 

Allows label positioning commands to function with backward compatibility when 

printing label formats designed for legacy models, where:  

DISABLED 

Produces the natural start of print position. (Default Setting) 

110 (PRODPLUS) 

Emulates the Prodigy Plus® start of print position. 

220 (ALLEGRO) 

Emulates the Allegro® start of print position. 

250 (PRODIGY) 

Emulates the Prodigy™ start of print position. 


When changing these values, the printer will automatically feed two labels to establish the 

new print position. 


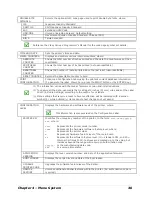
BACK AFTER PRINT 

Determines media movement when a cutter, present sensor, peel and present, or 

GPIO is enabled, where: 

MODE 

Repositions media, where: 
 

DISABLED 

Movement occurs only when the next label is ready to print, minimizing edge 

curling. 

(Default Setting)


ENABLED 
 

Movement occurs according to BACKUP DELAY timing after a cut, cleared sensor, 

or SOP to allow fastest throughput. 

BACKUP DELAY 

(1/50s) 

Instructs the printer to retract a presented label after a specified time elapses (0 – 

255, in one-fiftieth of a second increments), where: 

000 

Retraction occurs when the next label is received and processed. (Default Setting) 

FONT EMULATION 

Allows font substitution for all internal fonts (see examples), where:  

STANDARD 

FONTS 

Prints using a standard (internal) font. (Default Setting) 

CG TIMES 

Prints using the CG Times font.  

USER ID    S50 

Prints using a downloaded font. 

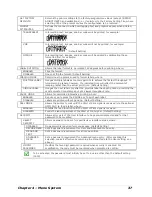
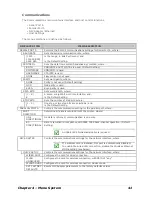
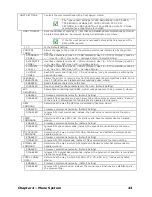
LABEL STORE 

Determines the command recall level used when retrieving stored label formats, 

where: 

STATE & FIELDS 

Recalls the printer state (i.e., heat, speed settings, etc.) and the label-formatting 

commands for the stored label. (Default Setting) 

FIELDS ONLY 

Recalls the label-formatting commands for the stored label. 

MENU LANGUAGE 

Selects the menu and configuration label language. Only languages that are 

resident will be displayed (see Appendix D), where: 

ENGLISH 

Enables English (Default Setting) 

DISPLAY SETTINGS 

Determines the appearance of the items in the display, where: 

GRAPHIC DISPLAY 

MODE 

Determines the magnification of the displayed items, where:  

STANDARD 

Is the normal setting.  

ENHANCED Is 

the 

enlarged 

setting. 

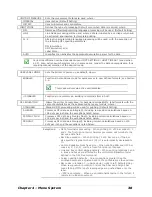
DISPLAY UNITS 

Determines the displayed 

type of distance information

, where: 

STANDARD 

Displays the information according to the UNITS OF MEASURE setting (see above).  

IMPERIAL 

Displays the information in inches. 

METRIC 

Displays the information in millimeters and centimeters. 


Summary of Contents for M-Class Mark II

Page 1: ...Operator s Manual ...

Page 2: ......

Page 3: ...usion of incidental or consequential damages and in those states the foregoing limitations may not apply The warranties here give you specific legal rights and you may have other legal rights which vary from state to state Firmware Software Agreement The enclosed Firmware Software resident in the Printer is owned by Licensor or its suppliers and is licensed for used only on a single printer in the...

Page 4: ... 2006 07 07 CSA C22 2 No 60950 1 03 1st Edition 2006 07 EN60950 1 2001 1st Edition IEC60950 1 2001 1st Edition As an Energy Star Partner the manufacturer has determined that this product meets the Energy Star guidelines for energy efficiency The manufacturer declares under sole responsibility that this product conforms to the following standards or other normative documents EMC EN 55022 1993 Class...

Page 5: ...oading Ribbon 9 3 Printer Operation 3 1 Front Panel Non Display Models 13 3 2 Front Panel Display Equipped Models 15 3 3 Windows Driver 16 3 4 Printer Configuration Utility 18 3 5 Media Calibration 19 3 6 User Defined Label Display Equipped Models 22 4 Menu System 4 1 Menu System Display Equipped Models 23 4 2 The User Menu 24 4 3 The Advanced Menu 24 4 4 The Test Menu 25 4 5 Menu Details 25 ...

Page 6: ...placement 52 5 7 Darkness Adjustment 53 5 8 Resetting the Printer 54 5 9 Downloading Firmware and Fonts 55 5 10 File Handling Messages Display Equipped Models 56 6 Troubleshooting 6 1 Problem Resolution 59 6 2 Fault and Warning Messages Display Equipped Models 63 6 3 Hex Dump Mode 68 Appendix A Specifications Appendix B GPIO Port Appendix C Paper Menu Setup Non Display Models Appendix D Changing t...

Page 7: ...r driver can be found on our website http www datamax oneil com or on the included CD ROM for printing from common applications If you wish to write a custom program a copy of the Class Series 2 Programmer s Manual can also be found on the CD ROM 1 1 1 2 2 2 U U Un n np p pa a ac c ck k ki i in n ng g g After removing the printer from the packaging material check the contents The following items s...

Page 8: ...Chapter 1 Getting Started 2 ...

Page 9: ...ace cables to the printer ensure the Power On Off Switch is in the Off position 1 Place the printer on a firm level surface 2 Ensure that the Power Switch on the Printer is in the Off position 3 Connect the AC Power Cord to the receptacle on the back of the Printer and then plug the AC Power Cord into a properly grounded outlet The power supply automatically detects and then adjusts to the applied...

Page 10: ...ional communications your host must have supporting software The USB Connection needs a USB cable and is supported in Windows 95 and greater operating systems Depending upon the operating system of your host computer installation requirements may differ slightly The Serial Connection needs a serial interface cable with specific pin outs for proper communications part numbers and pin outs are given...

Page 11: ... The following examples highlight several ways to use memory devices unless otherwise noted see Section 4 5 Printer Options Modules for details about function selections Files that reside in Module X cannot be copied see the Class Series 2 Programmer s Manual for module details For access to all functions ensure that the Advanced Menu is selected Press System Settings select Menu Mode and then Adv...

Page 12: ...s 1 Open the media cover and lower the Media Hanger Guide if equipped and Media Guide 2 Press in on the Printhead Latch and raise the Printhead Assembly Printhead Latch Media Guide Media Hanger Guide 3 Slide the Roll Media onto the Media Hub or Media Hanger If the printer is equipped with a Media Hanger raise the Media Hanger Guide The Media Hanger Guide should be pushed inward so that it is just ...

Page 13: ...bly If the printer does not correctly sense the top of each label it may be necessary to calibrate the printer see Section 3 5 Media Calibration The printer is factory set to use 4 inch media and ribbon if thermal transfer equipped When using a different width of media ribbon refer to Section 5 3 On M 4210 models equipped with a Media Hanger in place of a Media Hub high print speeds may result in ...

Page 14: ...nt panel To adjust 1 With media loaded as described in Section 2 2 grasp the Slide Tab and move the Sensor Eye Mark into position over media according to the table below 2 If loading media return to the media loading instructions Media Sensor Selection and Adjustment Media Type Sensor Eye Mark Position Sensing Required Die cut Near the middle of the label Gap Notched Centered over the notch Gap Re...

Page 15: ...Transfer to print using ribbon This can be accomplished via the DMXConfig Utility see section 3 4 or if display equipped via the menu system see section 4 5 1 Open the media cover Press in on the Printhead Latch and raise the printhead assembly Printhead Latch 2 Slide the Ribbon Roll onto the Ribbon Supply Hub until it rests against the flange Ensure the ribbon unwinds in the correct direction see...

Page 16: ...Chapter 2 Printer Setup 10 Ribbon Routing Diagrams CSI Coating Side In Ribbon Routing CSO Coating Side Out Ribbon Routing ...

Page 17: ...ute the ribbon under the Ribbon Idler and then out the front of the printer approximately 12 inches Ribbon Roll Ribbon Supply Hub Ribbon Idler 4 Close the Printhead Assembly and press down until it locks into place Printhead Assembly ...

Page 18: ...n up and then around to the Ribbon Take Up Hub winding it several times in a clockwise direction to secure it in place Ribbon Take up Hub 6 Close the cover and press the Feed button several times to position the ribbon and ensure proper tracking ...

Page 19: ...ers can be configured using the DMXConfig Utility see Section 3 4 The printer can also be configured using the Paper Menu Setup see Appendix C for users that do not have a host connection available 3 1 1 Lights Normal Mode Normal power up STOP Solid On Indicates the printer is in the Paused state Flashing When using the Peel Present Option Indicates a label is presented to the operator Indicates a...

Page 20: ...eed Cancel Produces Database Configuration and Test Label Print Ethernet Label Pause Feed Cancel Prints the printers Ethernet configuration Quick Calibration Press and Hold Feed Performs a Quick Calibration see Section 3 5 Empty Calibration Press and Hold Pause Feed Performs a Empty Calibration see Section 3 5 Delayed Power up Functions Turn on the printer when the three lights turn on press and h...

Page 21: ... area of the display Three LED indicators are located above the display Both provide real time operational information as defined below Item Definition A USB Host or SD device memory drive or keyboard has been detected RFID is installed A wired LAN connection has been detected WLAN is enabled and the printer s NOT associated with a WLAN Access Point Printer WLAN is associated with an WLAN Access P...

Page 22: ...our web site at www datamax oneil com Installing the Windows Driver Place the Accessories CD Rom included with your printer into your computers CD Rom drive Once the CD Rom starts select Install Windows Driver from the main menu and follow the instructions on the screen to install When prompted select your printer from the list i e Datamax O Neil M Class MarkII Continue to follow the on screen ins...

Page 23: ...the Stock setting matches the size of the label you are using If you cannot find a match for your label click New and enter the dimensions of your label Options Tab Print Speed Printhead Temperature These two settings will have the greatest effect on print quality Some label stocks will require more heat and slower print speeds to generate a quality image The Windows application software used to c...

Page 24: ...printer Older versions might not operate correctly with some printers For the latest version please visit our web site at www datamax oneil com Once you have installed the DMXConfig utility 1 Connect the host to the printer with a serial or parallel cable 2 Turn on the printer 3 Launch the DMXConfig utility 4 Query the printer by using the Query Printer toolbar button top left This will connect to...

Page 25: ...ght Successful calibration ERROR Light Unsuccessful calibration try again If the calibration continues to fail proceed to Section 3 5 3 Display Equipped Printers CALIBRATION COMPLETE will be displayed and the media will be advanced to the next top of form if calibration was successful or CANNOT CALIBRATE will be displayed if calibration was not successful In this case check the hints listed below ...

Page 26: ...r is properly loaded with media 1 Connect the host to the printer with a serial or parallel cable 2 Turn on the printer 3 Launch the DMXConfig utility 4 Query the printer by using the Query Printer toolbar button top left This will connect to the printer and get the current printer settings 5 Select the Sensor Calibration Tab and then click the Media Calibration Wizard button When prompted click O...

Page 27: ...w prompt you to Remove Stock Remove all media and backing from the printer Close the printhead and click OK 9 The Calibration Wizard will now respond with Passed Calibration click OK Re install the media in the printer Close the printhead and press the Feed button to test the calibration Each press of the Feed button labels should feed one label If the printer was unsuccessful in calibrating Retry...

Page 28: ...late is a stored label format where fields delimited by an ampersand become variable The printer will prompt you to enter the variable field data For example the stored label format could contain the data 19131423443 ENTER NAME Afterward when recalled from memory the display will indicate the variable field ENTER NAME Variable data can be any part of the DPL format font ID positioning etc No error...

Page 29: ...Display contrast is adjustable press and hold the MENU BUTTON to cycle through the contrast range this may take several seconds then release the button when the desired appearance has been achieved 4 The Menu System described below details functions available when the printer firmware is at Application Version 12 071 or greater Print a Configuration Label to identify your printer s current version...

Page 30: ...ol Printer Options System Settings Communications Diagnostics MCL Options After selecting the Advanced Menu it will be accessed whenever the MENU BUTTON is pressed To enable the Advanced Menu proceed as follows 1 Press the MENU BUTTON 2 Using the UP or the DOWN BUTTON scroll to SYSTEM SETTINGS then press the ENTER KEY 3 Scroll to MENU MODE then press the ENTER KEY 4 Scroll to ADVANCED MENU then pr...

Page 31: ...full width media to capture the entire format otherwise adjust the printer and set the Label Width 1 Press the CANCEL KEY to stop printing 2 A printing delay can be set see Print Test Rate in Diagnostics 4 4 4 5 5 5 M M Me e en n nu u u D D De e et t ta a ai i il l ls s s Media Settings The Media Settings menu contains label and ribbon sensing and sizing functions as well as printhead cleaning sel...

Page 32: ...E before a TOF Fault is declared where 16 00 Is the default setting Maximum Label Length should typically be 2 5 to 3 times the physical length of the label PAPER EMPTY DISTANCE Sets the distance 0 99 99 inches the printer will attempt to feed before an Out Of Stock Fault is declared where 00 25 Is the default setting When using clear or translucent media this setting should be longer than the act...

Page 33: ...ault setting EMPTY SENSOR LEVEL Establishes the threshold for the empty value 0 255 where 000 is the default setting TRAN SENSOR GAIN Establishes the sensitivity of the transmissive sensor 0 31 where 15 is the default setting REFL SENSOR GAIN Establishes the sensitivity of the reflective sensor 0 31 where 15 is the default setting PRINTHEAD CLEANING Controls the automatic cleaning alert and functi...

Page 34: ...equipped with a Media Hanger in place of a Media Hub high print speeds may result in printing degradation It is recommended to set the print speed at 8ips or less FEED SPEED Controls the rate of label movement between printing areas where x x in sec REVERSE SPEED Controls the rate of label movement 2 0 5 0 inches per second during backup positioning where 4 0 in sec Is the default setting SLEW SPE...

Page 35: ...stment parameters to finely and independently compensate for slight mechanical differences sometimes evident when multiple printers share label formats These settings are also available to make special label formatting adjustments where DARKNESS Controls the strobe time 1 64 to establish the nominal HEAT setting for printhead specific thermal characteristics where 32 Is the default setting CONTRAS...

Page 36: ...font sample PLU The names of the files contained in the plug in directory PRN Is processed as a DPL file TXT Is processed as a DPL file PROCESS FILE Selects from a list of available files for processing as noted below also see Section 5 10 File Handling Messages External File Extension Definition Action Converted Internal Extension BMP PCX IMG F7B Converts the black and white graphics file image f...

Page 37: ... and Seventy times ten is the default setting CUTTER Controls the Cutter operation where MODE Sets the detection method and response of the printer AUTO Is the default setting where the presence of the cutter option is automatically sensed If detected the cutter is enabled otherwise it will be ignored ENABLED Enables the cutter If the cutter is not detected a fault will be generated DISABLED Disab...

Page 38: ...s the default setting 64 BIT POWER ADJUST Adjusts the applied power KILL CODE Code used to permanently deactivate the device B3 B2 B1 B0 00 00 00 00 Is the default setting ACCESS CODE Code used to protect the memory contents B3 B2 B1 B0 00 00 00 00 Is the default setting GEN 2 LOCK ACTION Sets the lock level NONE PERMALOCK PWD READ WRITE BOTH where NONE is the default setting LOCK AFTER WRITE Lock...

Page 39: ... to work with a bar code verifier START OF PRINT Selects the type of input signal required to initiate Start of Print SOP where LOW PULSE Triggers printing with a low pulse HIGH PULSE Triggers printing with a high pulse ACTIVE LOW Triggers printing with a low signal ACTIVE HIGH Triggers printing with a high signal EDGE Triggers printing with a signal edge transition END OF PRINT Sets the type of o...

Page 40: ...hrough the Advanced Menu The menu selections are defined as follows DISPLAYED ITEM ITEM DESCRIPTION MENU MODE Sets the menu system access level where USER MENU Accesses a limited menu of basic controls Default Setting ADVANCED MENU Accesses the full menu of controls settings and diagnostics CONFIGURATION FILE Controls the creation storage and recall of printer configuration files where RESTORE AS ...

Page 41: ...MBOL DESKTOP MATH 8 TURKISH 8 ITC ZAPF DINGBAT 100 MACINTOSH PS TEXT ITC ZAPF DINGBAT 200 PS MATH UTF 8 ITC ZAPF DINGBAT 300 PC 858 MULTILINGUAL ISO 4 UK PS ITC ZAPF DINGBAT MICROSOFT PUBLISHING ISO 6 ASCII ISO 8859 1 LATIN 1 PC 8 CODE PAGE 437 VENTURA INTERNATIONAL ISO 8859 2 LATIN 2 PC 8 D N CP 437N VENTURA US ISO 8859 5 LATIN 5 PC 852 LATIN 2 VENTURA MATH ISO 8859 10 LATIN 6 PC 851 LATIN GREEK ...

Page 42: ... To capture all the data use media that is at least 2 inches 51 mm wide and set the Label Width in Media Settings according to the width of your labels 3 Menu settings that require a reset to become effective will be indicated with a section symbol while bulleted items denote host changes not yet saved CONFIGURATION LEVEL Displays the hardware and software levels of the printer where This informat...

Page 43: ...been printed providing the most accurate time stamps but at a slower throughput rate PAUSE MODE Allows for controlled interactive printing where ENABLED Requires you to press the PAUSE Key to print each label DISABLED Labels are printed without pausing Default Setting PEEL MODE Allows the printer to wait until the Start of Print signal is received via the optional GPIO Port to feed a label where E...

Page 44: ...e produced by legacy models where STANDARD Standard DPL processing will be used for printing Default Setting ALLEGRO Processes DPL data as an Allegro including row position calculations based on 194 dots per inch and the exceptions noted below PRODIGY PLUS Processes DPL data as a Prodigy Plus including column calculations based on 200 dots per inch and the exceptions noted below PRODIGY Processes ...

Page 45: ...OP to allow fastest throughput BACKUP DELAY 1 50s Instructs the printer to retract a presented label after a specified time elapses 0 255 in one fiftieth of a second increments where 000 Retraction occurs when the next label is received and processed Default Setting FONT EMULATION Allows font substitution for all internal fonts see examples where STANDARD FONTS Prints using a standard internal fon...

Page 46: ... be printed if insufficient text space exists see VOID DISTANCE below or if the fault occurred after printing 3 The text can be customized see the Class Series 2 Programmer s Manual for details VOID RETRY CONT VOID is printed on a faulted label with reprint attempts occurring automatically until the RETRY COUNT has been exceeded and then that label will be skipped discarded and printing will conti...

Page 47: ...t Setting STOP BITS Sets the number of stop bits where 1 2 1 One stop or two stop bits are selectable and is the Default Setting PARALLEL PORT A Controls the communication setting for the parallel port where PORT DIRECTION Determines if data is returned from the printer where UNI DIRECTIONAL No data is returned communication is one way BI DIRECTIONAL Data is returned in compliance with IEEE 1284 b...

Page 48: ...be used Default Setting A server assigned IP address takes precedence over any static IP address stored in the interface DISABLED The stored static IP Subnet Mask and or Gateway Address will be used SNMP Sets SNMP ENABLED Default Setting DISABLED ADVANCED Advanced settings for the NIC Card TELNET Enable Disable Telnet protocol FTP Enable Disable FTP protocol MTU Sets the Maximum Transmission Unit ...

Page 49: ...ot send feedback characters to the host Default Setting ESC SEQUENCES Allows data containing invalid ESC control code sequences to be processed where ENABLED Processes commands normally Default Setting DISABLED Ignores ESC sequences are during processing since some systems send a banner to the printer Bitmapped font downloads are disabled in this mode HEAT COMMAND Determines the way the DPL Heat c...

Page 50: ...here A Is the device type R RFID and S Linear Scanner B Is the resulting status C entire label complete F faulted failed label and U unknown C Is the number of expected reads given in two characters D Is the number of good reads given in two characters E Is the internal Job and Sub Job Identifier given in four characters each F Is the data that was read delimited with semicolons on multiple reads ...

Page 51: ...T PRESENTED when no label blocks the sensor Note that this test can also be used to check the sensor function of the Peel Present option TEST CUTTER Performs a functional test of the Cutter where PERFORM TEST 001 TIMES Cycles the cutter blade a selected number of times 0 999 with PASS FAIL results given for each cycling attempt TEST GPIO Performs a functional test of the GPIO port where MONITOR GP...

Page 52: ...EW Displays the data PRINT Prints a reference label iPH REPORT TUE 12 44PM 23MAY2006 4212 HE25 060224 090 PRINTHEAD SERIAL 5x 00289 PRINTHEAD MODEL 163 PRINTER SERIAL 60430014 PRINTHEAD INCHES 11175 INSTALLATION DATE INITIAL 02 02 2006 INSTALLATION DATE LAST 28 02 2006 PRINTHEAD CLEANING CLEAN PROCEDURES 0 CLEAN COUNTER RESET 0 NUMBER OF INCHES INITIAL 0 ICON DESCRIPTIONS Displays the various prin...

Page 53: ... and clean it thoroughly with solvent and a cotton swab After every roll of media Peel Off Roller Rotate the peel off roller and clean it thoroughly with solvent and a cotton swab After every roll of media Media Path Solvent After every roll of media Peel Tear Bar Solvent As needed Media Sensor Air blow Monthly Exterior Mild detergent or desktop cleaner As needed Interior Brush or vacuum cleaner A...

Page 54: ...ndicate a dirty or faulty printhead To clean the printhead 1 Turn Off and unplug the printer 2 Open the cover Unlock the Printhead Latch and raise the Printhead Assembly Allow the printhead to cool before proceeding 3 Move media and ribbon away from the printhead as necessary 4 Using a Cotton Swab moistened not soaked with isopropyl alcohol gently wipe away any build up on the printhead surface pa...

Page 55: ...nthead Close the cover 5 5 5 3 3 3 M M Me e ed d di i ia a a W W Wi i id d dt t th h h A A Ad d dj j ju u us s st t tm m me e en n nt t t When printing on less than full width media adjust for even pressure distribution as follows 1 With media loaded in the printer print a label and examine it Non display printers Simultaneously press the PAUSE FEED buttons Display equipped printers See Section 4 ...

Page 56: ...ian or Datamax O Neil Technical Support before proceeding To adjust the Burn Line 1 Load the printer with your media and ribbon if required 2 Loosen the two Locking Screws approximately turn counter clockwise 3 Turn the Adjustment Screws counter clockwise until the burn line is past the platen roller vertex Print a test label the label should look light and uneven Non display printers Simultaneous...

Page 57: ... 4 102mm wide media and ribbon see Section 2 2 2 Ensure the Media Width Adjustment is set to its left most position see Section 5 3 3 Print a test label Non display printers Simultaneously press the PAUSE FEED buttons Display equipped printers See Section 4 4 4 Turn the Pressure Adjustment Cams counterclockwise to increase the applied pressure or clockwise to decrease it Make equal adjustments to ...

Page 58: ... is installed remove it 3 With the printhead locked in the down position loosen the Printhead Mounting Screw it will remain in the assembly 4 Unlatch the Printhead Assembly While holding the Printhead raise the assembly Disconnect the two cables and then remove the old Printhead 5 While carefully holding the new Printhead connect both cables 6 Position the Printhead onto the Locating Pins in the P...

Page 59: ...t counterclockwise will lighten the print Compare a label printed with the old printhead and make this adjustment so that the new printhead matches the darkest portion of that label Display equipped printers Use the printer s menu to adjust Darkness see Section 4 5 Print Control Custom Adjustments Darkness Adjustment Large increases in the Darkness Adjustment can shorten printhead life If you need...

Page 60: ...1 Turn Off the printer 2 Turn on the printer when the three lights turn on press and hold the PAUSE and CANCEL Keys continue to depress the keys until the READY message or Ready light appears This reset has the same effect as the System Settings Set Factory Defaults selection in the menu system Level Two Reset To return the printer to the firmware default settings and clear all the calibration and...

Page 61: ... changes have occurred Print a Database Configuration Label to verify your new firmware version Following an unsuccessful download the ERROR Light will illuminate then the printer will perform a warm reset both the READY and STOP lights will be on during power up initialization The original firmware will remain operational If the printer fails to reset toggle the power Off and On Try re sending th...

Page 62: ... 5 PRINTER OPTIONS MODULES DELETE FILE for details 5 5 5 1 1 10 0 0 F F Fi i il l le e e H H Ha a an n nd d dl l li i in n ng g g M M Me e es s ss s sa a ag g ge e es s s D D Di i is s sp p pl l la a ay y y E E Eq q qu u ui i ip p pp p pe e ed d d M M Mo o od d de e el l ls s s Depending upon the module and operation selected several messages are possible when using the file handling system File H...

Page 63: ...lable for processing also note that some files may not display or Following a Copy File request this is normal when no files are available for copying also note that internal database files cannot by copied NOT SUPPORTED The file type requested is not supported Recheck the type of file requested for printing or processing and ensure that it matches one of the available types for that function PROT...

Page 64: ...Chapter 5 Maintenance and Adjustments 58 ...

Page 65: ...e cutter is properly installed Plug in and turn On the printer You should hear the cutter blade rotate and position itself properly However if the problem continues call for service The LCD is blank but the Ready Indicator is On The display contrast may set too low Press and hold the MENU Key for 10 seconds or until the display reappears Erratic feeding The printer may require Calibration see Sect...

Page 66: ...rinters see Section 4 5 If using serial communications ensure that the interface cable meets the requirements found in Section 2 1 Missing print on left or right side of the label Information may be formatted outside the label dimensions Check your software program label size For display equipped printers also check the values in the menu for Print Control Column Offset and Print Control Custom Ad...

Page 67: ...n the used ribbon Print any Internal Test Label non display printers see Section 3 1 2 display equipped printers see Section 4 4 If an image printed then check the protocol and port settings for both the printer and host These must match The heat setting may be too low Make an adjustment in the software program or through the Front Panel The media ribbon combination may be incorrect Contact a Medi...

Page 68: ... Section 5 3 The Platen Roller may be dirty or worn clean or call for service The Printhead Burn Line may need adjusting see Section 5 4 Skips labels when printing Media Calibration may be needed see Section 3 5 The Media Sensor may be out of position readjust the position see Section 2 3 The format may be within 1 8 inch of the label s trailing edge Try reducing or moving the format slightly Unab...

Page 69: ...on Possible Solution s The printer has detected a drop in the 24 volt power supply Try cycling the printer power Off and On If the fault does not clear call for service The printer has detected an analog to digital circuit converter failure Try cycling the printer power Off and On If the fault does not clear call for service The printer has detected a cutter mechanism fault WARNING Use extreme car...

Page 70: ...Sensor over the TOF mark see Section 2 3 4 If using media with large gaps adjust the Paper Empty Distance 5 Calibrate the printer see Section 3 5 Two possible causes 1 The printer was powered off or reset during a ribbon out of stock or TOF fault or 2 the printer was unable to complete the Media Calibration Depending upon the cause 1 Press the FEED Key in an attempt to identify and then clear the ...

Page 71: ...ration steps also ensure that no labels are stuck in the media sensor Retry the calibration If the problem persists call for service The ribbon sensor values have changed or the printer detects no or only sporadic ribbon supply hub movement Try the following 1 Ensure that ribbon is correctly loaded and that the printhead assembly is latched 2 Check the ribbon supply and ribbon take up hubs for obs...

Page 72: ...te the printer see Section 3 5 2 The Media Sensor may be out of position Readjust it see Section 2 3 3 The media may not be properly loaded Reload media also ensure that the Media Guide is positioned properly see Section 2 2 4 The Media Width Adjustment may be improperly adjusted see Section 5 3 5 The label may be longer than the default value for maximum length Check the Media Settings Maximum La...

Page 73: ... voltage has been lost The host has pending configuration changes that will not take effect until a host reset command is issued To save changes send a host reset command in DPL or to discard changes The printer has detected a low operating voltage Possible low or fluctuating line voltage level Try moving the printer to another outlet When more than 50 black is being printed try reducing the Heat ...

Page 74: ...turn on press and hold the FEED button Continue holding the FEED button until the STOP light turns off Now all data received by the printer will be output in hexadecimal code along with the printable ASCII equivalents as shown below To exit Hex Dump Mode simply turn the printer off and then back on Display equipped printers To begin go to the Diagnostics menu and enable Hex Dump Mode see Section 4...

Page 75: ... F to 95 F 4 C to 35 C Humidity 10 95 non condensing AC Input Voltage 90 132 or 180 264 VAC 47 63 Hz auto ranging Printing Print Method Direct Thermal Thermal Transfer optional Print Speed 2 6 IPS 50 152 mm s M 4206 M 4306 2 10 IPS 50 254 mm s M 4210 Resolution 203 dpi 8 dots mm M 4206 M 4210 300 dpi 11 8 dots mm M 4306 Tear Bar Tear Down DRAM Memory 8MB M 4206 16MB M 4210 M 4306 FLASH Memory 4MB ...

Page 76: ...Communications Interface USB RS 232 DB 9 and IEEE 1284 Compliant Centronics Parallel Baud Speed 600 to 38 400 bits per second BPS Handshaking Xon Xoff CTS DTR Parity Even Odd or None Stop Bits 1 or 2 Data Bits 7 or 8 Embedded Fonts and Barcodes The printer is equipped with the most popular industry fonts and bar codes see the Class Series 2 Programmer s Manual for full listings and detailed inform...

Page 77: ... View Media Dimensions Designator Description Maximum 1 Minimum 1 A label width 4 65 75 B liner width 4 65 75 C gap or notch between labels 3 25 100 D label length 3 250 E media thickness 0100 0025 F notch opening width 500 200 G distance from the media s edge to the media sensor aperture left justified 2 250 200 H reflective black mark width 2 4 65 500 I distance between reflective marks 3 500 J ...

Page 78: ...Appendix A Specifications 72 ...

Page 79: ...t a label until the Start of Print signal goes active When a label is ready to print but awaiting a Start of Print signal the prompting operation differs slightly depending upon equipment Non display models The STOP LED will flash Display equipped models The display will indicate WAITING FOR SIGNAL GPIO Port Configuration The connection to the GPIO signals can be accessed via the Option Port conne...

Page 80: ...4 VDC 500mA 1 Given relative to the printer 2 The operation of this multi function port is configuration dependent For GPIO operation disable all optional functions not used i e Present Sensor and Cutter and set GPIO to YES or on display equipped models set GPIO Device to APPLICATOR Use the Configuration Set command STX Kc or program the selections on non display models via the Printer Setup Menu ...

Page 81: ...re disabled during setup they can still occur when printing test labels To discard changes and revert to previous values turn off printer power To change Printer Setup Printer Setup Procedure Printer Setup Mode Prints the Printer Setup Menu List Prints the Test Label for test Current Item and Value is printed Increments item s value Decrements item s value Accepts the current values for test PAUSE...

Page 82: ... then release or for the TOF GAIN item hold FEED for 12 flashes etc Menu Items Values 1 DIRECT MEDIA TYPE 2 EDGE SENSOR TYPE 3 NO PRESENT SENSOR 4 NO CUTTER EQUIPPED 5 127 SOP ADJUST 0 005 in 6 127 PRESENT ADJUST 0 005 in 7 9600 BAUD RATE bps 8 8 DATA BITS 9 STD CONTROL CODES 10 100 CONT FORM LENGTH 0 01 in 11 3 OOS MAXVOLT 0 1 Volts 12 12 TOF GAIN 13 10 TOF DELTA 0 1 Volts 14 0 TOF LOW 0 1 Volts ...

Page 83: ...c or imperial values Possible Values Imperial Metric 6 ROW ADJUST Shifts the vertical start of print position in xxx dots Possible Values Range 0 255 nominal 128 0 close to edge 255 farthest from edge 7 COLUMN ADJUST Shifts the horizontal start of print position in xxx dots Possible Values Range 0 255 nominal 128 0 close to edge 255 farthest from edge 8 PRESENT ADJUST Specifies an additional amoun...

Page 84: ...options are installed the printer sets stop location to the next label s start of print Host commands will override 17 LABEL ALIGNMENT Sets the label alignment method Possible Values YES user manually determines ALIGN LENGTH AUTO printer determines ALIGN LENGTH NO no Label Alignment used 18 ALIGNMENT LENGTH Leading edge distance of two successive labels Must be entered if LABEL ALIGNMENT is set to...

Page 85: ...l throughput time 23 GPIO Sets the printer s option port to function for GPIO applications see Appendix B for more information Possible Values YES or NO default NO 24 FAULT HANDLING When a fault condtions is detected printing stops and the ERROR light turns on After the problem is corrected the FEED Key must be pressed to clear the fault The label in process is not reprinted Possible Values YES or...

Page 86: ...ontinue to hold the button until the STOP light turns off and then release it 2 Press and hold the FEED button and count 7 flashes of the ERROR light then release it The following printout should be produced 3 Press the PAUSE button one time to increment to the 19200 bps value The following printout should be produced 4 At this point you will accept the current values for test and exit the Printer...

Page 87: ...57 REFL______________ 0 RIBN______________ 237 TEMP______________ 64 VOLT______________ 218 PRESENT SENSOR____ 0 COUNTER INFORMATION ABSOLUTE VALUES 7 16 2003 LENGTH____ 773 INCHES TIME______ 20 HOURS RESETTABLE VALUES 7 16 2003 LENGTH____ 969 INCHES TIME______ 56 HOURS MEMORY CONFIGURATION INTERNAL MODULE A______ 128 SCALABLE FONTS_________ 64 LABEL SIZE 0426 10912 IN CONFIGURATION SERIAL PORT SE...

Page 88: ...or by host commands The three possible modes YES AUTO and NO are detailed in the following sections Label Alignment YES In this mode the operator must supply an ALIGN LENGTH value This value must be physically measured from leading edge to leading edge of two successive labels as shown The measurement must be as accurate as possible For very short labels errors as small as 0 01 can result in notic...

Page 89: ...ngth the greater the waste Auto Alignment with the Present Sensor enabled If the printer is equipped with the Present Sensor option and that feature is enabled while the label length is calculated the printer will pause and illuminate the STOP light after each movement The operator must press the PAUSE button for the alignment to continue This allows the operator to remove any labels as required h...

Page 90: ...abel Alignment length measurement OR Re measure Label Alignment Length use Menu Setup to set new length ensure desired length has been set Obtain a slightly different label Alignment Length measurement Using the Label Alignment AUTO mode hold the FEED button to force an alignment and label measurement Ensuring slack in the label stock may result in a slightly different measurement The Alignment Le...

Page 91: ...p position present position is not far enough forward Another present position has been determined Enabling the Present Sensor causes the label stop position present position to be approximately 0 1 behind the peel bar OR The Present Adjust value is not correct Disable the Present Sensor OR Ensure the host computer is not providing a Present Distance shorter than is required for the Tear Bar Use t...

Page 92: ... Printer and cutter faults are disabled during and but can still occur while printing test labels If at any time you wish to discard your changes and revert back to the previous calibration simply turn off power to the printer To perform Calibration Auto Media Calibration Until Paused light turns off Calibration Mode Analyze for Paper Analyze for Backing or Mark Analyze Out of Media condition Prin...

Page 93: ...t turns off then release it 2 Next press the PAUSE button The printer will feed approximately ten inches of media to calculate the TOF Delta and Low values to be used 3 Upon completion one of the following lights will flash five times to denote the result of the auto calibration attempt STOP Light Successful calibration Proceed to Step 4 ERROR Light Unsuccessful calibration try again If the calibr...

Page 94: ...3 Position the backing material or the black reflective mark in the media sensor close the Printhead Carrier Assembly and then press the FEED button The printer will flash the ERROR light as it analyzes the top of form mark 4 Place the media with the backing attached if any in the media sensor close the Printhead Carrier Assembly and then press the PAUSE button The printer will flash the ERROR lig...

Page 95: ...age you will add a new language column or modify the existing column in the spreadsheet click on the Generate DPL file s radio button and then send that file s to the printer Software requirements for modifying the menu language are as follows Microsoft Excel must be purchased by user Img2dl exe provided at ftp ftp datamax oneil com Anonymous Firmware EFIGS is a program used during the process to ...

Page 96: ... when trying to modify the MAX value however if cutting and pasting fields this warning system may be defeated Two Line Messages Some of the message are displayed as two lines These are indicated in the comment fields Comments This field can be modified with no effect D After editing is complete highlight all of the columns to be created by pressing the letter above the column more than one column...

Page 97: ... menu system and go to SYSTEM SETTINGS MENU LANGUAGE and select the desired font for the language Save the changes when prompted An error has occurred if the printer displays the new language selection but all messages remain in English In this case re check your process or contact Datamax O Neil Technical Support be ready to provide the Common xls and DPL download files created Other error messag...

Page 98: ... destroying the new menu language s Module Y can be UNLOCKED by sending this DPL string STX KpY0 To restore the factory generated EFIGS image download the file 832296 01A to the printer This file is located on the Datamax O Neil FTP site The letter at the end of the file name e g A specifies the revision The latest revision will be available on the FTP site Downloading the same language twice will...

Page 99: ...Appendix D Changing the Language 93 The screen shot below is an example of Unicode defined languages Chinese Russian Note the only additional information required is the double in row 1 ...

Page 100: ......

Reviews: