background image

DATALOGIC

DS41

Installation - 2.17

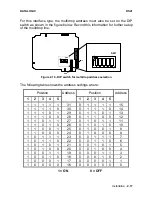
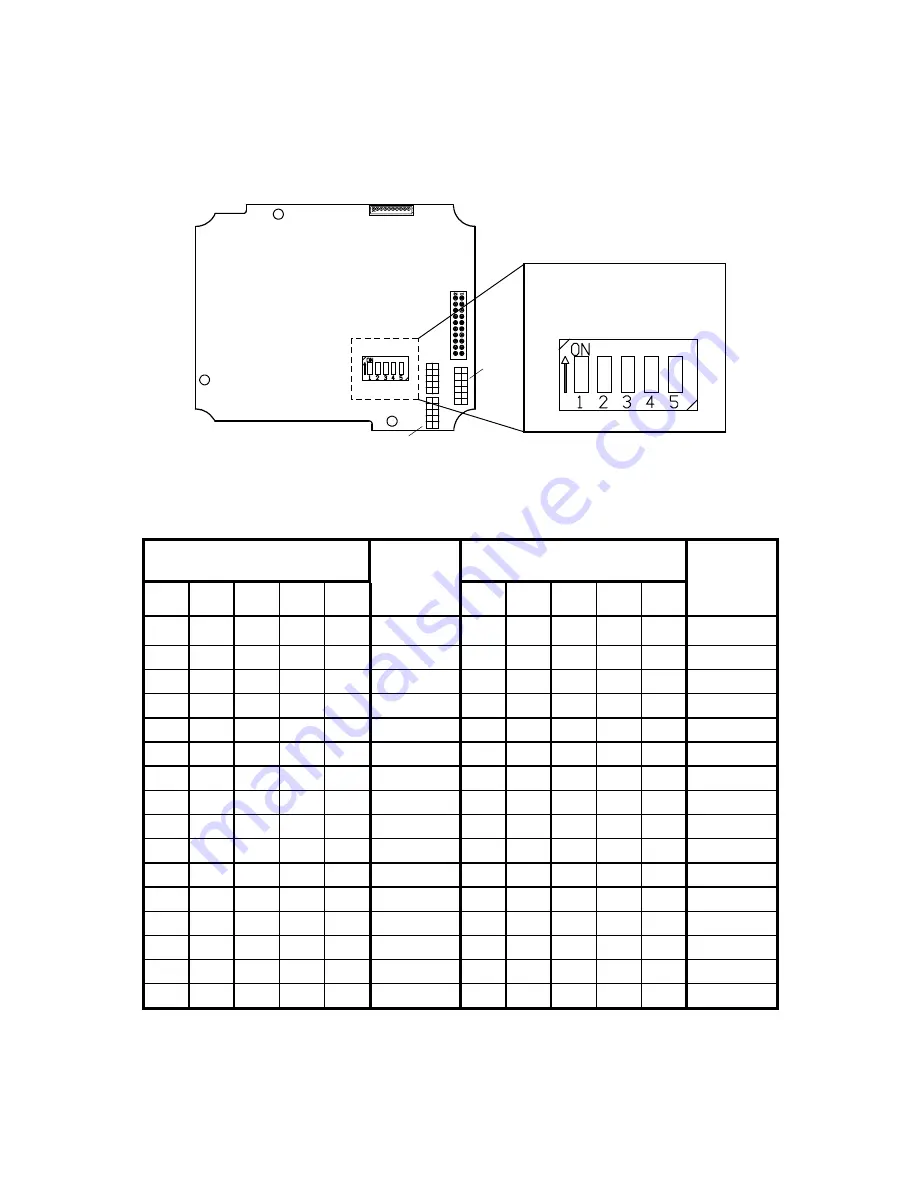
For this interface type, the multidrop address must also be set on the DIP
switch as shown in the figure below. Record this information for further setup
of the multidrop line.

SW1

SW2

SW3

SW4

SW1

Figure 2.19 - DIP switch for multidrop address selection

The following table shows the address settings where:

Position

Address

Position

Address

1

2

3

4

5

1

2

3

4

5

1

1

1

1

1

31

0

1

1

1

1

15

1

1

1

1

0

30

0

1

1

1

0

14

1

1

1

0

1

29

0

1

1

0

1

13

1

1

1

0

0

28

0

1

1

0

0

12

1

1

0

1

1

27

0

1

0

1

1

11

1

1

0

1

0

26

0

1

0

1

0

10

1

1

0

0

1

25

0

1

0

0

1

9

1

1

0

0

0

24

0

1

0

0

0

8

1

0

1

1

1

23

0

0

1

1

1

7

1

0

1

1

0

22

0

0

1

1

0

6

1

0

1

0

1

21

0

0

1

0

1

5

1

0

1

0

0

20

0

0

1

0

0

4

1

0

0

1

1

19

0

0

0

1

1

3

1

0

0

1

0

18

0

0

0

1

0

2

1

0

0

0

1

17

0

0

0

0

1

1

1

0

0

0

0

16

0

0

0

0

0

0

1 = ON

0 = OFF

Summary of Contents for DS41-X0

Page 1: ...DS41 Installation Manual ...

Page 2: ...DS41 INSTALLATION MANUAL ...

Page 3: ...NOLOGY EQUIPMENT ITE EN 50082 2 March 1995 ELECTROMAGNETIC COMPATIBILITY GENERIC IMMUNITY STANDARD PART 2 INDUSTRIAL ENVIRONMENT Following the provision of the Directive s 89 336 CEE AND SUCCESSIVE AMENDMENTS 92 31 CEE 93 68 CEE Ruggero Cacioppo Lippo di Calderara 23 03 1998 Quality Assurance Supervisor Product names mentioned herein are for identification purposes only and may be trademarks and o...

Page 4: ...tion 2 4 2 5 Mechanical Installation 2 5 2 6 JBOX Installation 2 6 2 6 1 Mounting JBOX 2 6 2 6 2 Electrical Connections For JBOX 2 8 2 7 Electrical Connections For 25 pin Models 2 11 2 7 1 Power Supply 2 12 2 7 2 Main Serial Interface 2 13 RS232 Interface 2 14 RS485 Non Polled Interface 2 15 RS485 Polled Interface 2 16 20 mA Current Loop Interface 2 19 2 7 3 Auxiliary RS232 Interface 2 20 2 7 4 In...

Page 5: ...iv 3 READING FEATURES 3 1 3 1 Step Ladder Mode 3 1 3 2 Picket Fence Mode 3 2 3 3 Performance 3 3 3 4 Reading Diagrams 3 4 4 MAINTENANCE 4 1 4 1 Cleaning 4 1 5 TECHNICAL FEATURES 5 1 ...

Page 6: ...ta transmission LED Cable with 25 pin connector 1 Mounting holes 2 Successful read LED 4 Presence sensor active LED 5 Power on LED 3 Laser active LED 9 8 Warning label Laser beam output window 10 7 Warning and Classification labels 11 Accessory mounting holes ...

Page 7: ...Data transmission LED Cable with junction box 1 Mounting holes 2 Successful read LED 4 Presence sensor active LED 5 Power on LED 3 Laser active LED 9 8 Warning label Laser beam output window 10 7 Warning and Classification labels 11 Accessory mounting holes ...

Page 8: ...pplicable requirements of both IEC 825 1 and CDRH 21 CFR 1040 at the date of manufacture The scanner is classified as a Class 2 laser product according to IEC 825 1 regulations and as a Class II laser product according to CDRH regulations There is a safety device which allows the laser to be switched on only if the motor is rotating above the threshold for its correct scanning speed The laser beam...

Page 9: ...ls Disconnect the power supply when opening the device during maintenance or installation to avoid exposure to hazardous laser light The laser diode used in this device is classified as a class 3B laser product according to IEC 825 1 regulations and as a Class IIIb laser product according to CDRH regulations As it is not possible to apply a classification label on the laser diode used in this devi...

Page 10: ...t Plug in Power Unit marked Class 2 rated 10 30 V minimum 0 46 A This device may also be supplied by a UL Listed Power Unit with a Class 2 or LPS power source which supplies power directly to the scanner via the 25 pin connector Model DS41 X1 This device is intended to be supplied via the Junction Box by an NEC Class 2 power source rated 10 30 V minimum 0 46 A See par 2 6 2 or 2 7 1 for correct po...

Page 11: ...x This page is intentionally left blank ...

Page 12: ...ost computer using the WINHOST interface utility program provided on diskette with the scanner or using the Host Mode programming procedure by ESC sequences via the serial interface There are four different programmable operating modes to suit various barcode reading system requirements Included in these is a test mode to verify the reading features and exact positioning of the scanner without usi...

Page 13: ...possibility to detect the absolute position of the label in the scan line for DSP models only see paragraph 1 3 PCS verification for DSP models only see paragraph 1 3 The DS41 scanner uses a solid state laser diode as a light source the light emitted has a wavelength between 630 and 680 nm Refer to the section Safety Precautions at the beginning of this manual for information on laser safety The u...

Page 14: ...rom the power on of the scanner The four LEDs on the left hand side of the scanner indicate the following POWER ON LED red Figure A 3 indicates the reader is connected to the power supply GOOD READ LED red Figure A 4 is used to signal successful barcode decoding It is also used in Test mode to signal the decoding percentage for details refer to the section Test Mode in the WINHOST Help On Line EXT...

Page 15: ...dels only DSP or NPP The following models are therefore available DS41 X X 1 Standard Resolution 6 2 Very High Resolution 7 3 Raster Version R2 8 4 Raster Version R1 9 Termination of the cable 0 25 pin connector 1 junction box Optical Resolution NPP models Optical Resolution DSP models All models perform 800 scans sec 1 4 ACCESSORIES The following accessories are available on request for the DS41 ...

Page 16: ...nt and intact when opening the packaging the list of parts includes 1 DS41 reader with cable 2 Installation manual 3 Barcode test chart s 4 DS41 communication and utility program disk 5 Mounting kit Mounting screws and washers 4 ea Mounting bracket 1 Junction box for junction box models only see paragraph 1 3 1 4 3 2 5 Figure 2 1 DS41 package contents ...

Page 17: ...5 2 8 and 3 4 4 Provide correct system cabling according to the signals necessary see the applicable sub paragraphs under 2 6 or 2 7 5 Configure the software parameters from a host computer using either the WINHOST interface utility program provided on diskette or using the Host Mode programming procedure by ESC sequences via the serial interface For more details about these configuration methods ...

Page 18: ...isconnected from the power supply during this operation Refer to the following instructions and diagram below when opening the reader Unscrew the four screws as shown below to open the scanner for access to the output interface jumper Carefully remove the cover of the scanner Avoid any contact with the mirrored rotor the lenses or other optical components Figure 2 2 Opening the DS41 ...

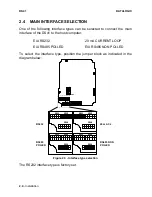
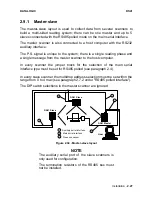
Page 19: ... the host computer EIA RS232 20 mA CURRENT LOOP EIA RS485 POLLED EIA RS485 NON POLLED To select the interface type position the jumper block as indicated in the diagram below RS232 RS485 POLLED SW1 SW2 SW3 SW4 20 mA C L RS485 NON POLLED SW2 SW3 SW4 SW2 SW3 SW4 SW2 SW3 SW4 SW2 SW3 SW4 Figure 2 3 Interface type selection The RS232 interface type is factory set ...

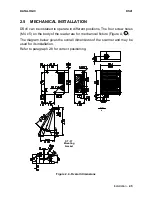
Page 20: ... positions The four screw holes M4 x 5 on the body of the reader are for mechanical fixture Figure A 2 The diagram below gives the overall dimensions of the scanner and may be used for its installation Refer to paragraph 2 8 for correct positioning ST 37 Mounting bracket mm in Figure 2 4 Overall dimensions ...

Page 21: ...able Junction Box System cables Figure 2 5 Scanner using JBOX For JBOX connections the scanner has a cable that terminates in a 24 pin connector that plugs into the junction box The system cables pass through 6 glands in the side of the JBOX and the individual wires connect to spring clamp terminal blocks inside which provide access to all scanner signals 2 6 1 Mounting JBOX The diagram below show...

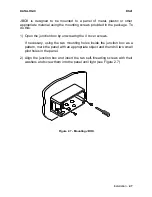
Page 22: ...n the junction box by unscrewing the 4 cover screws If necessary using the two mounting holes inside the junction box as a pattern mark the panel with an appropriate object and then drill two small pilot holes in the panel 2 Align the junction box and insert the two self threading screws with their washers and screw them into the panel until tight see Figure 2 7 Figure 2 7 Mounting JBOX ...

Page 23: ...the system cables by stripping the insulation back approximately 11 mm Using a device such as a screwdriver push down on the orange lever directly above the clamp see Figure 2 8 Insert the wire into the clamp and release the lever The wire will now be held in the spring clamp Figure 2 8 System cable connections to the junction box The wiring used can be solid or stranded but must meet the followin...

Page 24: ...nter and exit the junction box from different spring clamps but be physically connected together 1 17 18 39 J1 5 JBOX pinout for DS41 Pin Name 01 VS 02 SGND 03 VS 04 SGND 05 CHASSIS 06 VS 07 VS 08 PS 09 PS 10 SGND 11 SGND 12 VS 13 VS 14 n c 15 n c 16 SGND 17 SGND 18 NOREAD 19 NOREAD 20 RIGHT 21 RIGHT 22 WRONG 23 WRONG 24 TX232 TX485 CLOUT 25 RTS232 TX485 CLOUT 26 SGND 27 n c 28 SGND 29 TX232 TX485...

Page 25: ...e PCB inside the junction box as shown in figure 2 11 Scanner cable J1 Rubber seal Figure 2 11 Scanner cable connections to the junction box 5 Close the junction box using the 4 cover screws making sure the rubber seal is fitted correctly between the parts of the housing The junction box is now installed which completes the electrical connections for your scanning system If it ever becomes necessa...

Page 26: ... Presence sensor supply voltage 18 PS Presence sensor 19 PS Presence sensor 8 NO READ No read output 22 NO READ No read output 11 RIGHT Right read output 12 RIGHT Right read output 14 WRONG Wrong read output 15 WRONG Wrong read output 2 TX232 TX485 CLOUT 3 RX232 RX485 CLIN Main interface signals 4 RTS232 TX485 CLOUT see par 2 7 2 5 CTS232 RX485 CLIN 7 SGND Signal Ground 20 RXAUX Auxiliary input 21...

Page 27: ...in connector for connections to a UL Listed Direct Plug in Power Unit Figure 2 14 If the jack input is used to supply power to the DS41 pin 13 is automatically disconnected the supply voltage for the presence sensor remains on pin 9 The plug connector is not supplied with the DS41 V 10 30 Vdc Jack Plug GND Figure 2 14 Power supplied using the jack connector The power must be between 10 and 30 Vdc ...

Page 28: ...terface selected at each power on of the scanner If the recognized interface type is not compatible with the current communication handshaking then the system forces the XON XOFF protocol The parameters relative to the interface selected baud rate data bits etc can be configured using the WINHOST utility program or Host Mode programming For more details refer to the section Main Interface Menu in ...

Page 29: ...tion of the scanner This is the default interface The following pins of the 25 pin connector are used for RS232 interface connection Pin Name Function 2 TX232 Transmitted Data 3 RX232 Received Data 4 RTS232 Request To Send 5 CTS232 Clear To Send 7 SGND Signal Ground RTS CTS HARDWARE HANDSHAKING ENABLED DS41 USER INTERFACE 7 SGND SGND RTS232 4 DCD CTS232 5 DTR RX232 3 TXD TX232 2 RXD Figure 2 15 RS...

Page 30: ...es the CTS232 input to enable the transmission RS485 non polled interface The RS485 NON POLLED interface is a Full Duplex interface The NON POLLED configuration is used for point to point connections over longer distances than those acceptable for RS232 communications or in electrically noisy environments The following pins of the 25 pin connector are used for RS485 NON POLLED communications Pin N...

Page 31: ...ce The POLLED configuration can be used for multidrop connections with a Datalogic multiplexer or it can also be used for a master slave layout see paragraph 2 9 1 The following pins of the 25 pin connector are used for RS485 POLLED communications Pin Name Function 2 TX485 RS485 input output 4 TX485 RS485 input output 7 SGND Signal Ground DS41 MULTIPLEXER TX485 2 TX485 4 RTX485 RTX485 7 SGND RS485...

Page 32: ...shows the address settings where Position Address Position Address 1 2 3 4 5 1 2 3 4 5 1 1 1 1 1 31 0 1 1 1 1 15 1 1 1 1 0 30 0 1 1 1 0 14 1 1 1 0 1 29 0 1 1 0 1 13 1 1 1 0 0 28 0 1 1 0 0 12 1 1 0 1 1 27 0 1 0 1 1 11 1 1 0 1 0 26 0 1 0 1 0 10 1 1 0 0 1 25 0 1 0 0 1 9 1 1 0 0 0 24 0 1 0 0 0 8 1 0 1 1 1 23 0 0 1 1 1 7 1 0 1 1 0 22 0 0 1 1 0 6 1 0 1 0 1 21 0 0 1 0 1 5 1 0 1 0 0 20 0 0 1 0 0 4 1 0 0 1...

Page 33: ...ion with DS41 scanners connected to a Multiplexer 1 1 CHASSIS DS41 1 TX485 TX485 SGND DS41 0 max 1200 m three wires shield 7 4 2 7 4 2 120 Ohm MULTIPLEXER RTX485 RTX485 RS485REF SHIELD 1 120 Ohm DS41 up to 31 x max 2 m 7 4 2 Figure 2 20 DS41 multidrop connection to a Multiplexer ...

Page 34: ... pin connector are used Pin Name Function 5 CLIN Current Loop Input 3 CLIN Current Loop Input 4 CLOUT Current Loop Output 2 CLOUT Current Loop Output DS41 USER INTERFACE 5 3 4 C L IN C L IN C L OUT 2 C L OUT MAX 300 METERS I 20 mA I 20 mA Figure 2 21 20 mA C L connections To select this interface type follow the instructions in paragraphs 2 3 and 2 4 ...

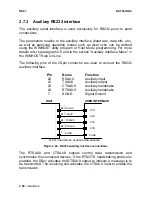
Page 35: ... of the 25 pin connector are used to connect the RS232 auxiliary interface Pin Name Function 20 RXAUX Auxiliary input 21 TXAUX Auxiliary output 23 CTSAUX Auxiliary handshake 24 RTSAUX Auxiliary handshake 7 SGND Signal Ground 7 SGND SGND DS41 USER INTERFACE TXD RXAUX 20 RXD TXAUX 21 RTS CTS HARDWARE HANDSHAKING ENABLED DCD RTSAUX 24 DTR CTSAUX 23 Figure 2 22 RS232 auxiliary interface connections Th...

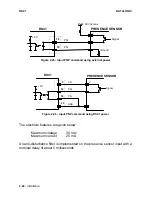
Page 36: ...h tells the scanner to scan for a code The yellow led Figure A 5 is on during the active phase of the PS signal indicating that decoding can take place This input is optocoupled and can be driven by both an NPN or PNP type command The connections are indicated in the following diagrams PRESENCE SENSOR DS41 30 Vdc max Vext PS PS 18 19 5V Signal V Figure 2 23 Input NPN command using external power P...

Page 37: ...and using external power PRESENCE SENSOR DS41 PS PS 18 19 VS 9 25 GND V Signal 5V Figure 2 26 Input PNP command using DS41 power The electrical features are given below Maximum voltage 30 Vdc Maximum current 25 mA An anti disturbance filter is implemented on the presence sensor input with a nominal delay of about 5 milliseconds ...

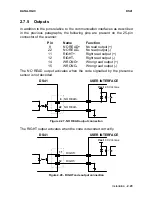
Page 38: ... READ No read output 11 RIGHT Right read output 12 RIGHT Right read output 14 WRONG Wrong read output 15 WRONG Wrong read output The NO READ output activates when the code signalled by the presence sensor is not decoded DS41 USER INTERFACE 22 8 NO READ NO READ 40 Vdc max Vext Figure 2 27 NO READ output connection The RIGHT output activates when the code is decoded correctly DS41 USER INTERFACE Vex...

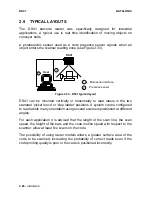
Page 39: ...hese outputs are all level or pulse programmable a 50 ms pulse is generated in the second case Further programming information is supplied in the section Output Lines in the WINHOST Help On Line 2 8 POSITIONING The DS41 scanner is able to decode moving barcode labels at a variety of angles however significant angular distortion may degrade reading performance When mounting the DS41 take into consi...

Page 40: ...le This avoids the direct reflection of the laser light emitted by the DS41 For raster models this angle refers to the most inclined or external raster line so that all other raster lines assure more than 10 Skew S Figure 2 31 Skew Angle The Tilt angle is represented by the value T in figure 2 32 Position the reader in order to minimize the Tilt angle T Figure 2 32 Tilt angle ...

Page 41: ...unted vertically or horizontally to read labels in the two standard picket fence or step ladder positions A system can be configured to read labels in any orientation using several scanners positioned at different angles For each application it is advised that the length of the scan line the scan speed the height of the bars and the code motion speed with respect to the scanner allow at least five...

Page 42: ...canner to the host computer In every scanner the jumper block for the selection of the main serial interface type must be set for RS485 polled see paragraph 2 4 In every slave scanner the multidrop address selection must be set within the range from 0 to 4 max see paragraph 2 7 2 under RS485 polled interface The DIP switch selections in the master scanner are ignored Host DS41 Master 1 3 2 Main se...

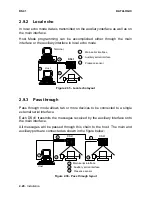
Page 43: ...serial interface Presence sensor 1 Figure 2 35 Local echo layout 2 9 3 Pass through Pass through mode allows two or more devices to be connected to a single external serial interface Each DS41 transmits the messages received by the auxiliary interface onto the main interface All messages will be passed through this chain to the host The main and auxiliary ports are connected as shown in the figure...

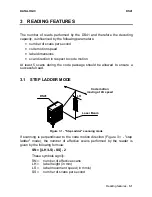
Page 44: ...ring the code passage should be allowed to ensure a successful read 3 1 STEP LADDER MODE Code motion moving at LS speed LH Laser Beam DS41 Figure 3 1 Step Ladder scanning mode If scanning is perpendicular to the code motion direction Figure 3 1 step ladder mode the number of effective scans performed by the reader is given by the following formula SN LH LS SS 2 These symbols signify SN number of e...

Page 45: ...mode If scanning is parallel to the code motion Figure 3 2 picket fence mode the number of effective scans is given by SN FW LW LS SS 2 These symbols signify SN number of effective scans FW reading field width in mm LW label width in mm LS label movement speed in mm s SS scans per second For example for a 50 mm wide code moving in a point where the reading field is 250 mm wide at a 1500 mm s speed...

Page 46: ...n the zone from 55 to 125 mm from the emission window The software resolution parameter for this version should be set to high see the section Scanner Resolution in the WINHOST Help On Line The Raster version R1 is a raster model used to read codes from 0 20 mm to 1 00 mm narrow bars with a raster aperture of about 12 mm at a 200 mm distance The Raster version R2 is a raster model used to read cod...

Page 47: ...NG DIAGRAMS DS41 1x and DS41 6x Standard Resolution 800 scans s NOTE 0 0 IS THE CENTER OF THE LASER BEAM OUTPUT WINDOW 0 30 mm 0 20 mm CONDITIONS Code Interleaved 2 5 or Code 39 PCS 0 90 Pitch angle 0 Skew angle 10 Tilt angle 0 SW Resolution High ...

Page 48: ...x and DS41 6x Standard Resolution 800 scans s NOTE 0 0 IS THE CENTER OF THE LASER BEAM OUTPUT WINDOW 0 50 mm 0 60 mm 0 80 mm 1 00 mm CONDITIONS Code Interleaved 2 5 or Code 39 PCS 0 90 Pitch angle 0 Skew angle 10 Tilt angle 0 SW Resolution Low ...

Page 49: ...1 2x and DS41 7x Very High resolution 800 scans s NOTE 0 0 IS THE CENTER OF THE LASER BEAM OUTPUT WINDOW 0 20 mm 0 15 mm 0 10 mm CONDITIONS Code Interleaved 2 5 or Code 39 PCS 0 90 Pitch angle 0 Skew angle 10 Tilt angle 0 SW Resolution High ...

Page 50: ...f the reader Dust dirt etc on the window may alter the reading performance Repeat the operation frequently in particularly dirty environments Use soft material and alcohol to clean the window and avoid any abrasive substances WARNING Clean the window of the DS41 when the scanner is turned off or at least when the laser beam is deactivated ...

Page 51: ...DS41 DATALOGIC 4 2 Maintenance This page is intentionally left blank ...

Page 52: ...0 Vdc Input current max 25 mA CONTROL OUTPUTS NO READ RIGHT READ WRONG READ optocoupled VCE max 40 Vdc Collector current max 40 mA continuous 130 mA pulsed VCE saturation 1V at 10 mA max Power dissipation max 90 mW at 40 C Ambient temp OPTICAL FEATURES Light source Semiconductor laser diode Wave length Note 2 630 680 nm Safety class Class 2 READING FEATURES Note 3 Scan rate 800 scans second Readin...

Page 53: ...ands from one of the serial ports HOST MODE PARAMETER STORAGE Non volatile internal EEPROM ENVIRONMENTAL FEATURES Operating temperature Note 4 0 to 40 C Storage temperature 20 to 70 C Humidity max 90 non condensing Vibration resistance IEC 68 2 6 test FC 1 5 mm 10 to 55 Hz 2 hours on each axis Shock resistance IEC 68 2 27 test EA 30G 11 ms 3 shocks on each axis Protection class IP65 PHYSICAL FEATU...

Reviews: