CR825 and CE875 Instant Issuance System Installation and Administrator’s Guide
21
6.
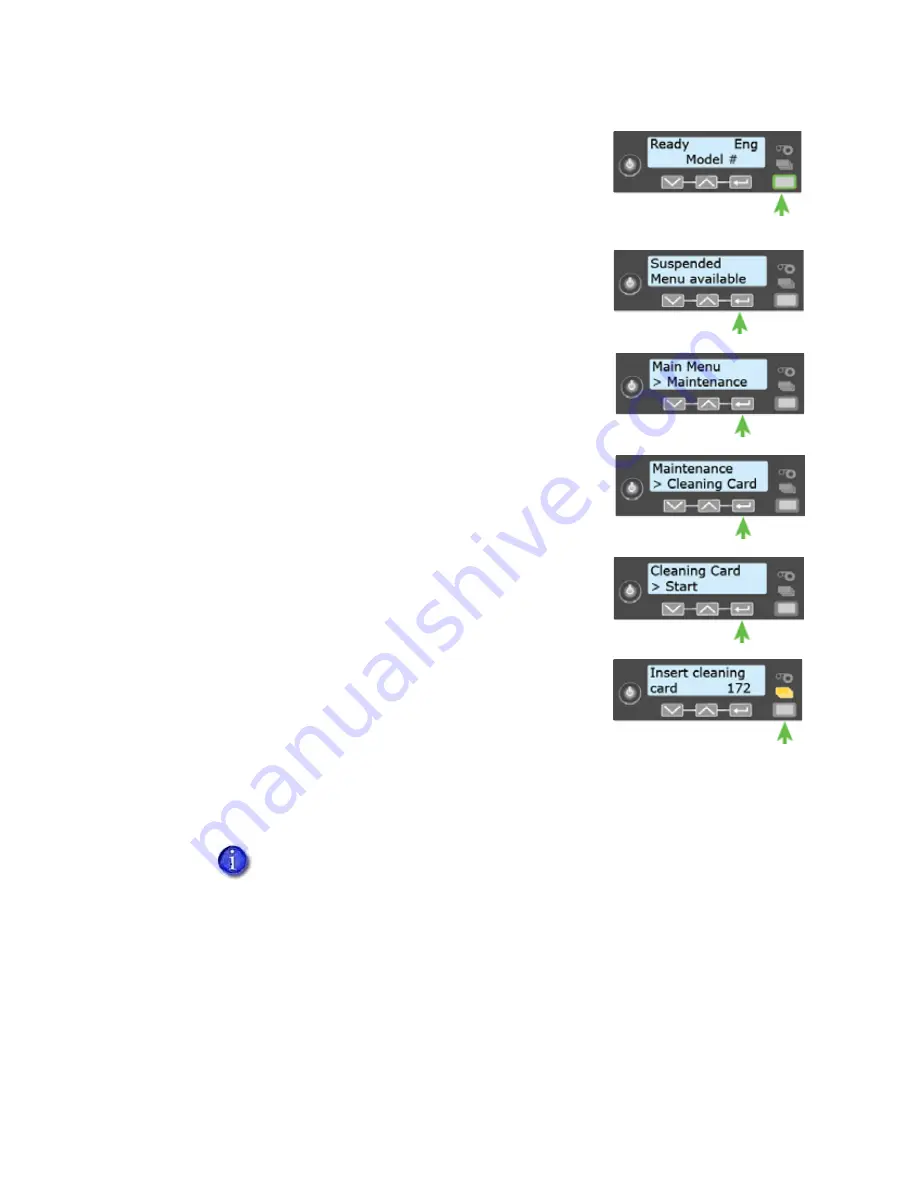
Use the LCD menu system to start the cleaning cycle.
a.
Begin when the printer displays Ready and the U
SER
button shows steady green. Press the U
SER
button.
Suspended displays on line 1 of the LCD panel.
b.
Press E
NTER
to enter the menu system.
c.
Maintenance displays on line 2 of the LCD panel. Press
E
NTER
to enter the Maintenance menu.
d.
Cleaning Card displays on line 2 of the LCD panel. Press
E
NTER
to enter the Cleaning Card menu.
e.
Start displays on line 2 of the LCD panel. Press E
NTER
to
start the cleaning process.
f.
Insert cleaning card displays on the LCD panel. Press the
U
SER
button to start the cleaning cycle.
The printer moves the card through the printer several
times. If the vertical option is installed, the card moves
into the vertical area and cleans the rollers located there.
At the end of the cleaning cycle, the cleaning card stops as it is entering the printer reject
tray (RT1).
7.
Open the printer access door and remove the used cleaning card.
8.
Continue with
.
If you are cleaning a system with an embosser, the cleaning card enters the
embosser and stops on top of the emboss wheel. Open the embosser access
door to remove the cleaning card from the system. You can remove the indent
cartridge to access the card, if necessary.
Summary of Contents for CR825
Page 8: ...viii...
Page 10: ...x...
Page 16: ...xvi...
Page 20: ...4 Printer Installation Multi Hopper Printer 13 4 in 340 mm 16 2 in 411 mm 25 6 in 651 mm...
Page 28: ...12 Printer Installation Unpack the Optional Multi Hopper...
Page 54: ...38 Printer Installation...
Page 70: ...54 Elements of Card Design...
Page 112: ...96 Printer Manager...
Page 129: ...CR825 and CE875 Instant Issuance System Installation and Administrator s Guide A 9...
Page 140: ...A 20 CE875 Instant Issuance System...


