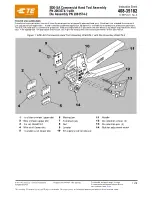
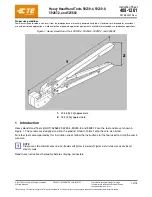
5.5.1 Changing the crimping dies with the quick die change system (only profile
239)
1.
Set micrometer to 0.0 mm position.
2.
Open the crimping tool fully by activating the
button.
3.
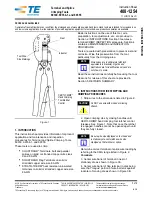
Push the eight pins of the quick die change system (1) into the
front holes of the crimping dies (2).
4.
Rotate anti-clockwise and remove the crimping dies (2) from the
deposit.
5.
Check the retaining bolts (3) of the crimping dies for damage.
6.
Hold the quick die change system with crimping dies in the
centre of the crimping tool.
WARNING!
Risk of squeezing!
When the die system closes, there is a risk of getting squeezed
between the dies.
•
Take care that no parts of your body are inside the forming
area when the crimping dies close.
Summary of Contents for ET4350
Page 1: ......
Page 3: ......
Page 32: ...3 Open and close the tool several times 4 Check oil level add hydraulic oil if required ...
Page 62: ......
Page 64: ...Retaining bolt Crimping die profile 262 263 239 266 232 237 554 245 246 247 245 114 4 x x x ...
Page 65: ...9 6 Hydraulic diagram ...
Page 66: ...9 7 Electric diagram ...
Page 69: ......
Page 70: ......
Page 71: ......
Page 72: ......