Nat.
OVEN BURNER CONVERSION
•
Remove oven bottom. To remove oven bottom, slide it
back into place to disengage front of oven bottom from
oven front frame, and pull the oven bottom out of the
oven.
•
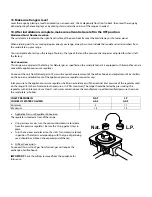
Using ½” wrench, adjust oven burner spud as follows. For
Natural to LP/Propane conversion tighten spud down
clockwise until snug (approximately 2-1/2 turns). This
restricts the flow of gas through the spuds to only that
allowed by the hollow LP/Propane metering pin. Do not
over tighten.
NOTE:
For LP/Propane to Natural conversion, loosen spuds
counterclockwise (approximately 2-1/2 turns). This
increases the flow of gas around the metering pin.
SURFACE BURNER CONVERSION
•
Remove each surface burner assembly
•
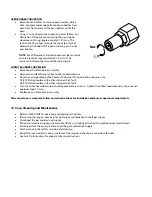
Remove the surface burner orifice hoods counterclockwise
•
Place the corresponding orifice hood on the burner fitting according to burner size:
9 K BTU Natural replace with orifice stamped 0.80 for LP
6 K BTU Natural replace with orifice stamped 0.65 for LP
•
Turn the orifice hood clockwise by hand approximately one turn. Tighten the orifice hood clockwise with a wrench
approximately 2 ½ turns.
•
Replace each surface burner assembly
After conversion is complete, follow normal instructions for installation and burner operation/ adjustments.
15. Care, Cleaning and Maintenance
•
Refer to USER GUIDE for operating and cleaning instructions.
•
If removing the range is necessary for cleaning or maintenance, shut off gas supply.
•
Disconnect the gas and electrical supply.
•
If the gas or electrical supply is inaccessible, lift the unit slightly at the front and pull out away from the wall.
•
Pull only ad far as necessary to disconnect the gas and electrical supply.
•
Finish removing the unit for servicing and cleaning.
•
Reinstall in reverse order making sure to level the range and check gas connections for leaks.
•
See Anti-Tip Instructions for proper anchoring instructions.

