background image

35 


QuickCam User’s Manul 

03-032-10187-04  


DALSA 

corp. 

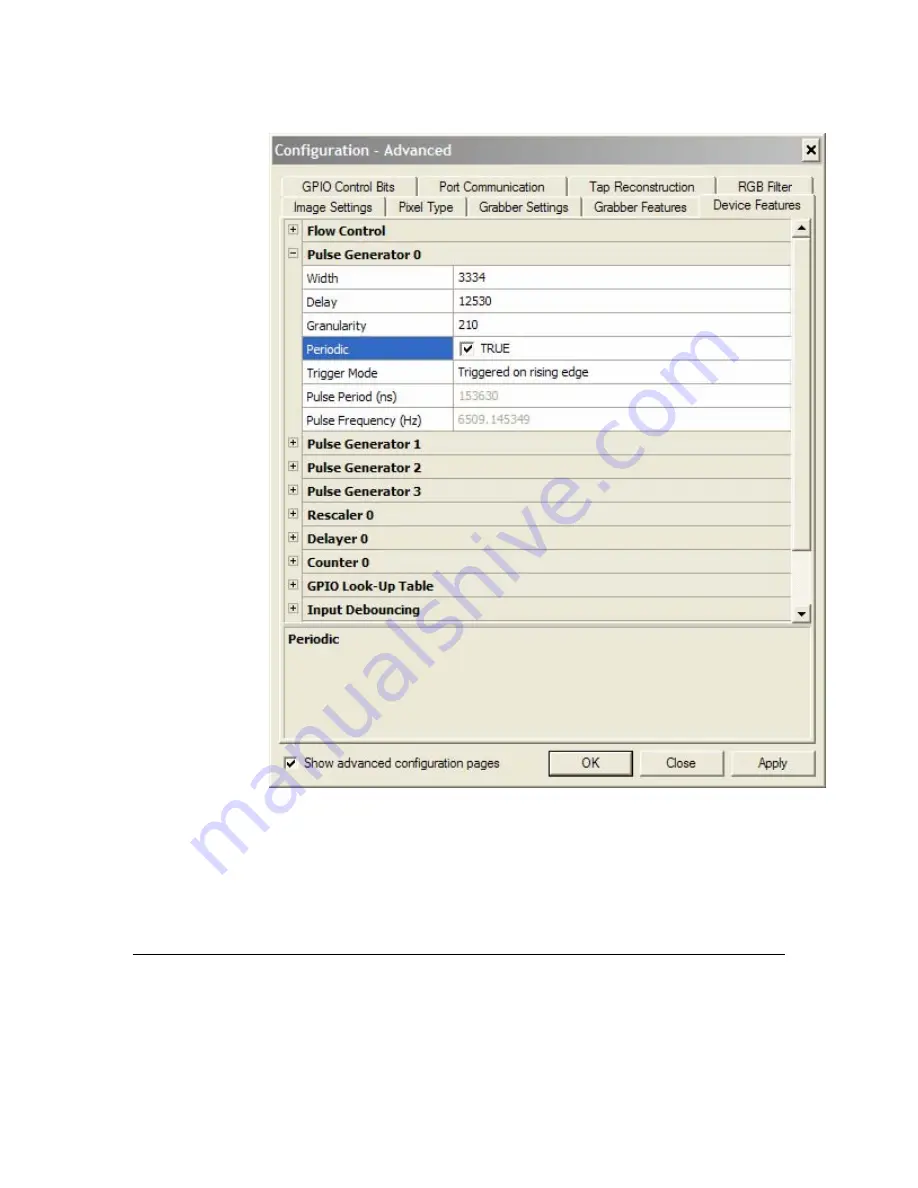
Example: Pulse Generator Configuration for 100 ms Period and 21 ms Exposure Time 


With the pulse generator 0 correctly set up, its output simply needs to be 
redirected to the camera.  
Here is a short summary of the outputs and inputs that would be used: 


Periodic Pulse Generator 0: I7 


Camera Control 1 (output): Q4 


The resulting program would look like this: 

Q4 = I7 

6.4 GPIO Look-Up Table 

The GPIO Look-Up Table tab is used to configure how the QuickCam software 
handles and redirects inputs and outputs. (This differs from the signals set on 

Summary of Contents for QuickCam

Page 1: ...QuickCam User s Manual 30 Aug 06 03 032 10187 04 www dalsa com ...

Page 2: ......

Page 3: ... Saving Camera Settings 10 Restoring Camera Settings 11 Restoring Factory Settings 11 Saving Camera Configuration to an XML File 11 Loading Camera Configuration from an XML File 12 Saving Loading and Resetting Pixel Coefficients 12 Saving Images 13 Viewing Resizing and Moving the Image_______________________________________15 3 1 Viewing an Image 15 3 2 Viewing a Saved Image 15 3 3 Resizing the Im...

Page 4: ...g a Region of Interest 53 7 3 Viewing a Region of Interest 53 7 4 Performing Flat Field Correction 53 7 5 Adjusting Analog Gain and Offset 54 7 6 Adjusting Digital Gain Offset and Background Subtract 55 7 7 Enabling and Disabling Coefficients 55 7 8 Setting Individual Pixel Coefficients 56 7 9 Using Calibration Macros 56 Recording a Camera Calibration Macro 56 Loading a Camera Calibration Macro 57...

Page 5: ...Camera Display Window 72 Time outs Packets Dialog Box 73 Virtual Serial Port 74 Menus _______________________________________________________________76 Menu Bar Commands 76 File Menu Commands 76 Configure Menu Commands 76 View Menu Commands 77 Window Menu Commands 77 Help Menu Commands 77 Toolbar Commands 78 Index ________________________________________________________________81 ...

Page 6: ...QuickCam User s Manual 4 03 032 10187 04 DALSA corp ...

Page 7: ...can find help from the accompanying user guide or directly from the QuickCam Help For context sensitive help place your cursor in the field where you want more help and press F1 or Click the Help button on the tab in QuickCam where you want more information For the complete Help select HelpÆQuickCam Help on the QuickCam menu bar You can find topics from the Help by using the table of contents and ...

Page 8: ...QuickCam User s Manual 6 03 032 10187 04 DALSA corp ...

Page 9: ...ing drivers ensure that your PC is equipped with a GigE network interface also referred to as a network adapter based on Intel s 82540 chip Many motherboard manufacturers are designing this chip directly into their board in LAN on the motherboard LOM implementations Alternately an Intel 82540 based network adapter also known as a network interface card can be slotted into a PC To install Spyder3 G...

Page 10: ...QuickCam To run QuickCam 1 On the Windows task bar click the Start button point to Programs Æ DALSA QuickCam Æ DALSA QuickCam 2 3 Connecting Detecting and Acquiring Images Detecting a Camera When you first open the QuickCam application and after powering up the camera QuickCam automatically detects all cameras on the network and asks you to set an IP address for each or accept the suggested defaul...

Page 11: ... a Camera To disconnect a camera 1 Open the Connection tab in the Camera Configuration Window On the Connection tab 2 Click Disconnect The camera should now be disconnected Toolbar equivalent To reconnect a camera after a disconnection 1 Open the Connection tab in the Camera Configuration Window On the Connection tab 2 Click Connect The camera should now be connected Toolbar equivalent Acquiring I...

Page 12: ...y grab images or Click the button to take a snap shot of the image Stopping Image Acquisition To stop acquiring images 1 Open the Connection tab in the Camera Configuration Window Under Device Actions 2 Click the Stop button Toolbar equivalent Rebooting a Camera To reboot the camera 1 Open the Connection tab in the Camera Configuration Window On the Connect Detect tab 2 Click the Reset Camera butt...

Page 13: ...ttings 2 Click Restore from Camera With the exception of pixel coefficients the last saved camera settings are restored Restoring Factory Settings On first initialization the camera operates using the factory settings You can restore the camera s original factory settings at any time through the Save Restore tab To restore the camera s factory settings 1 Open the Save Restore tab in the Camera Con...

Page 14: ...Loading and Resetting Pixel Coefficients You can save the current FPN and PRNU coefficients to the camera s non volatile memory allowing you to reload and re use the coefficients again at a later time You can also reset pixel coefficients to zero at any time To save or load pixel coefficients 1 Open the Save Restore tab in the Camera Configuration Window Under Pixel Coefficients 2 Select the pixel...

Page 15: ...e drop down box The pixel coefficient set displays Saving Images You can save the contents of the Image Output Window in TIFF format either as a single frame or as a series of frames You can control the size of the frame using the Width and Height controls in the Display section of the Connection tab Saving a Single Image To save a single image you must stop acquiring images first for example with...

Page 16: ...mes If you have not already done so click Start in the Connection window or use the button To save multiple images Method 1 1 Open the Save Restore in the Camera Configuration Window 2 In the Frames to Save spin box select the number of frames to save 3 Click Save As 4 In the Save As file browser select the location on your computer to save the frames 5 Click Ok The selected number of frames will ...

Page 17: ... should now be displayed in the Image Output Window 3 2 Viewing a Saved Image Method 1 1 From the Camera Display Window select the file the images were saved to By default this will be the Images file 2 Double click the name of the image you want to view The image will display in the Image Output Window Method 2 1 From the File menu select Load Image Output 2 In the file browser locate the file th...

Page 18: ...Click the button to zoom in on the image or Click the button zoom out on the image 3 5 Moving the Image in the Window You can unlock an image in order to move it around the Image Output Window This feature is useful when viewing areas of an image that has been zoomed in on 1 Open the image you want to move in the Image Output Window 2 Right click on the image and uncheck the Lock on center option ...

Page 19: ...on dropdown box For details see Changing the Camera s CCD Shift Direction Under Binning 5 Select the horizontal binning value from the Horizontal Binning dropdown box For details see Using Horizontal Binning 6 To save the settings to the camera s nonvolatile memory click Save Camera Settings 4 2 Setting the Camera s Sensitivity Mode You can operate the camera in high sensitivity low sensitivity or...

Page 20: ...ard or reverse CCD shift direction or external direction control This accommodates object direction change on a web and allows you to mount the camera upside down To set the camera s readout direction 1 Open the Readout tab in the Camera Configuration Window Under Readout 2 Select the direction to use from the list in the Direction dropdown box 3 To save the settings to the camera s nonvolatile me...

Page 21: ...ettings Notes on Binning For optimal flat field correction you should rerun the flat field correction after changing binning values Changing binning values does not automatically alter gain frame rate generation or other functions of the camera You may however have to re enter the camera s frame rate after changing binning values ...

Page 22: ...QuickCam User s Manual 20 03 032 10187 04 DALSA corp ...

Page 23: ...Rate and Exposure Time 3 Finally if applicable to your exposure mode set the exposure time in the Exposure Time µs text box This option is not available in some exposure modes and is grayed out For details refer to Setting the Camera s Line Rate and Exposure Time Setting the Camera s Exposure Mode You have a choice of operating the camera in one of the multiple exposure modes Depending on your mod...

Page 24: ...r in order to have the camera return the maximum exposure time for the current line rate To set the camera s line rate 1 Open the Exposure GPIO tab in the Camera Configuration Window Under Exposure 2 Enter the line rate to use by sliding the slider or typing the value in the Line Rate Hz textbox 3 To save the settings to the camera s nonvolatile memory click Save Camera Settings This option is ava...

Page 25: ...s 1 Assign a physical camera pin and signal to a GPIO Input number 2 Map the GPIO Input or Output from the Exposure GPIO tab to the corresponding GPIO Look Up Input Configuration 3 Using the LUT programming language map the GPIO Input Configuration to the GPIO Output Configuration The following sections provide details on the LUT control block the LUT programming language and the advanced features...

Page 26: ...er 5 1 8 1 8 1 8 1 Interrupt FIFO TIME 31 0 Q 15 TS_CNT 31 0 GP_CNT 31 0 GPIO_CNT 31 0 LI 7 0 GPIO_IRQ MASK 7 0 GP_CNT 31 0 S D S D Q 17 Q 16 GPIO_OUT 2 TS_TRIG 1 TS_TRIG 2 TS_TRIG 3 Q 17 16 11 10 9 8 7 3 interrupt time mask Q 17 16 11 10 9 8 7 3 Q 17 16 11 10 9 8 7 3 Q 17 16 11 10 9 8 7 3 TS_CNT 31 0 trigger trigger trigger Note that all external inputs from the camera TTL inputs and GPIO control...

Page 27: ...the LUT output assigned to GPIO_OUT 2 GPIO_OUT 3 Direct feedback from the LUT output assigned to GPIO_OUT 3 CAM_CTRL 3 Direct feedback from the LUT output assigned to CAM_CTRL 3 CAM_CTRL 4 Direct feedback from the LUT output assigned to CAM_CTRL 4 RSL_OUT Output from rescaler 0 DEL_OUT Output from delayer 0 GP_CNT_EQ Output of counter 0 Low when the counter s value is lower than or greater than a ...

Page 28: ...e used by one of the following modules Rescaler 0 input Delayer 0 reference signal Counter 0 clear event input Timestamp counter set event input Timestamp counter clear event input PULSE_TRIG2 Q11 Trigger for pulse generator 2 Used only when the pulse generator is in triggered mode If available can be used by one of the following modules Rescaler 0 input Delayer 0 reference signal Counter 0 clear ...

Page 29: ...n be used by one of the following modules Rescaler 0 input Delayer 0 references signal Counter 0 clear event input Timestamp counter set event input Timestamp counter clear event input 6 2 GPIO Control Block Programming Language The GPIO Control Block is programmed using a simple yet very flexible language By default the GPIO Control Block will not generate output signals regardless of the state o...

Page 30: ...ne eol output combined_expression eol eol r n r n n r output Q0 Q1 Q2 Q3 Q4 Q5 Q6 Q7 Q8 Q9 Q10 Q11 Q12 Q13 Q14 Q15 group combined_expression not_group group and expression or expression xor expression combined_expression expression and or xor expression input not_input false true group not_group false 0 false FALSE true 1 true TRUE input I0 I1 I2 I3 I4 I5 I6 I7 not_input input ...

Page 31: ... GPIO With Examples Overview As was mentioned in the introduction of this chapter to configure the GPIO you need to accomplish three main tasks Step 1 The first step is to select and assign the GPIO connector pins and signal type to use for any necessary inputs or outputs ...

Page 32: ...rp Step 2 Next you must map the GPIO input number and signal type set on the Exposure GPIO tab to a GPIO Look Up Table Input Configuration Label Step 3 The final step maps the GPIO Look Up Input Configuration Label to a GPIO Output Configuration Label ...

Page 33: ...LSA corp Example Setting a Simple EXSYNC 1 Assuming you are using a TTL signal assign GPIO Input 0 to Active Operation TTL Pin 1 2 Click Advanced to open the Configuration dialog box 3 In the Configuration dialog box open the Device Features tab ...

Page 34: ...QuickCam User s Manual 32 03 032 10187 04 DALSA corp 4 On the Device Features tab open the GPIO Look Up tree ...

Page 35: ... Input 0 to the Input 0 Configuration label 6 In the LUT Program text box enter the equation to map Input 0 Configuration I0 to Output 4 Q4 where Output Label Input Configuration Label If you refer to the GPIO Output Label table on page 25 you ll see that Output 4 is the LUT label for EXSYNC ...

Page 36: ...per second the signal needs to have a period of 100 ms The desired exposure time is 21 ms First the pulse generator 0 needs to be configured to the correct value In the pulse generator section of the Device Features tab shown in the following figure the following values would be specified Delay 12530 Width 3334 Granularity 209 Periodic TRUE Trigger Mode irrelevant in periodic mode With the pulse g...

Page 37: ...mply needs to be redirected to the camera Here is a short summary of the outputs and inputs that would be used Periodic Pulse Generator 0 I7 Camera Control 1 output Q4 The resulting program would look like this Q4 I7 6 4 GPIO Look Up Table The GPIO Look Up Table tab is used to configure how the QuickCam software handles and redirects inputs and outputs This differs from the signals set on ...

Page 38: ...the Exposure GPIO tab Input 1 Configuration Selects the input associated with the label I1 This should match the input setting for Input 2 on the Exposure GPIO tab Input 2 Configuration Selects the input associated with the label I2 This should match the input setting for Input 3 on the Exposure GPIO tab Input 3 Configuration Selects the input associated with the label I3 This should match the inp...

Page 39: ...ce or SDK functions use the language described in GPIO Control Block Programming Language 6 5 Pulse Generator To configure the Pulse Generator click the Advanced button on the Exposure GPIO tab in the Camera Configuration dialog box and open the Device Features tab The Pulse Generators are located on the Device Features tab The behavior of the Pulse Generator is defined by their delay and width Th...

Page 40: ... at a high level before falling to a low level Delay Indicates the number of cycles also determined by the granularity that the pulse remains at a low level before rising to a high level Granularity Indicates the number of PCI clock cycles that are used for each increment of the delay and width The amount specified in the granularity is multiplied by 30 nanoseconds Trigger Mode Indicates how a tri...

Page 41: ... available regardless of the periodic mode Pulse Frequency Hz Displays the frequency of the pulse generator This value is computed every time the delay width or granularity is modified and is available regardless of the periodic mode Pulse Generator Timing Positive Pulse Generated from a Rising Edge Trigger Trigger Pulse_Out pulse_delay pulse_width Negative Pulse Generated from a Level High Trigge...

Page 42: ... Rescaler To configure the Rescaler click the Advanced button on the Exposure GPIO tab in the Camera Configuration dialog box and open the Device Features tab QuickCam has a rescaler module that can be used to rescale a periodic input signal The signal output is resynchronized based on the rescaler settings The rescaler is defined by the following settings Granularity The granularity is the number...

Page 43: ...lows divider tor multiplica frequencyx input frequency output _ _ Input Selection Indicates which label in the GPIO LUT will be associated with the rescaler Make sure you select an input label that is not being used for its default behavior For example Q9 is used to send a trigger to pulse generator 0 If pulse generator 0 is used in triggered mode then it will be triggered by Q9 and cannot be used...

Page 44: ...t of the rescaler is considered an input for the GPIO LUT The labels for the output from the rescaler in the GPIO Control Block programming languages depend on the LUT input configuration 6 7 Counter To configure the Counter click the Advanced button on the Exposure GPIO tab in the Camera Configuration dialog box and open the Device Features tab QuickCam has general purpose counter module It simpl...

Page 45: ...e LUT It can be one of the following settings Disabled On the rising edge On the falling edge On both edges On the high level On the low level Down Event Same as above but for the down event but uses the Q16 label in the GPIO LUT Clear Event Same as above but for the clear event The clear event input of the counter does not have a predefined label on the GPIO LUT Input ...

Page 46: ...ra The debouncers are associated with the first and second PHYSICAL inputs of QuickCam usually Input 1 and Input 2 The debouncers make sure that their corresponding inputs filter out bouncing effects Bouncing is when there are a few very short pulses when the input signal transitions from low to high Without debouncing QuickCam may see these small pulses as real signals The debouncers make sure th...

Page 47: ...change the values of the GPIO Control Bits of QuickCam The QuickCam protocol and the SDK functions permit up to 16 GPIO Control Bits but only 4 are used at the moment Note that this panel is not meant to be a real time display of the control bits The panel uses an internal timer that reads the actual values from QuickCam ...

Page 48: ...rite These check boxes allow the values of the GPIO Control Bits to be modified GPIO Control Bits Read These read only check boxes represent the actual value that is set on the software controlled GPIO Control Bits GPIO Input Values These read only check boxes represent the actual values from the GPIO connector in GPIO Inputs 1 2 3 and 4 Refer to Configuring the GPIO Pinout for details on how to s...

Page 49: ...iguration Function selection of Output 3 GPIO Synchronization Synchronizes GPIO inputs using either 2 flip flops or 1 flip flop Using one flip flop may cause synchronization glitches so it is recommended that you use two flip flops CC1 Configuration Function selection of the Camera Control Signal 1 CC2 Configuration Function selection of the Camera Control Signal 2 CC3 Configuration Function selec...

Page 50: ... Indicates which label from the GPIO LUT that is associated with the set event input of the timestamp module Make sure you select an input label that is not being used for its default behavior The possible values are 0 Q3 1 Q7 2 Q8 3 Q9 4 Q10 5 Q11 6 Q16 7 Q17 Clear Mode Indicates how the timestamp module handles the clear event The possible values are Disabled On Apply The timestamp count is clea...

Page 51: ...isable interrupts on the Q3 output of the GPIO LUT Q7 Enabled Enable or disable interrupts on the Q7 output of the GPIO LUT Q10 Enabled Enable or disable interrupts on the Q10 output of the GPIO LUT 6 13 Delayer The delayer is used to delay an input signal The output of the delayer is the delayed version of the input signal A delayer is defined by Delay The delay is a value expressed in the number...

Page 52: ...abel in the GPIO Look Up Table Qn This parameter is used to select a label that is not used by another GPIO module The output of the delayer is considered an input for the GPIO Look Up Table The labels for the output from the delayer in the GPIO Control Block programming languages depend on the LUT input configuration ...

Page 53: ...prior to its digitization by an A D converter The digital processing chain contains the FPN correction the PRNU correction the background subtract and the digital gain and offset All of these elements can be set on the Image Processing tab of the Spyder3 GigE Camera Control application Figure 1 Analog and Digital Processing Chain Analog Processing Digital Processing analog video analog gain analog...

Page 54: ...sn t result in artifacts at low light levels due to the offset value 3 Photo Response Non Uniformity PRNU coefficients are used to correct the difference in responsivity of individual pixels i e given the same amount of light different pixels will charge up at different rates and the change in light intensity across the image either because of the light source or due to optical aberrations e g the...

Page 55: ...gion of Interest You can view the region of interest in the Image Output Window To view the region of interest 1 If the camera is currently grabbing images stop grabbing images by clicking the button on the toolbar 2 Open the Calibration tab in the Camera Configuration window Under Region of Interest 3 Enter the region of interest to use in the X1 and X2 text boxes 4 Click Apply 5 On the QuickCam ...

Page 56: ...n and offset separately from other processes Refer to the Processing Chain Description for an explanation on why you would want to use these commands To adjust the analog gain 1 Open the Calibration tab in the Camera Configuration Window 2 Beside Taps to Calibrate select the tap number to adjust either Tap 1 Tap 2 or All Taps 3 Enter the analog gain value s in decibels in the Analog Gain dB text b...

Page 57: ...mory click Save Camera Settings To adjust the analog offset 1 Open the Calibration tab in the Camera Configuration Window 2 Beside Taps to Calibrate select the tap number to adjust either Tap 1 Tap 2 or All Taps 3 Type the value or use the slider to enter the desired digital offset value to use in the Digital Offset DN text box 4 To save the settings to the camera s nonvolatile memory click Save C...

Page 58: ... Open the Calibration tab in the Camera Configuration Window Under Pixel Coefficients 2 Beside FPN Coefficients enter the pixel number to set 3 Enter the FPN coefficients to use in DN in the FPN Coefficient DN text box 4 Click Apply 5 Beside PRNU Coefficients enter the pixel number to set 6 Enter the PRNU coefficients to use in DN in the PRNU Coefficients DN text box 7 Click Apply 8 To save the pi...

Page 59: ...n the default location and use the default extension of scp 5 In the Save in box browse to the location where you want to save the macro 6 Click Save Loading a Camera Calibration Macro You can load a previously recorded camera calibration macro at a later time to repeat the sequence of actions To load a macro 1 On the toolbar click In the Open dialog box 2 In the Look in list click the drive folde...

Page 60: ...QuickCam User s Manual 58 03 032 10187 04 DALSA corp ...

Page 61: ...twork adapter is enabled Your network adapter may not have an IP address Typically when a system is not connected to a network with a DHCP server the network interfaces assign an address to themselves in the form of 169 254 XXX YYY This is called a zeroconf or autoconf IP address For the PC to detect communicate with the IP engine it must reside in the same sub network as the IP engine Moreover th...

Page 62: ...the Pro 1000 Grabber Device driver installation procedure described in DALSA QuickCamÆDocumentationÆDALSA Driver Installation Tool Manual pdf 8 3 My Frame Rate is Lower than Expected Possible Cause 1 Your network adapter is configured to run at 10 100 Mb s instead of 1 Gb s Solution Verify the network adapter settings to ensure it is set to operate at 1 Gb s Possible Cause 2 Your network is not pr...

Page 63: ...ayed on screen Example Error Report 8 5 Troubleshooting Switching Between Video and Test Patterns You can generate a test pattern to aid in system debugging The camera test patterns are useful for verifying camera timing and connections The Ethernet test patterns are useful for testing your Ethernet connection To set the camera s video mode 1 Open the Diagnostics tab in the Camera Configuration Wi...

Page 64: ...er to the Temperature Voltage section on the Diagnostics tab If it is within the proper range the camera returns OK and the voltage value Otherwise the camera returns an error message Verify Temperature To check the internal temperature of the camera refer to the Temperature Voltage section on the Diagnostics tab The camera will shut itself down if the internal temperature exceeds 75 C Verify Sign...

Page 65: ...63 QuickCam User s Manul 03 032 10187 04 DALSA corp ...

Page 66: ...ion window opens with the following default windows You can move and resize these windows as desired To toggle between displaying and hiding a window Click Window Æ Window Name Camera Configuration Window The Camera Configuration Window contains all of the tabs for controlling the camera Figure 2 Camera Configuration Window showing the Calibration Tab ...

Page 67: ...ter reboot the camera operates using the last saved user settings 9 Status Displays the camera s current connection status Name Displays and sets the current camera s name Model No Displays the model number of the currently selected camera This information is useful if you require product support Serial No Displays the serial number of the currently active camera Width Displays and sets the number...

Page 68: ...ontal Binning Displays and sets the camera s horizontal binning value 18 Save User Settings Saves the current settings to the camera s non volatile memory 10 Exposure GPIO Tab The Exposure GPIO tab configures the camera s exposure mode and settings It also configures the GPIO inputs and outputs Command Purpose Reference Page Number Exposure Mode Displays and sets the camera s exposure mode 21 Line...

Page 69: ...67 QuickCam User s Manul 03 032 10187 04 DALSA corp Save Camera Settings Saves the current settings to the camera s non volatile memory 10 ...

Page 70: ...ate Sets which taps to calibrate when performing an analog or digital adjustment 54 Analog Gain dB Displays and sets the camera s analog gain value in decibels You can enter the value directly or use the scroll bar to choose the gain setting 54 Analog Offset DN Displays and sets the camera s analog offset value in digital numbers You can enter the value directly or use the scroll bar to choose the...

Page 71: ... IP Information Displays the camera s IP information 62 Timeouts and Packets Displays timeout and packet information 62 Pixel Coefficients Displays the pixel coefficients for the coefficient set selected from the dropdown list 62 Signal Frequency Displays the signal frequency for the camera control signal selected from the dropdown list 62 Refresh Settings Refreshes the Diagnostics tab and display...

Page 72: ...el coefficients to the pixel coefficient set displayed in the Set Number dropdown box 12 Reset When clicked returns the pixel coefficient set displayed in the Set Number dropdown box to zero 12 Frames to Save Sets the number of frames to save to file It is enabled only when image acquisition is continuous and you are not using the Image Output Window Error Bookmark not defined Save As Invokes the ...

Page 73: ...a list of all command responses from the camera to the Spyder3 GigE Camera Control application History Provides a list of all camera messages Command Provides a list of all commands sent to the camera You can also send ASCII commands through the Command window Refer to your camera s user s manual for a list of the available ASCII commands Error Warning Provides a list of all error or warning messa...

Page 74: ... lists all of the detected cameras on the network You can also load macros XML files acquired images and other associated files for the currently connected camera You can also connect to any camera listed in the Camera Display window by double clicking on the camera name Note deleting images from the Camera Display Window only removes them from this list and will not delete them from where they ar...

Page 75: ...ameter indicates the maximum number of tries including the original command that the underlying communication layer will attempt Answer Timeout Indicates the maximum time in milliseconds that the camera can take to respond to a command from QuickCam First Packet Timeout Indicates the maximum time in milliseconds that the camera can take to send the first packet of image data to the application Whe...

Page 76: ...nect only to a Windows system serial port To avoid asking for changes from camera manufacturers two serial COM ports in the PC can be linked together to share the serial channel to the IP engine Through their linkage data written to one port can be read by the other port and vice versa These linked serial COM ports can be either virtual or physical To set up virtual ports use a virtual serial port...

Page 77: ...n the COM port and the camera Default 57600 Bits Specifies the data size for the COM port Parity Specifies the parity of the serial communication between the COM port and the camera Can be set at None Odd or Even Stop Specifies the number of stop bits for the COM port COM Port Specifies which serial COM port to monitor for activity ...

Page 78: ...mera Load Image Output Opens the selected image file in the Image Output Winow Save Image Output Saves the contents of the Image Output Window as a single TIFF file to the selected location Save Image Frame s Saves the number frames indicated in the Frames to Save dialog box in TIFF format to the selected location Exit Closes the program Configure Menu Commands Language Changes the interface langu...

Page 79: ...ow Opens or hides the Camera Output Window Message Window Opens or hides the Message Window Tool Bar Displays or hides the tool bar buttons Clear Message Window All Clear the output on all message tabs History Clear the output on the History tab Commands Clear the output on the Commands tab Message Clear the output on the Message tab Error Warning Clear the output on the Error Warning tab Restore ...

Page 80: ...ected to the network or Connect or connect currently selected camera Reboot currently selected camera Invoke the flat field correction wizard Begin recording a camera settings macro Load camera settings macro Stop recording camera settings macro Pause camera settings macro Start continuous image grab Snap a single image Display the current region of interest Fit image to window View image actual s...

Page 81: ...79 QuickCam User s Manul 03 032 10187 04 DALSA corp ...

Page 82: ...QuickCam User s Manual 80 03 032 10187 04 DALSA corp ...

Page 83: ...t Settings 11 Detect 9 59 Detecting a Camera 8 Diagnostics Tab 69 Digital 55 Gain 55 Offset 55 Processing 52 Disconnecting a Camera 9 E Enabling and Disabling Coefficients 12 55 Error Report 60 Exposure 22 Modes 21 Time 22 Exposure Control Tab 66 F File 11 12 Loading Settings 12 Save Settings 11 Flat Field Correction 53 Frame Rate Too Low 60 Troubleshooting 60 G gain 51 Gain Analog 54 Digital 55 G...

Page 84: ...Camera 9 Recording a Camera Settings Macro 56 Region of Interest Setting 53 Viewing 53 Rescaler 40 Resetting 12 Pixel Coefficients 12 Resetting Camera 10 Resizing the Image 15 Restoring 11 Camera Settings 11 Running QuickCam 8 S Save Restore Tab 69 Saving 10 11 12 Camera Settings 10 Pixel Coefficients 12 Settings to a Script File 11 Script File 11 12 Loading Settings 12 Saving Settings 11 Sensitiv...

Page 85: ...83 QuickCam User s Manul 03 032 10187 04 DALSA corp Z Zooming In or Out of an Image 16 ...

Reviews: