25
Maintenance
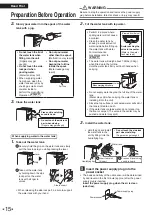
Maintenance
WARNING
• Be sure to stop operation and unplug the power supply plug before performing maintenance. (An electric shock or injury may result)
•
Do not use gasoline, benzine, thinner, polishing powder, paraffin, alcohol, etc. (Cracking, electric shock, and ignition of fire may result)
•
Do not wash the unit with water. (An electric shock and fire or malfunctioning may result)
(Left-
side)
(Front)
(Right-side)
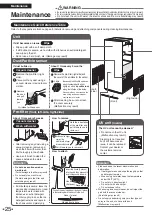
Maintenance Quick Reference Table
Refer to the respective reference pages for details on removing and attaching components during cleaning/maintenance.
Unit
If dirt becomes an issue
Wipe
• Wipe up dirt with a soft damp cloth.
• If dirt buildup is severe, wet a cloth with kitchen-use neutral detergent
and wipe up the dirt.
• Do not use a hard brush, etc. (Damage may result)
Dust/Particle sensor
If dust builds up
Vacuum cleaner
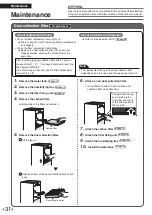
1
Remove the pre-filter (right-
side).
2 Vacuum off any dust using a
vacuum cleaner crevice tool or
similar.
About 1 time every 3 months
Wipe
1
Remove the pre-filter (right-side) and
the cover of the air intake for the sensor.
2
Because it is difficult to see even
when illuminated with a light,
lightly rub with a
dry cotton swab
along the left-side of the inside.
Vacuum off any dust around the
area using a vacuum cleaner
crevice tool or similar.
Lens
3
After cleaning, be sure to attach
the cover securely.
(Malfunction may result)
1
Remove
the hook
and pull
toward
you
Air intake for the sensor
Pre-filter
(front, left-side, right-side)
About 1 time every 2 weeks
Vacuum cleaner
Wash with water
• After removing any dust using a
vacuum cleaner, remove and
wash the filter with water, then
dry thoroughly in the shade.
• Use a soft brush to clean the
spaces between the slats.
Attention
•
Do not use a cotton swab or
hard brush.
(Partial damage to the filter may result)
• Do not apply too much force.
(Partial damage to the filter and
scratching may result)
How to remove
2 Pull it toward you to remove it.
1 Hold down the upper
center of the
pre-filter with a finger
to release the hooks.
Hold the indentation
of the pre-filter and
pull it toward you to
remove it.
How to attach
Insert the hooks (2 places)
into the unit, then press until
a catching sound is heard.
Hooks
(2 places)
Push all the way in and insert the hook (1 place)
in the center upward to attach it to the unit.
Hook (1 place)
Viewed from above
Reverse side
• If dirt buildup is severe, leave the
part soaking in lukewarm or room
temperature water mixed with
kitchen-use neutral detergent,
then thoroughly rinse so that no
detergent remains and leave in
the shade until completely dry.
UV unit
(inside)
The UV unit cannot be cleaned.*
• Do not touch the UV unit.
(Malfunction may result)
* Cleaning is not required,
but if dirt becomes an
issue, it can be replaced.
Contact your dealer or
the customer service
center.
Attention
• Please observe to prevent discoloration and
deformation.
• If detergent was used, wipe thoroughly so that
no detergent remains.
• When using hot water, keep the temperature
below 104ºF (40ºC).
• Do not dry in direct sunlight.
• Do not dry with a hairdryer.
•
Do not expose to fire.
• When using a vacuum cleaner, do not impact the
part with the vacuum cleaner.
(Scratching may result)
• Do not apply deodorizing spray or other types of
spray to the unit, or use near the unit.
(Malfunction may result)
01_EN_3P672685-2A.indd 25
2021/12/13 13:56:04
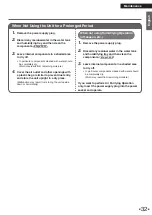
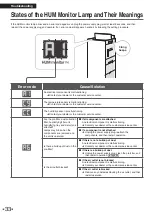
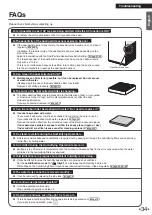
Summary of Contents for MCKB70YSAU
Page 2: ...1...

