background image

14

English

Read First

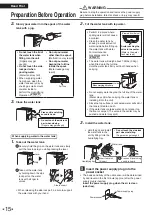
3. 

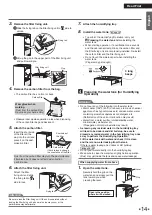
Remove the filter fixing unit.

1

 Slide the fixing tab on the filter fixing unit to 

 side to 

unlock.

Fixing tab

2

 Lift up the grip in the upper part of the filter fixing unit 

and pull toward you.

Grip

Filter fixing unit

4. 

Remove the carbon filter from the bag.

• 

The carbon filter has no front or back.

Carbon filter

Wear gloves when 

working. 

(Dust from the carbon filter 

may make your hands dirty.)

•  Observe local waste separation rules when disposing 

of the carbon filter bag and desiccant.

5. 

Attach the carbon filter.

Insert the short-side 

of the filter all the 

way into the unit and 
place it on the dust 

collection filter.

Carbon filter

Short-side of 

the filter

If hard to insert, change 

the orientation of the filter.

Dust from the carbon filter may turn the dust collection 
filter black, but it does not affect dust collection 

performance.

6. 

Attach the filter fixing unit.

Attach the filter 
fixing unit and slide 
the fixing tab to 


side to lock.

Fixing tab

Attention

Be sure to lock the filter fixing unit. If the unit is operated without 
locking the filter fixing unit, abnormal noise may occur or the 

performance may deteriorate.

7. 

Attach the humidifying tray.

8. 

Install the water tank. 


Page 15

•  To perform the Humidifying Operation, carry out 

4

 Preparing the water tank

 before installing the 

water tank.

• 

When starting operation, if a notification tone sounds 
and the odor sensor lamp blinks, the carbon filter and 
the filter fixing unit are not properly installed. Re-install 
the carbon filter and the filter fixing unit.

•  Do not touch the side lock part when installing the 

water tank. 
(Fingers may get caught)

3 long 

beeps

4

  Preparing the water tank (for Humidifying 

Operation)

Attention

•  Do not pour any of the following into the water tank.

•  Warm water (104ºF (40ºC) or above), aroma oil, chemical 

agents such as hypochlorous acid, unclean water, water 
containing aromatic substances or detergent, etc. 
(Deformation of the unit or malfunction may result)

• 

Water from a water purifier, ionized alkaline water, 

mineral water, well-water etc. 
(Propagation of mold or bacteria may result)

• 

As leaving any residual water in the humidifying tray 

will lead to bad odors and dirt build-up, be sure to 

discard any residual water in the humidifying tray once 

a day to perform the Humidifying Operation. 

Fill the water tank with water and check if it is clean 

and there is no water leaking from the tank.


If there is water leakage, bad odors or dirt build-up 


Page 26, 28

•  Do not pour water directly into the humidifying tray.
•  Make sure to close the water tank tightly before operation. 

(Dust may get inside the tank and cause water leakage)


When supplying water from above

1. 

Open the water tank.

Securely hold the grip on the 
water tank and slowly pull the 
tank toward you while 
pressing the lever.

Grip

Lever

Open to the position 

where it will be locked.

01_EN_3P672685-2A.indd   14

2021/12/13   13:55:55

Summary of Contents for MCKB70YSAU

Page 1: ...fying air purifier Please read the operation manual carefully and follow it for correct use Please read the Safety Precautions section before use Please keep the operation manual in a safe place for l...

Page 2: ...1...
Page 3: ...t Particle Sensor Sensitivity Setting 21 Monitoring mode within AUTO Operation and ECONO MODE 21 Airflow rate range for AUTO FAN 21 Humidifying Filter Drying Operation 23 Airflow rate set to Quiet whe...

Page 4: ...ced by the manufacturer its service agent or a similar qualified person in order to avoid a hazard Electric shock short circuit or fire may result from use while damage Do not operate this appliance w...

Page 5: ...ely dispose of the packing materials Packing materials such as nails and other metal or wooden parts may cause cuts or other injuries Tear apart and throw away plastic packaging bags so that children...

Page 6: ...During use Small children or immobile persons due to illness or injury should not operate the unit by themselves This appliance is not intended for use by persons including children with reduced physi...

Page 7: ...ormalities Once a day fill the water tank with water Check that the water tank is clean and there is no water leaking from the tank If water leaks household items may get wet and electric shock and el...

Page 8: ...to outdoor air e g near windows etc or direct airflow from air conditioners etc Room humidity may not be detected and indicated correctly Positions near combustion based heating devices and other high...

Page 9: ...Dust Particle sensor Inside the air inlet right side Page 9 21 22 25 34 Air inlets Front Side UV unit Inside the unit Humidifying tray Grip is below Back Model name Production no Power supply plug Po...

Page 10: ...tion filter needs to be replaced and blinks when it is time to replace the dust collection filter Operating Indicator panel Dust Particle sensor lamp Indicates the volume of dust in 3 colors blue oran...

Page 11: ...heir meanings Page 33 Odor sensor lamp Indicates the intensity of odors in 3 colors blue orange red Blue indicates that the air is clean Blue Orange Red Low High Lamp color Odors If operation is start...

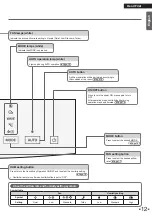
Page 12: ...etting lamps white Indicate the humidity setting in 3 levels Low Standard High Humidifier lamp white Lights up during Humidifying Operation Slowly blinks during humidifying filter drying operation Pag...

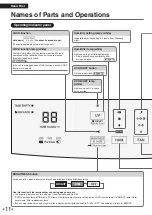
Page 13: ...TO operation Page 16 AUTO button Optimum operation will be performed according to the condition of the room Page 16 ON OFF button Press to turn the power ON press again to turn OFF After operation sto...

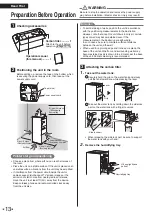
Page 14: ...noise from nearby radios or stereos move the unit to at least 7ft 2m away from the device Keep cordless phones and radio controlled clocks away from the unit also Attention To avoid staining of walls...

Page 15: ...nk When starting operation if a notification tone sounds and the odor sensor lamp blinks the carbon filter and the filter fixing unit are not properly installed Re install the carbon filter and the fi...

Page 16: ...er tank with tap water Perform in a place where spilling water will not cause a problem Clean the water tank by shaking a small amount of water inside before filling up the water tank with water For m...

Page 17: ...er Low Standard or High Monitoring mode Blinking About AUTO operation The unit automatically switches between Air Purifying Operation and Humidifying Operation based on the indoor temperature and humi...

Page 18: ...e the unit is set to carry out Air Purifying Operation in AUTO FAN MODE If the power supply plug is unplugged or the unit is stopped and started again the operation that was in progress last time will...

Page 19: ...a rough estimate Standard Operation is carried out automatically with a humidity of 50 as a rough estimate High Operation is carried out automatically with a humidity of 60 as a rough estimate Dependi...

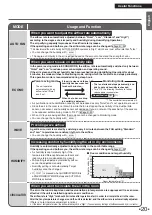
Page 20: ...of UV rays the emission of UV rays stops and the UV ON OFF lamp is turned off The UV emission is repeated approx 30 minutes every 90 minutes approx after the UV emission is stopped The setting return...

Page 21: ...drawn in while the fan is stopped the sensitivity of the dust particle sensor odor sensor and humidity sensor will decrease If you do not want the sensitivity of the sensors to be reduced set Monitor...

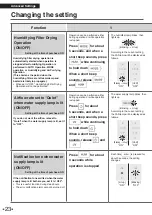
Page 22: ...med Operation can be performed either during operation or while operation is stopped Press for about 5 seconds and when a short beep sounds press while continuing to hold down When a short beep sounds...

Page 23: ...hange the setting Each press cycles between ON and OFF Lit up ON Unlit OFF Press A short beep sounds the Humidity setting lamps Low blinks and the ECONO MODE lamp changes to the following display acco...

Page 24: ...ws Blinking Lit up ON Unlit OFF Airflow rate set to Quiet when water supply lamp is lit ON OFF Setting at the time of purchase ON If you do not want the airflow rate set to Quiet when the water supply...

Page 25: ...mode The settings will be remembered even if the power supply plug is removed Press to change the setting Each press cycles between ON and OFF Lit up ON Unlit OFF Press A short beep sounds the water...

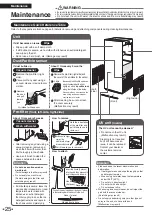
Page 26: ...emoving any dust using a vacuum cleaner remove and wash the filter with water then dry thoroughly in the shade Use a soft brush to clean the spaces between the slats Attention Do not use a cotton swab...

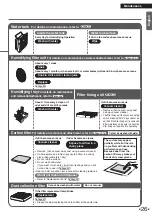
Page 27: ...ixing unit is removed After maintenance be sure to attach the filter fixing unit again before operating Carbon filter For details on removal and attachment refer to Page 13 14 Cannot be washed with wa...

Page 28: ...r a while about 30 seconds and check that there is no water leakage from the bottom of the tank Water leakage may result if dust is caught The inside of the water tank can be cleaned by removing the l...

Page 29: ...lfunction may result 2 Install the water tank Page 15 Humidifying tray Wash with water Wash with water about 1 time every 3 days or if odor and dirt are still an issue Use a soft cloth brush or cotton...

Page 30: ...results it is not a problem for use The parts can be used even if still wet after cleaning If not to be used for a prolonged period leave the parts in a shaded area to dry off thoroughly then attach...

Page 31: ...g filter Water leakage may result if not correctly attached Securely slide it under filter retainers 6 places Protrusions 6 places The illustration shows the frame lower half Combination of frame and...

Page 32: ...lamp will turn off About purchase and disposal Refer to Replacement Parts Page 40 Note The replacement timing of the dust collection filter depends on how it is used and the usage environment 1 Remov...

Page 33: ...tic bag or similar to prevent dust entry and store the unit upright in a dry place Malfunction may result from storing the unit upside down or horizontally When not using Humidifying Operation off sea...

Page 34: ...midifying tray and water tank attached Lamps may blink when the components are removed and the unit is operated If all components are attached An electrical component is malfunctioning Contact your de...

Page 35: ...hed with water Do I need to replace it A It cannot be washed with water If you wash it with water it will lose its shape and you will not be able to use it If you inadvertently washed it with water re...

Page 36: ...ashing on the humidifying filters Whistling and fluttering sound during operation Is there a buildup of dust on the pre filter Clean it Page 25 Is the dust collection filter clogged up Depending on us...

Page 37: ...Page 10 If you remove the power supply plug when the air is clean odor free wait at least 5 seconds then reinsert the power supply plug and start operation the reference odor level that determines the...

Page 38: ...customer service center The airflow rate cannot be adjusted Is the odor sensor lamp blinking Attach the carbon filter and filter fixing unit properly Page 14 Humidifying function Phenomenon Check poi...

Page 39: ...but Humidifying Operation does not stop the humidifying filter unit continues to rotate Even if the water supply lamp lights up the humidifying filter unit will continue to rotate for about 90 minute...

Page 40: ...ed Is humidifying filter drying operation set to OFF Page 23 24 There is water spilled on the floor Have you tilted the unit If you tilt the unit water may spill out Before moving the unit turn off th...

Page 41: ...n the water tank is filled while installed in the unit If the water tank is removed from the unit before filling the water tank volume is 0 66 gallons 2 5 liters in order to make carrying easier Repla...

Page 42: ...TE This equipment has been tested and found to comply with the limits for a Class B digital device pursuant to part 15 of the FCC Rules These limits are designed to provide reasonable protection again...

Reviews: