background image

8. 

Press 

 or 

 to select the desired temperature.

Note:

 The set temperature for the weekly timer is displayed only 

when setting the weekly timer mode.

 INFORMATION

The temperature can be set between 18~30°C.

9. 

Press 

Result:

 Temperature and time are set in ON timer. Time is 

set in OFF timer. Timer lamp lights orange. 

Result:

 New reservation screen will appear.

10. 

Repeat the previous procedure to set another reservation 
or press 

 to complete the setting.

11. 

Press 

 to complete the setting.

Result:


 is displayed on the LCD.

Note:

 A reservation can be copied with same setting to another day.

Refer to “4-6-2 To copy reservations” on page 13.

4-6-2  To copy reservations

A reservation can be copied to another day. The complete 
reservation of the selected day of the week will be copied.

1. 

Press 

.

2. 

Press 

 or 

 to select the day of the week to be copied.
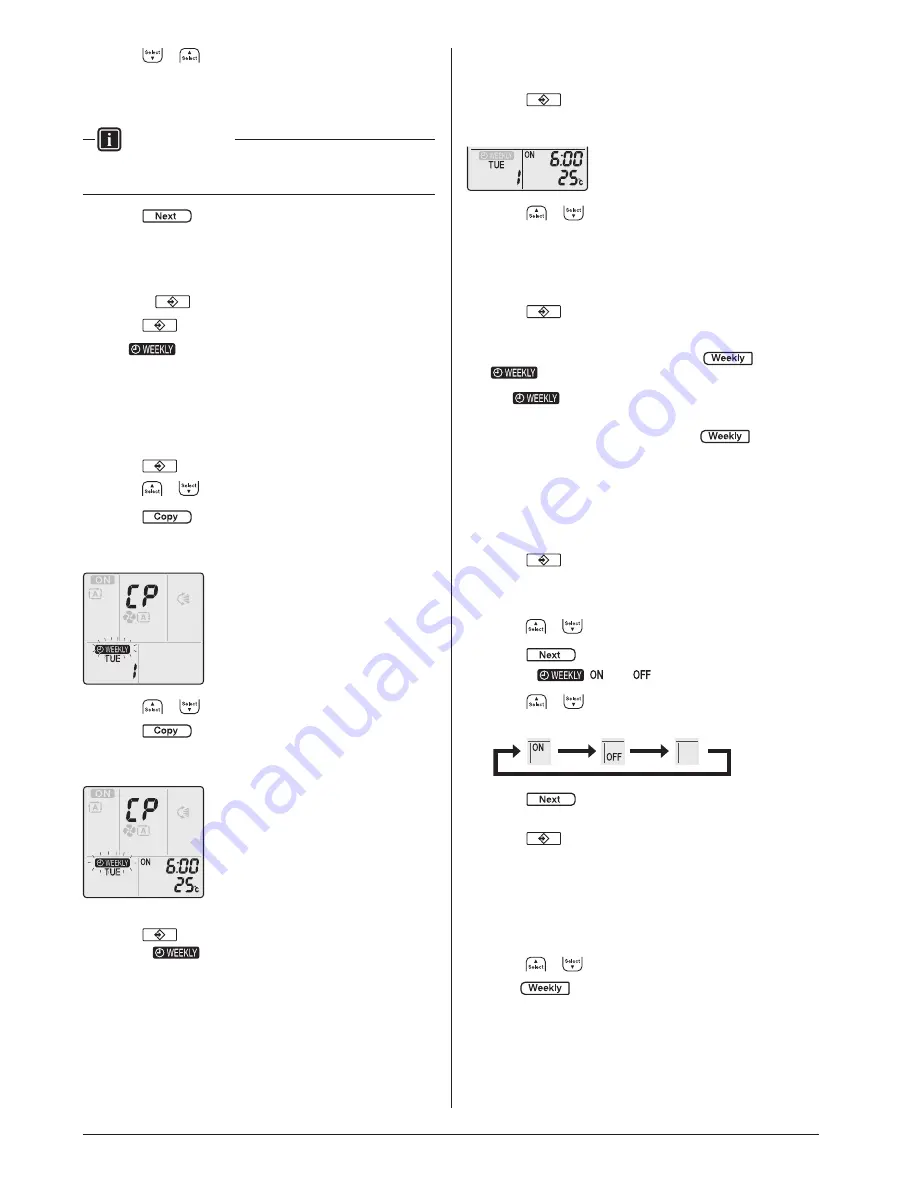
3. 

Press 

Result:

 The reservation of the selected day of the week 

will be copied.

4. 

Press 

 or 

 to select the destination day.

5. 

Press 

.

Result:

 The whole reservation is copied to the selected day and 

the timer lamp lights orange.

Note:

 To copy to another day, repeat the procedure.

6. 

Press 

 to complete the setting. 

Result:


 is displayed on the LCD.

Note:

 To change the reservation setting after copying, refer to 

“4-6-1 To set Weekly timer operation” on page 12.

4-6-3 

To confirm reservations

You can confirm if all reservations are set to your needs.

1. 

Press 

Result:

 The day of the week and the reservation number 

of the current day are displayed.

2. 

Press 

 or 

 to select the day of the week and 

reservation number to be confirmed and check the 

reservation details.

Note:

 To change the reservation setting, refer to “4-6-1 To set 

Weekly timer operation” on page 12.

3. 

Press 

 to exit the confirmation mode.

4-6-4  To deactivate and reactivate Weekly timer operation

1. 

To deactivate the Weekly timer, press 

 while 

 is displayed on the LCD.

Result:


 disappears from the LCD and the timer lamp 

goes off.

2. 

To reactivate the Weekly timer, press 

 again.

Result:

 The last set reservation mode will be used.

4-6-5  To delete reservations

To delete individual reservations

Use this function if you want to delete a single reservation setting.

1. 

Press 

Result:

 The day of the week and the reservation number 

are displayed.

2. 

Press 

 or 

 to select the day of the week to be deleted.

3. 

Press 

Result:


,  , and 

 blink.

4. 

Press 

 or 

 and select “blank”.


Result:

 The setting will change as follows:

5. 

Press 

Result:

 The selected reservation is deleted.

6. 

Press 

 to exit.

Result:

 Remaining reservations will be active.

To delete a reservation for each day of the week

Use this function of you want to delete all reservation settings 

for one day of the week. This can be used in confirmation or 

setting mode.

1. 

Press 

 or 

 to select the day of the week to be deleted.

2. 

Hold 

 for about 5 seconds.

Result:

 All reservations for the selected day will be deleted.

13 

01_EN_3P524249-1.indd   13

6/12/2018   1:47:38 PM

Summary of Contents for FTXJ25TVMAK

Page 1: ...round comfort Enjoy year round comfort Enjoy year round comfort Enjoy year round comfort DAIKIN ROOM AIR CONDITIONER OPERATION MANUAL MODELS FTXJ25TVMAW FTXJ35TVMAW FTXJ50TVMAW FTXJ60TVMAW FTXJ25TVMAK...

Page 2: ...t panel 17 6 4 To open the front panel 17 6 5 About the air filters 17 6 6 To clean the air filters 18 6 7 To clean the titanium apatite deodorising filter 18 6 8 To close the front panel 18 6 9 To re...

Page 3: ...ty pipe lightning conductor or telephone earth lead Imperfect earthing may result in electric shock CAUTION Do not use the air conditioner for purposes other than those for which it is intended Do not...

Page 4: ...e Front panel f Service lid g Intelligent eye sensor h Display i Room temperature and humidity sensor j ON OFF button and operation lamp green k Signal receiver l Timer lamp orange m Intelligent eye l...

Page 5: ...n is active Operation mode Automatic Operation mode Drying Operation mode Heating Operation mode Cooling Operation mode Fan only Powerful operation is active Econo operation is active Outdoor unit qui...

Page 6: ...esulting in battery leakage rupturing or heating Do not damage or peel off labels on the batteries 1 Slide the front cover to take it off 2 Insert 2 dry batteries AAA LR03 alkaline 3 Replace the front...

Page 7: ...indoor unit position to avoid direct airflow to walls 1 Press for at least 2 seconds Result The menu appears on the display 2 Press or to change the menu to Result The menu appears on the display blin...

Page 8: ...a room without heating or cooling Decrease the humidity in a room What The system operates differently depending on the user selection Setting Description Automatic The system cools down or heats up a...

Page 9: ...up and down swing setting a b a Flap range in cooling or drying operation b Flap range in heating or fan only operation To adjust vertical airflow direction 1 Press Result appears on the LCD The flaps...

Page 10: ...tically returns to the default screen after 60 seconds To return to the default screen sooner press twice Intelligent eye operation The system detects movement in the room and automatically adjusts th...

Page 11: ...he outdoor unit by limiting the rotation speed of the compressor If power consumption is already low Econo operation will NOT further reduce power consumption Outdoor unit quiet operation Use Outdoor...

Page 12: ...o stop operation press Result and disappear from the LCD and the timer lamp goes off and the day of the week are displayed on the LCD INFORMATION When you set the ON OFF timer the time setting is stor...

Page 13: ...ock on page 5 INFORMATION Weekly timer and ON OFF timer operation CANNOT be used at the same time The ON OFF timer operation takes priority Weekly timer will be in standby disappears from the LCD When...

Page 14: ...ons You can confirm if all reservations are set to your needs 1 Press Result The day of the week and the reservation number of the current day are displayed 2 Press or to select the day of the week an...

Page 15: ...To install the Daikin Mobile Controller application 1 Open Google Play for appliances using Android App Store for appliances using iOS 2 Search for Daikin Mobile Controller 3 Follow the directions on...

Page 16: ...he screen 7 Connect your smartphone to the home network To reset the connection setting to the factory default Reset the connection setting to the factory default in case you want to switch between th...

Page 17: ...the unit consumes electricity Before restarting the unit turn on the main power supply switch 6 hours before operation to ensure smooth running Condensation may form if the humidity is above 80 or if...

Page 18: ...els off DANGER RISK OF ELECTROCUTION Before cleaning be sure to stop the operation turn the circuit breaker off or pull out the supply cord Otherwise an electric shock and injury may result 1 Clean wi...

Page 19: ...te deodorising filter INFORMATION Clean the filter with water every 6 months 1 Remove the dust from the filter with a vacuum cleaner INFORMATION Replace the filter every 3 years Dispose of the old fil...

Page 20: ...ance performed by a specialist For specialist maintenance contact your dealer Maintenance costs shall be borne by the user In certain operating conditions the inside of the unit may get dirty after se...

Page 21: ...lfunction Measure The system operates but heating is insufficient air is NOT blown from the unit To prevent the release of cold air air does not come out directly after operation is started Please wai...

Page 22: ...flaps louvres or front panel correct their positions at the beginning or end of operation or while operation is stopped It is the sound of the flaps louvres or front panel moving 7 1 9 Symptom White m...

Page 23: ...http www daikinthai com dmobile index html for more information and FAQ Problem Measure Connection to the WLAN adapter is not possible none of the LEDs are blinking Try operating the unit with the re...

Page 24: ...3P524249 1 M17B306 1806 HT The two dimensional bar code is a manufacturing code...

Reviews: