4
REFRIGERANT PIPING WORK
For refrigerant piping of outdoor unit, refer to the installation
manual supplied with the outdoor unit.
Before rigging tubes, check which type of refrigerant is used.
All field piping must be provided by a licensed refrigeration
technician and must comply with the relevant local and
national codes.
•
Use a pipe cutter and flare suitable for the used refrigerant.
•
If R407C refrigerant is used, apply ether oil or ester oil around
the flare portions before connecting.
•
To prevent dust, moisture or other foreign matter from
infiltrating the tube, either pinch the end, or cover it with tape.
•
The outdoor unit is charged with refrigerant.
•
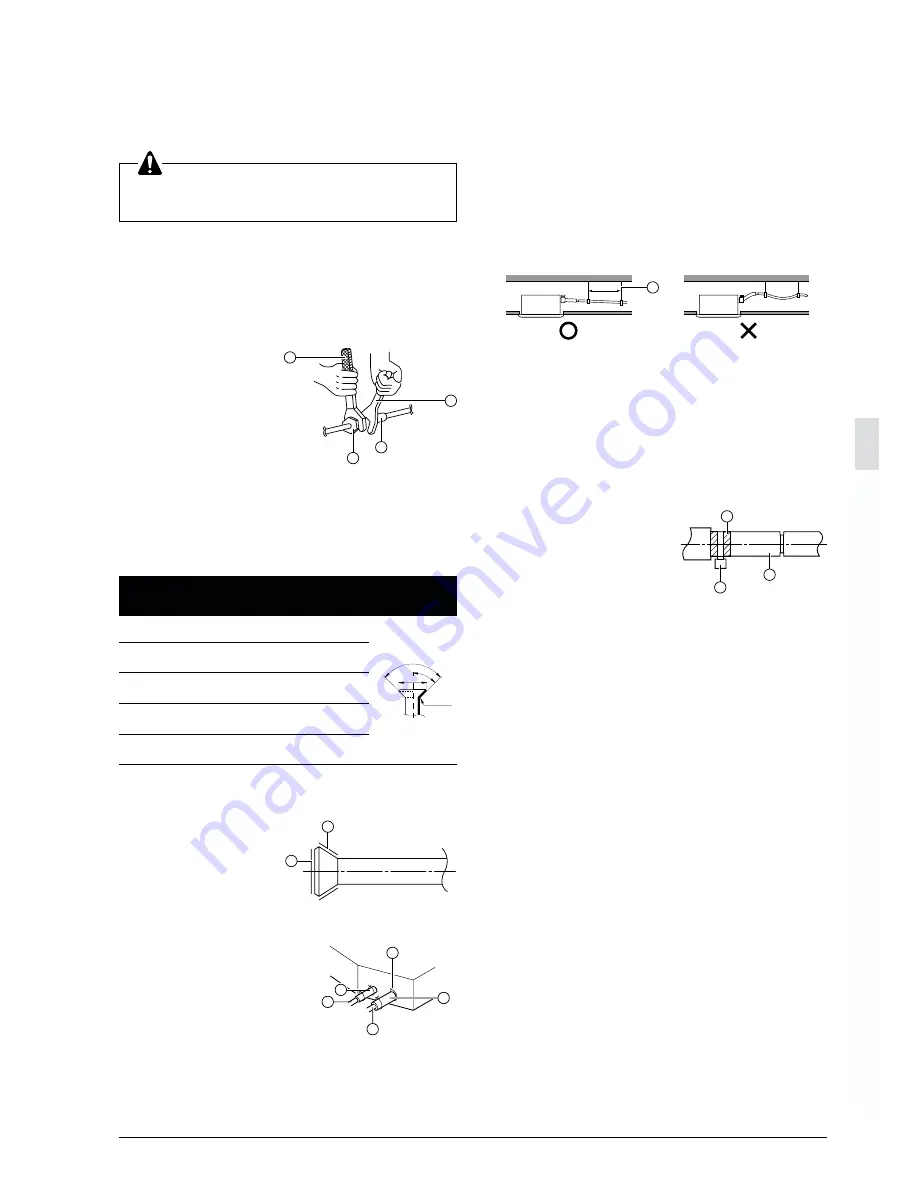
Be sure to use both a spanner and torque wrench together when
connecting or disconnecting pipes to/from the unit.
1
Torque wrench
2
Spanner
3
Piping union
4
Flare nut
•
Do not mix anything other than the specified refrigerant, such
as air, etc.., inside the refrigerant circuit.
•
Refer to Table 1 for the dimensions of flare nut spaces and
the appropriate tightening torque. (Overtightening may
damage the flare and cause leaks.)
Table 1
Pipe gauge
Tightening torque
Flare dimension A
Flare shape
(mm)
Ø 6.4
1420~1720 N•cm
8.3~8.7
(144~176 kgf•cm)
Ø 9.5
3270~3990 N•cm
12.0~12.4
(333~407 kgf•cm)
Ø 12.7
4950~6030 N•cm
15.4~15.8
(504~616 kgf•cm)
Ø 15.9
6180~7540 N•cm
18.6~19.0
(630~770 kgf•cm)
Ø 19.1
9720~11860 N•cm
22.9~23.3
(990~1210 kgf•cm)
•
When connecting the flare nut, coat the flare both inside and
outside with refrigerating machine oil and initially tighten by
hand 3 or 4 turns before tightening firmly.
1
Coat here with refrigerating
machine oil
• Check the pipe connector for gas leaks, then insulate it as
shown in the figure below.
1
Liquid pipe
2
Gas pipe
3
Insulation for fitting of liquid line
(supplied with the unit)
4
Insulation for fitting of gas line
(supplied with the unit)
5
Clamps (use 2 clamps
per insulation)
•
If the refrigerant gas leaks during the work, ventilate the area.
A toxic gas is emitted by the refrigerant gas being exposed to
a fire.
•
Finally make sure there is no refrigerant gas leak. A toxic gas
may be released by the refrigerant gas leaking indoor and
being exposed to flames from an area heater, cooking stove,
etc.
DRAIN PIPING WORK
Rig the drain piping as shown in figure and take measures
against condensation. Improperly rigged piping could lead to
leaks and eventually wet furniture and belongings.
1
Hanging bar
1. Install the drain pipes.
•
Keep piping as short as possible and slope it downwards
so that air may not remain trapped inside the pipe.
•
Keep pipe size equal to or greater than that of the
connecting pipe (Vinyl pipe of 25mm nominal diameter and
32mm outer diameter).
•
Insert the supplied drain hose into the drain socket, up to
the white tape.
•
Tighten the clamp until the screw head is less then 4mm
from the hose.
1
Clamp metal
(supplied with the unit)
2
Drain hose
(supplied with the unit)
3
White tape (field supply)
•
Insulate the drain piping inside the building.
•
If the drain hose cannot be sufficiently set on a slope, fit
the hose with drain raising piping (field supply).
HOW TO PERFORM PIPING (see figure 8)
1
Ceiling slab
2
Hanger bracket
3
Adjustable range
4
Drain raising pipe
5
Drain hose (supplied with the unit)
6
Clamp metal (supplied with the unit)
1 Connect the drain hose to the drain raising pipes, and insulate
them.
2 Connect the drain hose to the drain outlet on the indoor unit,
and tighten it with the clamp.
PRECAUTIONS
•
Instal the drain raising pipes at a height of less than 550mm.
•
Install the drain raising pipes at a right angle to the indoor unit
and no more than 300mm from the unit.
1
1-1.5m
2
1
3
5
4
2
1
3
R0.4~0.8
45
° ±
2
90
°±
0.5
A
2
3
1
4
1
1


