Daikin Altherma 3 R F, Installation Manual
The Daikin Altherma 3 R F is a cutting-edge heating system that provides energy-efficient climate control for homes. To ensure a hassle-free installation, we offer a comprehensive Installation Manual. Download this manual for free at manualshive.com, and equip yourself with all the necessary instructions to optimize your Altherma system's performance.
Share
Download


Reviews:
No comments
Related manuals for Altherma 3 R F

EVOLUTION Series
Brand: C&H Pages: 39

DAC10059
Brand: Danby Pages: 26

AC02AMV1
Brand: Vax Pages: 16

DAFU-1000
Brand: Daikin Pages: 15

RR20AVAK9
Brand: Daikin Pages: 72

BA-DME012-E
Brand: Parker Pages: 148

CleanSeal V3
Brand: Camfil Pages: 63

Maestro Smart
Brand: Olimpia splendid Pages: 40

PCRPH1308
Brand: Daikin Pages: 10

HCF RTL G 14
Brand: Lennox Pages: 44

FTX09WMVJU9
Brand: Daikin Pages: 34

VRV III REMQ72PBYD
Brand: Daikin Pages: 130

CW-C180ES
Brand: Panasonic Pages: 23

CW-A90VE
Brand: Panasonic Pages: 21

CW-C180EN
Brand: Panasonic Pages: 36

CW-2005SU
Brand: Panasonic Pages: 20

C18ABZ1VF
Brand: Fedders Pages: 8
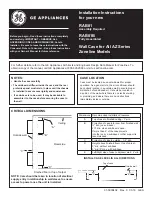
RAB81
Brand: GE Pages: 8


