background image

―13― 

6. CONNECTION PROCEDURE (continued) 


6.4 Connection of the Gas Hose 


WARNING 


● 

You  may  suffer  from  danger  of  suffocation  caused  by  lack  of  oxygen  when 

shield  gas  keeps  drifting  in  a  closed  place.  Be  sure  to  turn  off  the  shield  gas 

at the main when the welding power source is not in use. 


WARNING 

● 

Be  sure  to  connect  the  gas  hose  after  fixing  to  the  stand,  as  physical  injuries  may  result 

from falling down of gas cylinder. 

● 

Attach a proper gas regulator to the gas cylinder. Failure to observe the demand may result 

in physical injuries. The gas regulator for high pressure gas must be used.


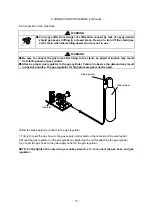
Follow the steps below to connect to the gas regulator. 


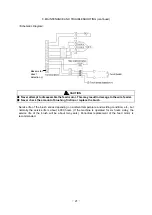
1. Firmly connect the gas hose to the gas supply inlet located on the rear side of the wire feeder. 

2. Mount the gas regulator on the gas cylinder by tightening the nut for attaching the gas cylinder .   

3. Connect the gas hose to the gas supply outlet on the gas regulator. 


NOTE:  Firmly  tighten  the  nuts  using  a  monkey  wrench,  etc.  to  connect  the  gas  hose  and  gas 

regulator. 

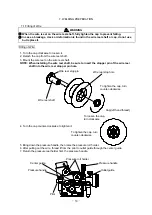
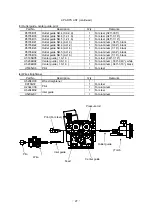
Gas cylinder 

Gas regulator 

Gas inlet 

 13

Summary of Contents for OTC CM-741U

Page 1: ...stalling operating or maintaining this equipment This equipment and this manual are for use only by persons trained and experienced in the safety operation of welding equipment Do not allow untrained persons to install operate or maintain this equipment Contact your distributor if you do not fully understand this manual DAIHEN Corporation WELDING PRODUCTS DIVISION June22 2011 Upon contact advise M...

Page 2: ...tarting on January 1 1995 Please make sure that this product is not allowed to bring into the EU after January 1 1995 as it is The same restriction is also applied to any country which has signed the EEA accord Please ask us before attempting to relocate or resell this product to or in any EU member country or any other country which has signed the EEA accord ...

Page 3: ...G SAFETY PRECAUTIONS 2 3 CHECKING OF QUANTITY OF THE ACCESSORIES 8 4 NAME OF PARTS 8 5 CARRYING AND INSTALLING OF THE WIRE FEEDER 9 6 CONNECTION PROCEDURE 11 7 WELDING PREPARATION 14 8 MAINTENANCE AND TROUBLESHOOTING 20 9 PARTS LIST 22 10 SPECIFICATIONS 30 1 ...

Page 4: ...ELDING can be hazardous 1 PROTECT YOURSELF AND OTHERS FROM POSSIBLE SERIOUS INJURY OR DEATH Be sure to Keep children away Keep pacemaker wearers away until consulting a doctor 2 Read and understand the summarized safety information given below and the original principal information that will be found in the PRINCIPAL SAFETY STANDARDS 3 Have only trained and experienced persons perform installation...

Page 5: ...urely in place 7 Do not use worn damaged undersized or poorly spliced cables 8 Do not touch electrodes or any metal object if POWER switch is ON 9 Do not wrap cables around your body 10 Turn off POWER switch when not in use 11 Remove dust by blowing moisture free compressed air on each part periodically ARC RAYS can burn eyes and skin FLYING SPARKS AND HOT METAL can cause injury NOISE can damage h...

Page 6: ...wire at contact tip when not in use 10 Do not use the welding power source for anything other than arc welding 11 Wear oil free protective garments such as leather gloves a heavy shirt cuffless trousers boots and a cap 12 A loose cable connection can cause sparks and excessive heating 13 Tighten all cable connections 14 When there is an electrical connection between a work piece and the frame of w...

Page 7: ...AFETY STANDARDS 7 Turn face away from valve outlet when opening cylinder valve 8 Keep protective cap in place over valve except when gas cylinder is in use or connected for use 9 Do not disassemble or repair the gas regulator except if you are authorized by the manufacturer WARNING Do not alter or remodel our products You may get injured or have your equipment damaged because of fire failure or ma...

Page 8: ... and wire feeder solidly on a flat surface 3 Do not pull the welding power source across a floor laid with cables and hoses 4 Do not put wire feeder on the welding power source 5 Do not put the welding power source or wire feeder where they will pit or fall WELDING WIRE can cause puncture wounds 1 Do not press the gun trigger until instructed to do so 2 Do not point the gun toward any part of the ...

Page 9: ...ices for the Preparation for Welding and Cutting of Containers That Have Held Hazardous Substances American Welding Society Standard AWS F4 1 from American Welding Society National Electrical Code NFPA Standard 70 from National Fire Protection Association Safe Handling of Compressed Gases in Cylinders CGA Pamphlet P 1 from Compressed Gas Association Code for Safety in Welding and Cutting CSA Stand...

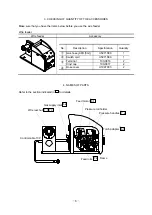
Page 10: ...PARTS Refer to the section indicated in for details No Description Specification Quantity Gas hose 9 8ft 3m U5971R00 1 Switch cord U5971S00 1 Terminal 100 0816 2 Vinyl cap 100 0817 2 Hose cover U1997C03 2 Pressure handles Wire reel hub Frame Torch adapter Feed rolls Control cable 10P Feed motor Pressure roll holder 6 3 7 2 7 2 8 1 Gas supply inlet 6 4 7 1 7 3 8 ...

Page 11: ... mask or weld at a partial exhaust facility approved by the local regulation Adequately ventilate or wear a gas mask when using the welding machine in a tank a boiler a hold of a ship because heavier gas such as carbon dioxide or argon gases are drifting there When using the welding machine at a narrow space comply with a trained supervisor s directions And be sure to wear a gas mask Do not operat...

Page 12: ... optional bracket of part number U30022Z00 Do not hang the wire feeder using the handle of the wire feeder as shown in the diagram below Do not install or hang the wire feeder in a posture resulting in falling of the reel as shown in the diagram below When installing the wire feeder at a high place be sure to install and secure it on a horizontal surface Reel installation angle is normal A force i...

Page 13: ...the Welding Power Source and to the Gas regulator Standard Composition NOTE Standard composition consists of the parts indicated in Preparation of the parts except the standard composition is required to use the wire feeder Available in 16ft 5m 33ft 10m 49ft 15m and 66ft 20m Follow the steps below to connect to the welding power source and to the gas regulator 1 Ground the base metal if required b...

Page 14: ... site on the steel plate or on steel structure install a leakage breaker CAUTION Use the proper torch cable that matches the welding current Welding current Cable thickness 200 A AWG 1 38mm2 or more 350 A AWG 0 60mm2 or more 500 A AWG 3 0 80mm2 or more When performing pulse welding using a 56ft 17m or more cable use the thicker cable by one rank 6 3 Connection of the welding torch Welding torch is...

Page 15: ...ach a proper gas regulator to the gas cylinder Failure to observe the demand may result in physical injuries The gas regulator for high pressure gas must be used Follow the steps below to connect to the gas regulator 1 Firmly connect the gas hose to the gas supply inlet located on the rear side of the wire feeder 2 Mount the gas regulator on the gas cylinder by tightening the nut for attaching the...

Page 16: ...to insert the stopper pin of the wire reel shaft into the wire reel stopper pin hole 4 Turn the cap counter clockwise to tighten it 5 Bring down the pressure handle then raise the pressure roll holder 6 After pulling out the wire thread it from the pilot to outlet guide through the center guide 7 Return the pressure reel holder first the pressure handle Pressure handle Outlet guide Pressure roll h...

Page 17: ... then lift the pressure roll holder 3 Separate the feed roll from the wire feeder by pulling out the feed roll 4 Mount the new feed roll with the wire size marked on the wire feeder facing out For aluminum welding 1 Remove the pressure roll 2 Change the center guide for aluminum 3 Attach the middle gear and feed roll for aluminum 4 Attach the wire straightener 5 Change the outlet guide for aluminu...

Page 18: ... 2 045 2 3 3 4 1 0 040 2 3 4 5 0 9 035 2 3 4 5 0 8 030 1 2 4 5 0 6 024 1 2 4 5 7 3 Adjusting of the wire reel hub 7 3 Adjusting of the wire reel hub After performing inching operation take care to adjust the brake of the wire reel hub to prevent the wire from going too slack The bake has been properly adjusted before shipment Therefore readjustment of the brake is not required for welding in stand...

Page 19: ...sing the INCHING key the INCHING lamp located at the upper right of the INCHING key lights up When the wire appears from the end of the torch press the INCHING key again the INCHING lamp goes out Cut the wire at about 0 4in 10mm from the end of the tip Wire feed speed can be adjusted by turning the parameter adjusting knob WARNING Touching the charging parts may cause fatal electric shocks and bur...

Page 20: ...the Wire Feeder CAUTION When hanging the wire feeder firmly fix the cap knob and clamp screw to prevent the device from dropping Do not use the carrying handle of the wire feeder to hang the wire feeder Cap Hanging bracket optional Carrying handle 18 ...

Page 21: ...cket and tighten to the following torque so as not to loose the hexagon head bolt M10X30 nut M8 washer M8 and spring washer M8 3 pieces for each of the hanging bracket accessory in that order 4 Adjust the wire reel hub M10 24N m 245kgf cm M8 6N m 61kgf cm Brake pad Install the felt surface toward the wire reel shaft side Hexagon head bolt M10X55 Cap Brake disk Install the protrusion toward the wir...

Page 22: ... breakdown in the voltage detection cable Trouble with the motor Replace the motor with a new one Wire pressure is too weak Refer to Recommended wire adjustment in Section 7 2 Dust and chip are accumulated on the outlet guide and on the feed roll Remove the dust and chip 3 Pressure roll does not rotate smoothly Failure of the pressure roll holder Replace it with a new one 4 Shield gas is not suppl...

Page 23: ... amount of brushing friction or replace the brush Service life of the brush varies depending on ambient temperature and welding condition etc but normally the service life is about 4 000 hours If the machine is operated for six hours a day the service life of the brush will be about two years Periodical replacement of the feed motor is recommended Base metal direct detection 21 ...

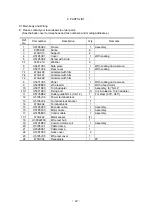
Page 24: ...89 Grommet with film 1 8 U5971C05 Panel 1 With coating and a screen 9 U5209B00 Wire feeder 1 With a feed motor 10 U5971D00 Torch adapter 1 Assembly for NO 4 10 1 U5971D03 Fixing bolt 1 It is included in Torch adapter 11 K5735B02 Outlet guide NO 4 0 9 1 2 1 For steel 035 045 12 U5185J09 Power terminal block 1 13 U5185J04 Terminal block bracket 1 14 4739 492 Terminal block 1 15 U5185X00 Encoder cabl...

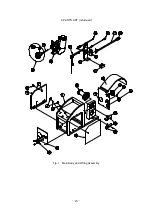
Page 25: ... 23 9 PARTS LIST continued Fig 1 Main Body and Wiring Assembly 23 ...

Page 26: ...39B12 Feed roll 0 9 1 0 1 2 2 035 040 045 9 1 3361 880 Hexagon socket cap screw 4 M4 x 16 9 2 3361 884 Bolt 4 M4 x 10 10 U5185B04 Guide block 1 11 U5185B05 Center guide 1 12 4802 206 Feed motor 1 13 U5185B06 Insulating board 1 14 U3971B04 Insulating bush 3 14 1 3361 895 Flat head screw 3 M6 x 20 15 U5185Q00 Drive gear 1 16 U5185B09 Pressure spring holder 2 17 U5185B12 Compression spring 2 18 U5185...

Page 27: ... Piping Assembly Ref No Part number Description Q ty Remarks 1 4813 001 Gas solenoid valve 1 W 31156 2 U4179D01 Hose elbow 1 3 U5971G01 Gas connector 1 4 U1997D02 Flange 1 Fig 3 Gas Piping Assembly 6 5 3 2 4 20 11 10 18 17 16 19 12 13 1 14 22 15 7 8 9 2 1 4 3 25 ...

Page 28: ...K5439B06 2 K5439C00 2 1 6 1 6 1 16 1 16 K5439B07 2 K5439C00 2 0 6 0 8 024 030 K5439B09 2 K5439C00 2 1 6 2 0 1 16 5 64 K5439B10 2 K5439C00 2 1 2 1 6 045 1 16 K5439B11 2 K5439C00 2 0 9 1 0 1 2 035 040 045 K5439B12 2 K5439C00 2 0 8 0 9 1 0 030 035 040 K5439B13 2 K5439C00 2 Aluminum U type groove 1 0 1 2 040 3 64 K5463R02 2 K5463R02 2 1 2 1 6 3 64 1 16 K5463R03 2 K5463R03 2 1 6 2 0 1 16 K5463R04 2 K54...

Page 29: ...r aluminum 1 16 black K5735B32 Outlet guide NO 5 AL1 2 1 For aluminum 3 64 black K5735B33 Outlet guide NO 5 AL1 6 1 For aluminum 1 16 black U5185B05 Center guide 1 0 1 6 1 For steel 040 1 16 U5204B02 Center guide 0 8 1 0 1 For aluminum 030 040 white U5204B03 Center guide 1 0 1 6 1 For aluminum 040 1 16 black U5185J06 Pilot 1 For steel 4 Wire straightener Part No Description Q ty Remarks U5204H00 W...

Page 30: ...nector red 1 1 3 4739 550 Quick connector blue 1 1 4 U5971J02 Fitting plate 2 7 Aluminum kit Part No Description Q ty Remarks K5735E00 Aluminum kit 1 The following parts are contained K5463R03 Feed roll 1 2 1 6 4 3 64 1 16 U5204B03 Center guide 1 0 1 6 1 040 1 16 black U5185P00 Gear 2 U5204H00 Wire straightener 1 U2344C08 Pilot 1 For wire straightener U5204J07 Inlet guide 1 For wire straightener U...

Page 31: ...21 7 Aluminum wire 3 64 K5735B22 2 8 Aluminum wire 040 K5735B21 9 Aluminum wire 3 64 K5735B22 2 10 Aluminum wire 1 16 K5735B23 11 Aluminum wire 3 64 K5735B32 3 12 Aluminum wire 1 16 K5735B33 K5735D00 K5735E00 NO Torch series Welding wire WTA200 SUT 1 It is a standard building in Wire feeder 2 It is attached to Aluminum KIT 3 It is attached to Torch adapter KIT Table for Option parts and option KIT...

Page 32: ...ling method Cable length For mild steel For aluminum 10ft 3m 13ft 4m 15ft 4 5m 20ft 6m 10ft 3m 350 A 60 Air cooling WT3510 SUT WT3510 MUT WT3510 LUT 400 A 60 WT4000 SUT WT4000 MUT WT4000 LUT 500 A 60 WT5000 SUT WT5000 MUT WT5000 LUT 200 A 60 WTA200 SUT 300 A 50 WTA300 SUT 400 A 100 Liquid cooling WTAW400 SUT 10 3 Standard Accessory Part number Description Q ty Remarks K5439C00 Pressure roll 2 Pre ...

Page 33: ... 31 10 SPECIFICATIONS continued External view of CM 741U Wire feeder unit in mm 31 ...

Page 34: ...Dong Da Dao Shanghai The People s Republic of China Post Code 200120 Phone 86 21 5882 8633 Fax 86 21 5882 8846 OTC Taiwan Co Ltd 2F No 153 Huanbei Rd Chung Li City Taoyuan Hsien Taiwan R O C Phone 886 3 461 3962 Fax 886 3 434 2394 OTC DAIHEN Asia Co Ltd 23 43 16th F1 Sorachai Building 23 Soi 63 Sukhumvit Road Klongtonnua Wattana Bangkok 10110 Thailand Phone 66 2 714 3201 Fax 66 2 714 3204 OTC DAIH...

Reviews: