background image

6

•  Unless a whole house 

filtration system

 is installed, 

the provided water filter cartridge, should be installed 

according to the Use and Care Manual.

•  Turn OFF the 

ice maker

 using the 

ICE

 key whenever the 

water supply valve is turned off. The 

ICE

 key is lit when 

the ice maker is on.

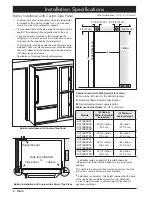
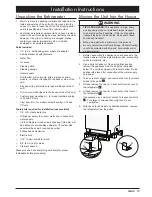
Preparing the Location

 WARNING

Follow all cabinet dimensions shown on the following 

pages to insure safe operation. All minimum product 

dimensions must be met. Dimensions shown provide the 

minimum required clearances.

•  Your Dacor built-in refrigerator can be installed in a 

cabinet opening (see facing page) or at the end of a 

cabinet run, using a custom side panel to cover the 

exposed side (see page 8). 

•  Carefully check the location where the appliance is to be 

installed. Put it in a location with convenient access. The 

power supply shall meet the 

Electrical Specifications

Also, the utilities need to be installed close by in a 

cabinet adjacent to the location selected so that the 

power plug can be disconnected and the water supply 

shut off without removing the appliance from the cutout.

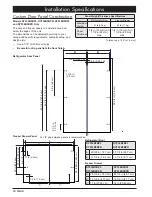
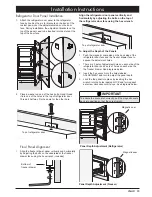
•  The location should allow the refrigerator door 

and freezer drawer to open freely. See 

Product 

Dimensions

•  For best performance, place the refrigerator away from 

sources of heat such as cooking appliances, household 

heating outlets or other sources of heat.

•  Do not install the appliances in a location where the 

water line could freeze.

•  The floor must be capable of supporting the weight of 

the appliance.

Model

Weight

DYF30BFBPL, DYF30BFBPR 

DYF30BFBSL, DYF30BFBSR 

DYF30BFTSL, DYF30BFTSR

606 lb (275 kg)

DYF36BFBPL, DYF36BFBPR 

DYF36BFBSL, DYF36BFBSR 

DYF36BFTSL, DYF36BFTSR

650 lb (295 kg)

•  The floor must be solid, level and all cutout surfaces 

must be at right angles. 

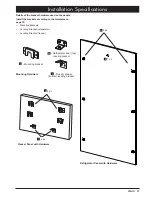
•  In the interest of safety, the surrounding cabinet must 

have sufficient material for attachment of the anti-tip 

brackets in the areas shown in the cutout diagrams on 

the following pages.

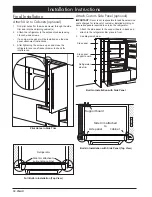
•  Plan the installation so that the appliance can be 

removed easily if service is required. Dacor is not 

responsible for additional service costs charged for 

removal of customer installed molding or decorative 

panels to allow access for servicing the refrigerator.

Installation Specifications

Electrical Specifications

 WARNING

Electrical and grounding connections must comply with the 

applicable portions of the national electrical code and/or 

other local electrical codes.

This appliance comes with an 

electrical cord with a three-prong 

grounding plug for a 

115

 Vac, 15 

Amp. power supply. Plug it into a 

115

 Vac, three-prong, grounding 

electrical outlet only.

Electrical Requirements

Electrical Circuit 

Requirements:

15 Amp. 115 Vac, 60 Hz. 

dedicated, grounded, circuit. 

Total Connected Load: See product data label.

Circuit Requirements

The wiring from the electrical outlet shall be connected to 

a circuit protected by a 15 or 20 Amp. circuit breaker or 

time delay fuse, installed by a licensed electrician. Do not 

use an outlet that can be turned off by a switch. Using an 

electrical outlet with a ground fault interrupter (GFI) is not 

recommended.

Water Supply Specifications

 WARNING

The built-in water filter cannot be used to treat water that 

is not suitable for human consumption. Do not connect this 

appliance to a water supply that is microbiologically unsafe 

or of unknown quality without adequate disinfection. 

Systems certified for cyst reduction may be used on 

disinfected water that may contain filterable cysts.

Water Supply Requirements

Water Supply 

Pressure:

25 to 73 p.s.i. 

(0.17 MPa to 0.50 MPa)

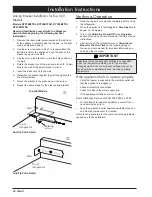
•  The appliance is provided with a fitting for connection 

to a 1/4-inch polyethylene water line. The customer 

must provide the water line and any fittings required 

to connect the water line to the 

household water supply. 

•  The water line must be long enough 

to provide enough slack to allow the 

refrigerator to be moved for floor 

cleaning and servicing, without the 

need to first disconnect the water 

line.

•  The water line must be routed so that no part of it is 

located in areas that will fall below freezing.

 WARNING

Observe all governing codes and ordinances during 

planning and installation. Contact your local building 

department for further information.

Summary of Contents for Discovery series

Page 1: ...n Instructions Discovery Built In Refrigerator Models DYF30BFBPL DYF30BFBPR DYF30BFBSL DYF30BFBSR DYF30BFTSL DYF30BFTSR DYF36BFBPL DYF36BFBPR DYF36BFBSL DYF36BFBSR DYF36BFTSL DYF36BFTSR Dacor Part No 108790 Rev C ...

Page 2: ... Help If you have questions or problems with installation contact your Dacor dealer or the Dacor Customer Service Team For repairs to Dacor appliances under warranty call the Dacor Distinctive Service line Whenever you call have the model and serial number of the appliance ready The model and serial number are printed on the product data label The product data label is located on the right door ja...

Page 3: ...edicated properly grounded three prong electrical outlet DO NOT cut or remove the third ground prong from the power cord DO NOT use an adapter plug DO NOT use a power cord that is frayed or damaged DO NOT connect the appliance to an extension cord Keep the power cord away from heated surfaces NOTE Use of an electrical outlet with a ground fault interrupter GFI is not recommended READ AND SAVE THES...

Page 4: ...ian should perform all other service Before performing any type of service disconnect the unit from the electrical outlet or disconnect power at the circuit breaker panel or fuse box Use this appliance only for its intended purpose the storage of food and beverages It is not intended for commercial or industrial use WARNING WARNING General Safety Precautions WARNING To reduce the risk of fire elec...

Page 5: ... bottom compressor models A B C D E F 5 36 inch wide models 6 Dimensions are with standard Epicure style door handle installed Distance to side wall is required to allow door to open 105 degrees However a 90 degree door opening is sufficient to allow all drawers to open to full extension 7 Height can be increased up to 1 inch 2 5 cm using the adjustable legs Electric cord length 90 inches 2 3 m Ha...

Page 6: ... 14 6 cm 24 1 8 61 3 cm 7 83 1 2 212 0 cm 7 Electric cord length 90 in 2 3 m 5 36 inch wide models 6 Dimensions are with standard Pro style door handle installed Distance to side wall is required to allow door to open 105 degrees However a 90 degree door opening is sufficient to allow all drawers to open to full extension 7 Height can be increased up to 1 inch 2 5 cm using the adjustable legs Epic...

Page 7: ...ustom panel thickness and door handle depth However a 90 degree door opening is sufficient to allow all drawers to open to full extension 5 Height can be increased up to 1 inch 2 5 cm using the adjustable legs Models DYF30BFBPL DYF30BFBPR DYF36BFBPL DYF36BFBPR Product Specifications Electrical cord length 90 in 2 3 m 105 C4 39 in 99 2 cm 1 B Product tolerances 1 16 1 6 mm 24 1 8 in 61 cm 1 22 1 8 ...

Page 8: ...if service is required Dacor is not responsible for additional service costs charged for removal of customer installed molding or decorative panels to allow access for servicing the refrigerator Installation Specifications Electrical Specifications WARNING Electrical and grounding connections must comply with the applicable portions of the national electrical code and or other local electrical cod...

Page 9: ...t Height 2 DYF30BFBPL DYF30BFBPR DYF30BFBSL DYF30BFBSR 29 5 8 in 75 2 cm 84 in 213 4 cm DYF30BFTSL DYF30BFTSR 29 5 8 in 75 2 cm 84 in 213 4 cm DYF36BFBPL DYF36BFBPR DYF36BFBSL DYF36BFBSR 35 1 2 in 90 2 cm 84 in 213 4 cm DYF36BFTSL DYF36BFTSR 35 1 2 in 90 2 cm 84 in 213 4 cm A A E W E W 5 1 2 in 14 cm 5 1 2 in 14 cm 4 in 10 cm 4 in 10 cm B C Full Built In Installation Full Built in Installation Top...

Page 10: ...supply location Minimum Cabinet Depth 23 7 8 in 60 6 cm Models B Cabinet Width for Built In Installation 1 C Minimum Cabinet Height 2 DYF30BFBPL DYF30BFBPR DYF30BFBSL DYF30BFBSR 29 5 8 inches 75 2 cm 84 inches 213 4 cm DYF30BFTSL DYF30BFTSR 29 5 8 inches 75 2 cm 84 inches 213 4 cm DYF36BFBPL DYF36BFBPR DYF36BFBSL DYF36BFBSR 35 1 2 inches 90 2 cm 84 inches 213 4 cm DYF36BFTSL DYF36BFTSR 35 1 2 inch...

Page 11: ...stalling the custom panels you must first install the door drawer handles With custom panel models you have the advantage of being able to select a handle style that meets your own personal taste Dacor recommends handles with larger D style pulls Any handle designed for use with an appliance should produce satisfactory results Handles are not provided with custom panel models Selected handle kits ...

Page 12: ...l bit for all holes Be careful not to penetrate the front finish Installation Specifications Refrigerator Door Panel DYF30BFBPL DYF30BFBPR DYF36BFBPL DYF36BFBPR A 29 3 8 in 74 7 cm 35 1 4 in 89 7 cm B 13 1 2 in 34 2 cm 16 1 2 in 4 17 cm DYF30BFBPL DYF30BFBPR DYF36BFBPL DYF36BFBPR A 29 3 8 in 74 7 cm 35 1 4 in 89 7 cm B 13 1 2 in 4 17 cm 16 1 2 in 4 17 cm C 11 in 27 95 cm 14 in 35 45 cm Refrigerato...

Page 13: ...ezer drawer bottom leveling bracket Details of the bracket hardware used on the panels Install the brackets according to the templates on page 10 Mounting Brackets Leveling Bracket refrigerator Leveling Bracket freezer B 1 pc C 2 pc Refrigerator Panel with Hardware Freezer Panel with Hardware Mounting Hardware ...

Page 14: ...Thickness Specifications Maximum Weight 10 lb 4 5 kg Panel Thickness 3 4 18 mm min 1 1 8 28 mm max Tolerances 1 16 1 6 mm Drill hole in supplied grill 4 places Customer supplied screw 4 places Custom panel 8 1 2 21 6 cm A C D E B DYF30BFBPL DYF30BFBPR DYF36BFBPL DYF36BFBPR A 29 3 8 74 7 cm 35 1 4 89 7 cm B 27 7 8 708 mm 27 7 8 708 mm C 13 16 20 mm 13 16 20 mm D 5 8 15 mm 5 8 15 mm E 15 16 25 mm 15...

Page 15: ...Wait to remove the packing materials and tape from the inside and outside of the unit until it is moved into the house It is best to leave the unit on the shipping pallet until it is positioned in front of the cabinet cutout 2 Verify that all required components have been provided Inspect the unit for shipping damage including cosmetic damage If any item is missing or damaged please contact your d...

Page 16: ...sert the hex end first and thread each set screw as deep as possible 3 Hand thread the ten 10 adjustment studs B Each stud will grip the panel hardware so thread the stud only until half remains above the surface Freezer Drawer Panel Installation 1 Make sure that all tape has been removed from the drawer 2 Place washers on two 2 of the hex bolts Hand thread the two bolts into the holes in the bott...

Page 17: ...horizontally by adjusting the bolts on the top of the refrigerator door face using the hex wrench To Adjust the Depth of the Panels 1 Push the magnetic seal aside on the back side of the refrigerator door face and the freezer drawer face to expose the adjustment holes There are 3 sets of adjustment holes on each side of the refrigerator door and 2 sets of holes on each side the the freezer drawer ...

Page 18: ... on bottom 1 Connect one end of a 1 4 inch O D polyethylene water line to the household water supply valve 2 Hold the other end of the water line over a bucket Turn on the water valve to flush out impurities and air When the water is clear turn off the valve 3 Connect the water supply fitting to the back of the refrigerator as shown below Make sure it is tightened firmly into place but do not over...

Page 19: ...ts 4 Remove the screws that hold the side trim pieces in place Installation Instructions 5 Slowly and gently push or walk the unit backward into place As you do this have someone gently pull the water supply line s slack and power cord s slack through the access holes into the adjacent cabinetry This will help prevent the unit from landing on the line and cord Leveling Use the leveling feet to lev...

Page 20: ... Custom Side Panel optional IMPORTANT Dacor is not responsible for additional service costs charged for removal of customer installed molding or decorative panels required to service the refrigerator 1 Attach the side panel to the support board in back and attach to the refrigerator trim piece in front 2 See diagrams below Full Built in Installation Top View Side panel support board Side panel Ref...

Page 21: ...hole in the wall at the point marked in step 2 Insert the provided wall anchor into the wall 5 Reposition the bracket and attach it to the top of the refrigerator Use two 2 of the machine screws in the anti tip bracket kit included 6 Attach the bracket to the wall with one 1 wood screw Repeat the above steps for the other anti tip bracket Attach Trim Covers optional 1 The trim covers cover the inn...

Page 22: ...he appliance is first plugged in Stand by should appear on the display 3 Turn to the Switching On and Off in the Operation section of the use and care manual for first time start up instructions 4 After turning on the refrigerator turn to Using the Ice Maker for the First Time on the following page of the use and care manual for important information on setting up the ice maker IMPORTANT Adjustmen...

Page 23: ...c damage Has the water supply line been properly installed according to specifications and checked for leaks Is the unit properly aligned with the adjacent cabinets Do all doors drawers and shelves operate smoothly without interference Has all packaging tape and literature been removed from inside and outside of the appliance Is the power cable connected to a three prong grounded electrical outlet...

Page 24: ...Dacor 14425 Clark Avenue City of Industry CA 91745 Phone 800 793 0093 Fax 626 403 3130 www dacor com ...

Reviews: