13
Installation Instructions
Moving the Unit Into the House
WARNING
•
TIP OVER HAZARD:
This appliance is large, heavy
and tips easily when not installed. Always transport
in an erect position if possible. If this is not possible,
transport laying on the back side. Keep doors taped
shut during transport.
• Move and install with a minimum of two persons.
• Be very careful to avoid floor damage. Delicate flooring
should be protected with plywood, hard cardboard, or
similar material.
1. Before transporting the appliance, check access to the
location where it will be installed (door size, maneuvring
space in stairwells, etc.).
2. Use a dolly to transport. Once at the final location,
remove the appliance from the pallet as instructed
below. The unit is equipped with rollers to allow it to be
pushed into place after connection of the water supply
and power.
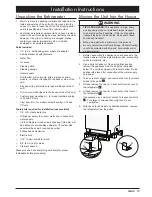
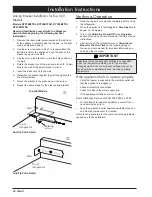
3. Take a crescent wrench, and remove the four (4) screws
bolted to the pallet
A
.
4. Lift and remove the two (2) L- brackets from the rear of
the refrigerator
B
.
5. Lift and remove the two (2) L- brackets on the front of
the refrigerator
D
.
• If necessary, use a crescent wrench to loosen the bolts
C
. Turn twice to release, then retighten. Do not
overtighten.
6. With the help of at least one additional person, remove
the refrigerator from the pallet.
Unpacking the Refrigerator
1. Wait to remove the packing materials and tape from the
inside and outside of the unit until it is moved into the
house. It is best to leave the unit on the shipping pallet
until it is positioned in front of the cabinet cutout.
2. Verify that all required components have been provided.
Inspect the unit for shipping damage (including cosmetic
damage). If any item is missing or damaged, please
contact your dealer immediately. Do not install a
damaged or incomplete appliance.
Parts included
• 1/4” to 3/4” self-locking water supply line adapter
• Anti-tip bracket kit with fasteners
• Water filter
• Ice scoop
• Cleaning cloth
• Cleaning sponge
• User manuals
• Grill (bottom grill units only, ships in place on some
models, on others, it is taped to the back or side of the
unit)
• Kick panel (top grill units only, taped to back or side of
unit)
• Trim covers, white (taped to the back or side of the unit)
• Custom panel mounting kit - for model numbers ending
in PL and PR only
• Vinyl door trim - for model numbers ending in PL and
PR only
Tools/parts required for installation (not provided)
• 1/4” O.D. plastic water line
• Fittings necessary to connect water line to household
water supply
• 1/8 inch diameter wood screws (required if side trim will
be attached to surrounding cabinets or if custom side
panels will be used, 5 required per side)
• Phillips head screwdriver
• Electric drill
• 1/16” (2 mm) drill bit for wood
• 3/8” (8 mm) bit for walls
• Crescent wrench
Make sure you have everything necessary for proper
installation before proceeding.
B
A
A
C
D

