17
Moving the Unit into Final Position
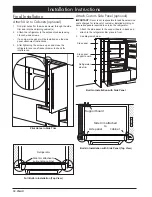
1. If a custom side panel will be installed on one side of
the unit, attach the required support board to the wall
prior to pushing the unit into position (see page 18).
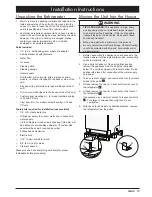
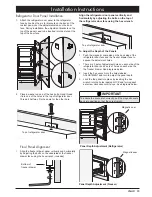
2. Before moving the unit to its final position, make sure
the front leveling legs are in the up position. Using a
crescent wrench, turn the legs
A
(see diagram below)
to the right until they clear the floor. On some bottom
grill models, you may need to remove the grill to access
the legs.
WARNING
• Be careful when installing or removing the appliance
to reduce the likelihood of damage to the floor, to the
power cord and the water supply line.
• After moving the unit into place, be sure to lower the
front leveling legs to help support the refrigerator. See
Leveling
.
3. Remove the trim covers taped to the back or side of the
unit. On some models the ventilation grill or kick panel
is taped to the unit and needs to be removed before
performing the following steps.
If the unit is to be installed without the side trim attached
(the unit will not be attached to the surrounding
cabinets):
4. Remove the screws that hold the side trim pieces in
place.
Installation Instructions
5. Slowly and gently push or walk the unit backward into
place. As you do this, have someone gently pull the
water supply line’s slack and power cord’s slack through
the access holes into the adjacent cabinetry. This will
help prevent the unit from landing on the line and cord.
Leveling
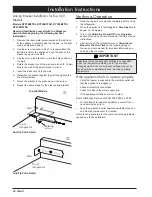
Use the leveling feet to level the appliance all directions. On
units with a bottom grill, make sure that the grill is removed
before proceeding.
1. Adjust the height of the front legs
A
by turning them
with a crescent wrench.
2. Adjust the height of the rear wheels by turning the
adjusting bolts
B
located on the front of the unit.
IMPORTANT:
The leveling legs must contact the floor to
properly support the weight of the refrigerator. The front
rollers are for moving the refrigerator and not for permanent
support.
3. Some units have a plastic coating over the grill or kick
panel. Remove any plastic coating on the grill or kick
panel (depending on the model). Install the grill/kick
panel on the bottom of the unit, behind the freezer
drawer. The grill/kick panel is held in place by magnets.
continued...
A
A
B
B
Kick Panel Installation -
Top Grill Models
Grill Installation -
Bottom Grill Models
Side Trim
Showing Screws


