


19
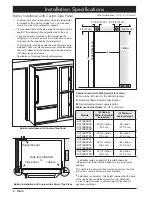
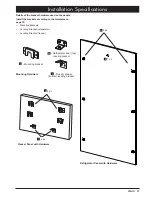
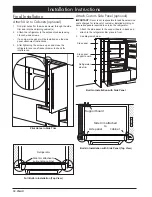
Anti-tip Bracket Installation
It is mandatory to install the anti-tip brackets
(included)
on the upper part of the refrigerator and secure it to the wall.
The method of installation depends on the appliance model.
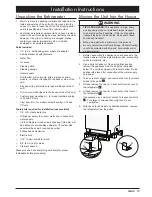
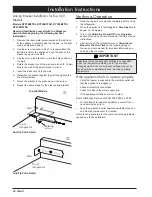
Anti-tip Bracket Installation for Bottom Grill
Models
Models DYF30BFBSL DYF30BFBSR, DYF36BFBSL
DYF36BFBSR, DYF30BFBPL DYF30BFBPR,
DYF36BFBPL DYF36BFBPR
Read and familiarize yourself with the diagrams
below before beginning the following bracket
installation.
1. Place a anti-tip brackets (included) on the top of the
appliance.
2. Line up the bottom slot in the bracket with the screw
holes on the top of the appliance. See diagrams below.
3. Use the slot on the bracket to mark the hole position on
the wall.
4. Remove the bracket and drill a 3/8” (8 mm) hole in the
wall at the point marked in step 2. Insert the provided
wall anchor into the wall.
5. Reposition the bracket and attach it to the top of the
refrigerator. Use two (2) of the machine screws in the
anti-tip bracket kit (included).
6. Attach the bracket to the wall with one (1) wood screw.
Repeat the above steps for the other anti-tip bracket.
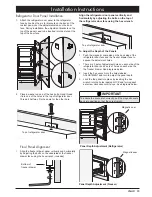
Attach Trim Covers (optional)
1. The trim covers cover the inner surface of the side trims
and the screws heads.
2. To install the side trim pieces, open the refrigerator door
and freezer drawer to access the inner surfaces of the
side trims.
3. Slide the trim covers into place, as shown, until they
“click” into place. See diagrams below.
4. Close the doors.
Installation Instructions
Trim cover
Trim Cover Installation
Trim Cover Installation (Top View)
Refrigerator
side trim
Trim
cover
Refrigerator
side trim
Anti-Tip Finished Install
Top of refrigerator
Top of refrigerator
Anti-Tip Parts Detail
Wall
Wall
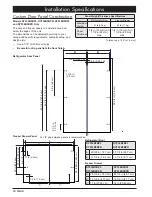
Bottom Grill Models


