background image


D-Link EasySmart Switch User Manual


16 

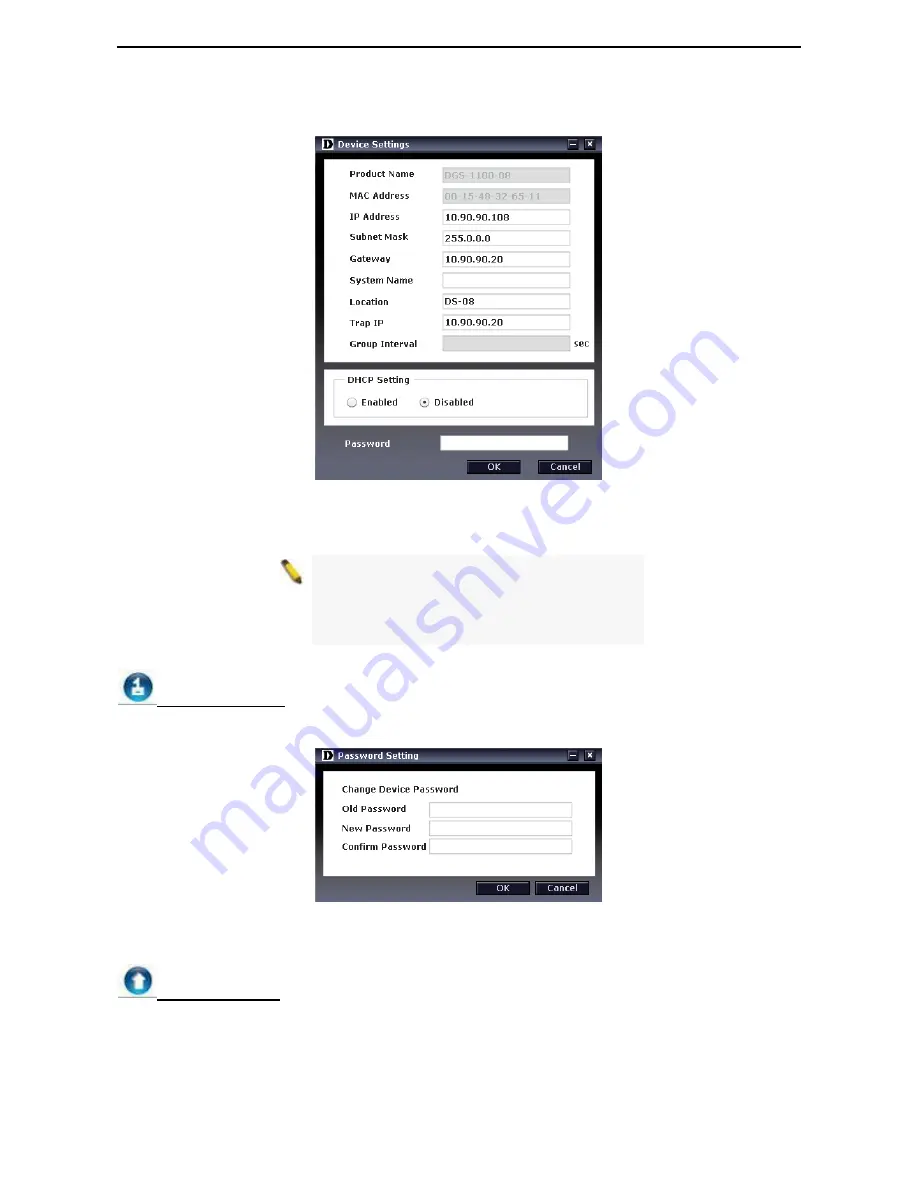
To  apply the configuration, insert the correct device password in the  Confirm  Password box and then click 

OK


Figure 26 – SmartConsole Device Settings 


NOTE:

  The  EasySmart Switch automatically 

sends  out discovery  packets to  maintain  the 
connection between the devices and 
SmartConsole Utility. Therefore, ensure to 
configure the 

Group Interval

 setting. 


Password Manager 

Select a switch from the Device List.  Click on this icon to launch  the Device Password Manager  window. 
Here you can enter a new password and confirm it. 


Figure 27– SmartConsole Password Manager 


Firmware Upgrade 

Select one or many switches of same model name from the Device List. Click on this icon to launch  the 
Firmware Upgrade window. Specify the Firmware Path (or Browse for one) that you are going to use. Input 
the correct password of device, and then click 

Upgrade.

 The state will show "OK" after completion, and “Fail” 

is firmware upgrade fails or cannot be completed for any reason. 


Summary of Contents for EasySmart DGS-1100-08P

Page 1: ......

Page 2: ...acking 6 Packing contents of DGS 1100 05 08 6 Packing contents of DGS 1100 08P 6 Packing contents of DGS 1100 16 24 6 Step 2 Switch Installation 6 Desktop or Shelf Installation 6 Rack Installation 7 W...

Page 3: ...ection 27 L2 Features Statistics 27 L2 Features Cable Diagnostics 28 VLAN 802 1Q VLAN 29 VLAN 802 1Q Management VLAN 30 VLAN Port Base VLAN 31 VLAN Surveillance VLAN 31 VLAN Voice VLAN 33 VLAN Traffic...

Page 4: ...D Link Web Smart Switch User Manual iii L2 Features 41 VLAN 41 QoS Quality of Service 41 Management 41 Power Saving 41 Appendix C Rack mount Instructions 42...

Page 5: ...ge In this guide the term Switch first letter capitalized refers to the EasySmart Switch and switch first letter lower case refers to other Ethernet switches Some technologies refer to terms switch br...

Page 6: ...es and works immediately Connecting to EEE compliant devices such as PCs and servers the network can save energy without compromising any performance While connecting to legacy devices which do not su...

Page 7: ...lt configuration and all changes will be lost Rear Panel Figure 4 DGS 1100 08 Rear Panel 5V 1A AC adapter The port is where to connect the 5V 1A AC adapter DGS 1100 08P 8 Port 10 100 1000Mpbs PoE Easy...

Page 8: ...eset button for 5 seconds the Switch will change back to the default configuration and all changes will be lost Rear Panel Figure 6 DGS 1100 08P Rear Panel 48V 1 57A Desktop adapter The port is where...

Page 9: ...ink Act Speed LED Ports 1 24 Flashing Indicates a network link through the corresponding port Blinking Indicates that the Switch is either sending or receiving data to the port Green Indicates that th...

Page 10: ...hat screw on the D Link EasySmart Switch One Multi lingual Getting Started Guide One CD with User Manual and SmartConsole Utility program Packing contents of DGS 1100 16 24 One D Link EasySmart Switch...

Page 11: ...r palm size switches Figure 12 Attach the mounting brackets to the Switch Then use the screws provided with the equipment rack to mount the switch in the rack Figure 13 Mount the Switch in the rack or...

Page 12: ...aintained Particular attention should be given to supply connections other than direct connections to the branch circuit e g use of power strips Wall mount The Switch can be mounted on a wall Two moun...

Page 13: ...installation Commercially available 6 AWG wire is recommended The length of the cable depends on the proximity of the switch to proper grounding facilities A screwdriver not included in the accessory...

Page 14: ...ient choice By using the SmartConsole Utility you do not need to change the IP address of your PC and it is easier to initialize multiple EasySmart Switches Please refer to the following installation...

Page 15: ...tory default IP address is 10 90 90 90 with a subnet mask of 255 0 0 0 and a default gateway of 0 0 0 0 The web configuration can also be accessed through the SmartConsole Utility Open the SmartConsol...

Page 16: ...the same L2 network segment of your PC and use the SmartConsole Utility to discover the Smart Switches Option 2 Follow these steps to install the SmartConsole Utility manually 1 Insert the Utility CD...

Page 17: ...ings at the left Figure 20 SmartConsole Utility SmartConsole Settings The SmartConsole Settings at the left has five icons Utility Settings Log Trap File and Help Utility Settings Click this icon to l...

Page 18: ...Click Clear Log to clear all log entries Click OK to exit Figure 22 SmartConsole Log Trap Click this icon to launch the Trap window Click View Trap to show the events of the SmartConsole Utility and...

Page 19: ...d a Device List setting file About Click this icon to launch the SmartConsole Info window Figure 25 SmartConsole About Device Configuration The Device Configuration in the SmartConsole Utility has fiv...

Page 20: ...word Manager Select a switch from the Device List Click on this icon to launch the Device Password Manager window Here you can enter a new password and confirm it Figure 27 SmartConsole Password Manag...

Page 21: ...Refresh Web Access Select a switch from the Device List Click this icon to launch your internet browser e g The Internet Explorer Here you can configure the Switch through the Web based Management ut...

Page 22: ...rrent IP addresses of devices Subnet Mask Displays the Subnet Mask setting of the device Gateway Displays the Gateway setting of the device MAC Address Displays the device MAC Addresses Firmware versi...

Page 23: ...for essential utility functions like firmware and configuration management By choosing different functions in the Function Tree you can change all the settings in the Main Configuration Screen The mai...

Page 24: ...Save Configuration Tool Bar Tool Menu The Tool Menu offers global function controls such as Reset System Reboot Device Firmware Upgrade and Configuration Backup Restore Figure 36 Tool Menu Reboot Devi...

Page 25: ...ation Backup Restore Allow the current configuration settings to be saved to a file not including the password and if necessary you can restore configuration settings from the file Figure 40 Tool Menu...

Page 26: ...firmware hardware and IP address It also offers an overall status of common software features Port Mirroring Click Setting L2 Features Port Mirroring By default this feature is disabled Storm Control...

Page 27: ...efault gateway before using the default or previously entered settings By default the IP setting is static mode with IP address is 10 90 90 90 and subnet mask is 255 0 0 0 System Information By enteri...

Page 28: ...rts is Auto NOTE Be sure to adjust port speed settings appropriately after changing connected cable media types Link Status Reporting Down indicates the port is disconnected Flow Control You can enabl...

Page 29: ...support is designed to enhance Ethernet networking throughput and significantly reduce the CPU utilization of large file transfers like large multimedia files or large data files by enabling more effi...

Page 30: ...en network stations or devices and an IGMP host With IGMP snooping enabled the EasySmart switch will forward multicast traffic only to the connections that have members attached Figure 169 L2 Features...

Page 31: ...s The Switch will automatically shut down the port The Loopback Detection port will be unlocked when the Loopback Detection Recover Time times out The Loopback Detection function can be implemented on...

Page 32: ...rmines the type of cable errors occurred in the cable Select a port and then click the Test Now button to start the diagnosis Figure 183 L2 Features Cable Diagnostics Test Result The description of th...

Page 33: ...with an empty VLAN name field and all ports are configured as Untagged members The 802 1Q VLAN configuration is accomplished in three steps Enabling 802 1Q VLAN function Creating a new VID group and...

Page 34: ...ck to rename the VLAN group Delete VID Click to delete the VLAN group Figure 227 VLAN 802 1Q VLAN VLAN Table NOTE When 802 1Q VLAN is enabled the Port Based VLAN settings will be set to Disabled VLAN...

Page 35: ...ick Apply Rename Click to rename the VLAN group Delete VID Click to delete the VLAN group NOTE When Port Based VLAN is enabled the 802 1Q VLAN settings and 802 1Q management VLAN settings will be set...

Page 36: ...ices by default There are another five surveillance components that could be options to be configured for surveillance VLAN These five components are Video Management Server VMS VMS Client Video Encod...

Page 37: ...red priority Figure 252 L2 Features Voice VLAN Settings VLAN Traffic Segmentation Traffic segmentation is used to limit traffic flow for a group of ports on a single Switch This method of segmenting t...

Page 38: ...sm Select Strict Priority to process the packets with the highest priority first Select WRR Weighted Round Robin to process packets according to the weight of each priority When a priority level has r...

Page 39: ...bandwidth ceiling is applied to receiving transmitting or both receiving and transmitting packets No Limit This drop down menu allows you to specify that the selected port will have no bandwidth limit...

Page 40: ...both the Mac Address and VID and Click Apply Click Delete to remove one entry or click Delete all to clear the list You can also copy a learned MAC address from Dynamic Forwarding Table please refer t...

Page 41: ...Power Shut Off Sequence Defines the method used to deny power to a port once the threshold is reached The possible fields are Deny next port When the power budget is exceeded the next port attempting...

Page 42: ...ct From Port To Port to control the PoE functions of a port DGS 1100 08P will auto disable the ports if port current is over 375mA in 802 3af mode NOTE The PoE Status information of Power current Powe...

Page 43: ...ual 3 39 9 Click Apply to make the configurations take effects or click Refresh to redisplay the table NOTE For the PoE Port Settings table if the classification was shown as Legacy PD it will be clas...

Page 44: ...twisted pair UTP cabling outfitting your network with a powerful 1000 Mbps capable backbone server connection which will create a flexible foundation for the next generation of network technology pro...

Page 45: ...op Power Adapter DGS 1100 16 24 AC input 100 240 VAC 50 60Hz internal universal power supply Acoustic Value DGS 1100 05 08 08P 16 24 0dB Fan less Operation Temperature DGS 1100 05 08 16 24 0 40 C DGS...

Page 46: ...nt in a rack should be such that the amount of air flow required for safe operation of the equipment is not compromised C Mechanical Loading Mounting of the equipment in the rack should be such that a...

Page 47: ......

Reviews: