background image

DSL-300G ADSL Modem User’s Guide


Diagnostics 

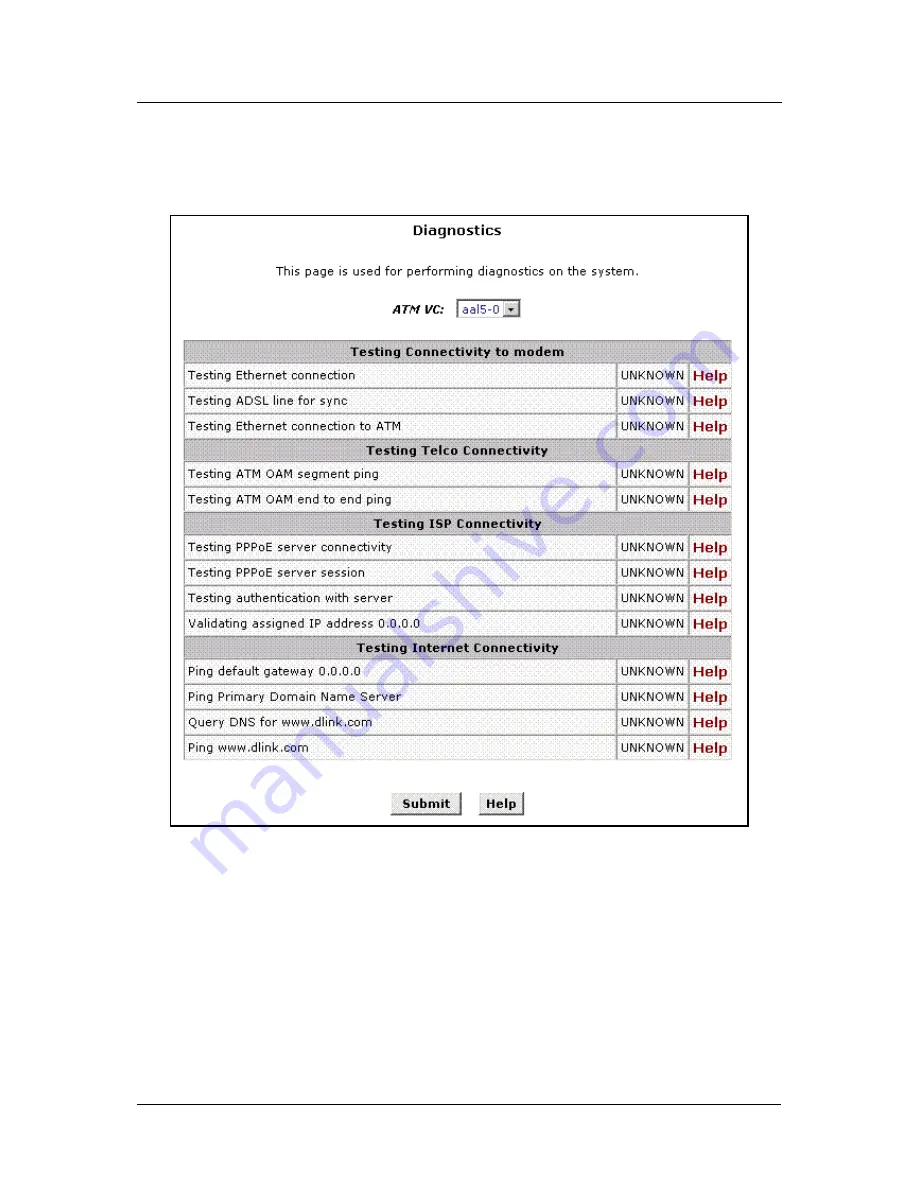
The diagnostics feature executes a series of test of your system software and hardware connections. Use this 
feature when working with your ISP to troubleshoot problems. 


Diagnostics Window 


Select the Virtual Circuit and click the Submit button. A message will appear informing you if the loop test 
succeeded or failed. 

The diagnostics utility will run a series of test to check whether the device's connections are up and working. 
This takes only a few seconds. The program reports whether the test passed or failed. A test may be skipped if 
the program determines that no suitable interface is configured on which to run the test. 


36

Summary of Contents for DSL-300G

Page 1: ...DSL 300G ADSL Modem User s Guide January 2004 ...

Page 2: ...ance with the instructions may cause harmful interference to radio communications However there is no guarantee that interference will not occur in a particular installation If this equipment does cause harmful interference to radio or television reception which can be determined by turning equipment off and on the user is encouraged to try to correct the interference by one or more of the followi...

Page 3: ... of the package The package must be mailed or otherwise shipped to D Link with all costs of mailing shipping insurance prepaid D Link shall never be responsible for any software firmware information or memory data of Purchaser contained in stored on or integrated with any product returned to D Link pursuant to this warranty Any package returned to D Link without an RMA number will be rejected and ...

Page 4: ...O MODEM CONNECTION 4 POWER ON MODEM 4 CONFIGURING THE MODEM FOR THE FIRST TIME 5 Configuring IP Settings on Your Computer 5 ACCESS THE WEB CONFIGURATION MANAGER 12 WEB CONFIGURATION MANAGEMENT GUIDE 15 Quick Configuration 16 System View 17 Change LAN IP Settings 18 DHCP Service Modes 19 PPP Configuration 21 IpoA Configuration 23 EOA Configuration 25 NAT 27 BRIDGE CONFIGURATION 29 ATM VC Configurat...

Page 5: ... in general terms in the following steps 1 Gather information and equipment needed to install the device Before you begin the actual installation make sure you have all the necessary information and equipment 2 Install the hardware that is connect the cables Ethernet and telephone to the device and connect the power adapter 3 Check the IP settings on your computer and change them if necessary so t...

Page 6: ...net NIC adapter Additional Software It may be necessary to install software on your computer that enables the computer to access the Internet through computers operated by your ISP or service provider Additional software must be installed if you are using what is called a bridged connection For a bridged connection the information needed to make and maintain the Internet connection is stored on yo...

Page 7: ... s Guide ascertain that you have 1 One DSL 300G ADSL Ethernet Modem 2 One CD ROM with this User s Guide and the Quick Installation Guide 3 One twisted pair telephone cable used for ADSL connection 4 One straight through Ethernet cable 5 One AC power adapter suitable for your electric service 6 One Quick Installation Guide hardcopy vii ...

Page 8: ......

Page 9: ...at and upper layer protocols Modem Description and Operation The DSL 300G ADSL Modem is designed to provide a simple cost effective and secure ADSL Internet connection for your small to medium sized private network The ADSL connection technology enables many interactive multi media applications such as video conferencing and collaborative computing The Modem is easy to install and use The DSL 300G...

Page 10: ...en light indicates a valid ADSL connection This will light after the ADSL negotiation process has been settled Blinking green light indicates an active WAN session Ethernet Link Act Steady green light indicates a valid Ethernet connection Blinking green indicates an active Ethernet session Rear Panel All cable connections to the Modem are made at the rear panel The factory reset button is located ...

Page 11: ...em Connection Connect Ethernet LAN to Modem The Modem may be connected to any 10 100BASE TX Ethernet LAN Any connection to an Ethernet concentrating device such as a switch or hub must operate at a speed of 10 100 Mbps only When connecting the Modem to any Ethernet device that is capable of operating at speeds higher than 10Mbps be sure that the device has auto negotiation NWay enabled for the con...

Page 12: ...ink port on the switch or hub for another device connect to any on the other MDI X ports 1x 2x etc with a cross wired cable or use crossover adapter Figure 2 Switch to Modem Connection Power On Modem To power on the device 1 Insert the AC Power Adapter cord into the power receptacle located on the back of the Modem and plug the adapter into a nearby power source 2 You should see the Power LED indi...

Page 13: ...nd connect to the service provider s network There are different methods used to establish the connection to the service provider s network and ultimately to the Internet You should know what Encapsulation and connection type you are required to use for your ADSL service It is also possible that you must change the PVC settings used for the ADSL connection Your service provider should provide all ...

Page 14: ...indows XP for DHCP Use the following steps to configure a computer running Windows XP to be a DHCP client 1 From the Start menu on your desktop go to click on Control Panel 2 In the Control Panel folder click on Network and Internet Connections 6 ...

Page 15: ...he Network and Internet Connections folder click on Network Connections 4 In the Network Connections folder highlight the Local Area Connection icon by clicking on it once A new option is revealed under Network Tabs in the left side panel 7 ...

Page 16: ...e settings of the connection under Network Tabs 6 In the General Tab of the Local Area Connection Properties menu highlight Internet Protocol TCP IP under This connection uses the following items by clicking on it once Click on the Properties button 8 ...

Page 17: ... display as an installed component click Install 6 In the Select Network Component Type dialog box select Protocol and then click Add 7 Select Internet Protocol TCP IP in the Network Protocols list and then click OK 8 You may be prompted to install files from your Windows 2000 installation CD or other media Follow the instructions to install the files 9 If prompted click OK to restart your compute...

Page 18: ...n 2 In Network and Dial up Connections window right click the Network icon and then select Properties 3 In the Network Properties dialog box select TCP IP and then click Properties 4 In the TCP IP Settings dialog box click the Obtain and IP address automatically option 5 Double click OK twice to confirm and save your changes and then close the Control Panel Your computer is now ready to use the Mo...

Page 19: ...plays a list of currently installed network protocols If the list includes TCP IP then the protocol has already been enabled Skip to Configure IP Information 5 If TCP IP does not display as an installed component click Add 6 In the Select Network Protocol dialog box select TCP IP and then click OK You may be prompted to install files from your Windows NT installation CD or other media Follow the i...

Page 20: ...on go to Settings and choose Control Panel 2 In the Control Panel window double click on the Internet Options icon 3 Click the Connections tab and click on the LAN Settings button 4 Verify that the Use proxy server option is NOT checked If it is checked click in the checked box to deselect the option and click OK To use the web based management software launch your web browser software and use the...

Page 21: ...on to refresh the screen Then you may proceed to change the other parameters Up to 8 unique PVCs can be defined Default 0 Operation Mode Use this pull down menu to enable a PVC connection profile Choose Enabled to activate the selected PVC or Disabled to disable it Connection Type Choose Bridged IP LLC or Bridged IP VC Mux form the pull down menu Default Connection Type Bridged IP LLC VPI Type in ...

Page 22: ...L connection for your account This will normally take a few seconds When the ADSL connection has been successfully established the ADSL Link LED indicator will light steady green If the ADSL Link indicator does not light after a minute or so access the web configuration manager an double check the settings Note Some accounts use PPP connection software for their Internet service connection If you ...

Page 23: ...N folder contains hyperlinked menus used for assigning LAN IP settings to the Modem and IP services performed by the Modem The Bridging and WAN folders contain menus used to configure settings that allow the Modem to operate on the service provider s network If you are using the Modem for multiple virtual connections these menus are also used to configure these additional virtual connections PVCs ...

Page 24: ...e the selected PVC or No to disable it Default Operation Mode Yes for PVC 0 For PVC 1 to PVC 7 default is No Connection Type Choose Bridged IP LLC or Bridged IP VC Mux form the pull down menu Default Connection Type Bridged IP LLC VPI Type in the VPI value for the selected PVC Default 8 VCI Type in the VCI value for the selected PVC Default 35 Click the Submit button to save the settings in tempor...

Page 25: ...splays the basic information about the device hardware and software versions the system uptime and the operating mode To change the time settings click the Modify button A menu will appear in a new window for configuring the system time for the Modem A green Operational Status icon indicates the DSL service is connected and functioning DSL Displays the operational status and performance statistics...

Page 26: ...ough the WAN port The external DHCP server may be part of the ISP s network The remaining alternative Internal DHCP Server is used to obtain IP settings from a DHCP server within the Ethernet LAN The IP settings will sent through the LAN port LAN IP Address The IP address your computers use to identify the device s LAN port Note that the public IP address assigned to you by your ISP is not your LA...

Page 27: ... settings or receive them from a DHCP server on your LAN or from the ISP see previous section DHCP Mode Configuration Choose one the options below from the DHCP Mode drop down menu DHCP Server This is the default mode for the Modem In this mode it provides DHCP services to properly configured hosts on the Ethernet LAN DHCP Relay In this mode the Modem is an intermediary device or relay agent betwe...

Page 28: ...the ADSL Modulation type used unless you have been instructed to do so If this setting is not configured properly the Modem will not work DSL Mode Configuration for change modulation method If you are instructed by your ISP to change the Modulation type is used for your service select the desired modulation type from the pull down menu and click Loop Start The modulation types available are T1 413...

Page 29: ...igure the following settings on the PPP Configuration page Inactivity TimeOut mins The time in minutes that must elapse before a PPP connection times out due to inactivity Ignore WAN to LAN traffic while monitoring activity When enabled data traffic traveling in the incoming direction from the WAN port to the LAN port will not count as activity on the WAN port i e it will not prevent the connectio...

Page 30: ...le with PPoE interfaces but not with PPoA interfaces The name of the ISP service you are using with this PPP connection ISPs may offer different types of services for example for online gaming or business communications each requiring a different login and other connection properties Use DHCP When set to Enable the device will acquire additional IP information from the ISP s DHCP server The PPP co...

Page 31: ... to a less restrictive set of protections because they originate within the network The term DMZ de militarized zone in Internet networking terms refers to computers that are available for both public and in network accesses such as a company s public Web server Netmask The netmask you want to assign to the interface RFC 1577 Specifies whether the IPoA protocol to be used complies with the IEFT sp...

Page 32: ...ec Type drop down list select the level of firewall security for the interface Public Private or DMZ 4 In the RFC 1577 Click the Yes radio button if the interface complies with the IETF specification RFC 1577 and click the Add button 5 Click the Submit button A confirmation page will display to confirm your changes 6 Click the Close to return to the IPoA page and view the new interface in the tabl...

Page 33: ...our ISP Before creating an EOA interface or modifying the default settings contact your ISP to determine which type of protocol they use IMPORTANT Your ISP may use a protocol other than EOA for communication with the Modem such as the point to point protocol PPP One type of PPP named PPP over Ethernet PPPoE actually works on top of the EOA protocol The other type PPP over ATM PPPoA does not Howeve...

Page 34: ...iffer if this address is not available Some ISPs use static IP settings that are manually assigned to each account If your service provider instructs you to configure a Static IP Address type in the global IP Address for this EOA interface Net Mask If you are assigned a Static IP Address and Net Mask type in the Net Mask for this EOA interface Use DHCP When checked this setting instructs the devic...

Page 35: ...r disable NAT by selecting the Enable or Disable option in the configuration menu and submitting the settings NAT Configuration To view the NAT Rule setting menu or the NAT Translations entries select the option from the NAT Options drop down menu To configure NAT Rules select the NAT Rule Entry option and click the Add button A new window is displayed Add NAT Rule From the Rule Flavor drop down l...

Page 36: ...ddress From Type the public IP address assigned to you by your ISP Global Address To If you have multiple WAN interfaces in both the Global Address From and Global Address To fields type the IP address of the interface to which this rule applies This rule will not be enforced for data that arrives on other PPP interfaces If you have multiple WAN interfaces and want the rule to be enforced on a ran...

Page 37: ...interface associated with each MAC in its bridge forwarding table When the bridge receives a data packet it compares its destination MAC to the entries in the bridge forwarding table When the packet s destination MAC address matches one of the entries it forwards the packet through the interface that connects to the corresponding network The bridge does not send the data directly to the receiving ...

Page 38: ...ion settings open the Save Reboot menu and click the Save button to save your changes to permanent memory Note If you enable bridging on an interface that has already been assigned an IP address then it is considered IP enabled and will route rather than bridge IP packets received on the interface The interface will bridge non IP data it receives however You can determine whether the Ethernet eth ...

Page 39: ...log into the Configuration Manager and then click the ATM VCC button in the Bridging folder The ATM VCC Configuration page displays as shown below ATM VCC Configuration Menu Additional Virtual Connections In order to use more than one PVC setting it will be necessary to define one or two set of parameters for each virtual connection First use the ATM VC Configuration menu to define new AAL5 settin...

Page 40: ...mmunication between the Modem and service provider If you are adding a new VCC Interface or changing the existing VPI value type in the new VPI value VCI If you are adding a new VCC Interface or changing the existing VCI value type in the new VCI value Mux Type Select VC Mux or LLC from pull down menu MAX Proto per AAL5 This setting indicates the number of higher level interfaces that the VC can s...

Page 41: ...ange user name and password used for management privileges log into the Configuration Manager click on the Add button and change these settings in a new window User ID This lists the current User ID user name New Password Type in the new password Confirm New Type in the new password a second time for confirmation Click the Submit button to save the settings in temporary memory When you are done ma...

Page 42: ...er you have submitted all the configuration changes you want to make for this session click on the Save Reboot link in the Admin folder to view the Save Reboot page Save and Reboot To save current configuration settings as they have been submitted click the Save button Disregard the selection in the Reboot Mode drop down list it does not affect the save process The changes are now saved to permane...

Page 43: ...custom settings Image Upgrade Use the Image Upgrade menu to update firmware from a file on your system Image Firmware Upgrade Upgrade File Type in the full path and file name of the firmware file to be uploaded Alternatively you may click the Browse button to search for the file on your system When the filenames have been entered click the Upload button to commence loading the firmware file If the...

Page 44: ...ect the Virtual Circuit and click the Submit button A message will appear informing you if the loop test succeeded or failed The diagnostics utility will run a series of test to check whether the device s connections are up and working This takes only a few seconds The program reports whether the test passed or failed A test may be skipped if the program determines that no suitable interface is co...

Page 45: ...ate problems in the functioning of the system To display the Alarm page log into the Configuration Manager click the Alarm button in the Admin folder Alarm Trap Information Page Listed under Alarm Trap Information are the time and date of each recorded alarm event the type of alarm and a brief statement indicating its cause To remove all entries from the list click the Clear button New entries wil...

Page 46: ...eam up to 1 5 Mbps Upstream up to 512 Kbps MEDIA INTERFACE EXCHANGE RJ 11 port ADSL telephone line connection RJ 45 port for 10 100 BASE T Ethernet connection Physical and Environmental DC inputs Power Adapter 120 VAC to 230 VAC 60Hz 24W 9 V AC 1A Power Consumption 9 Watts Max Operating Temperature 5 to 40 C 41 to 104 F Humidity 5 to 95 non condensing Dimensions 142 mm x 117 mm x 31 mm Weight 360 ...

Page 47: ...it your telephone line into two separate lines one for regular telephone service and the other for ADSL then you do not need to use any type of filter device Follow the instructions given to you by your ADSL service provider ISP or telephone company about where and how you should connect the Modem to the ADSL line In Line Filters Two common styles of low pass filters are shown in this section the ...

Page 48: ...he splitter has three RJ 11 ports used to connect to the wall jack the Modem and if desired a telephone or telephone device The connection ports are typically labeled as follows Line This port connects to the wall jack ADSL This port connects to the Modem Phone This port connects to a telephone or other telephone device The diagram below illustrates the proper use of the split line style filter Fi...

Page 49: ...na com cn Denmark D Link Denmark Naverland 2 DK 2600 Glostrup Copenhagen Denmark TEL 45 43 969040 FAX 45 43 424347 URL www dlink dk E MAIL info dlink dk Egypt D Link Middle East 7 Assem Ebn Sabet Street Heliopolis Cairo Egypt TEL 20 2 635 6176 FAX 20 2 635 6192 URL www dlink me com E MAIL support dlink me com fateen dlink me com Finland D Link Finland Thlli ja Pakkahuone Katajanokanlaituri 5 FIN 0...

Page 50: ...e Synergy Singapore 609917 TEL 65 774 6233 FAX 65 774 6322 E MAIL info dlink com sg URL www dlink intl com South Africa D Link South Africa 102 106 Witchhazel Avenue Einstein Park 2 Block B Highveld Technopark Centurion South Africa TEL 27 0 12 665 2165 FAX 27 0 12 665 2186 URL www d link co za E MAIL attie d link co za Spain D Link Iberia C Sabino De Arana 56 Bajos 08028 Barcelona Spain TEL 34 93...

Page 51: ...d Colindale London NW9 5AB United Kingdom TEL 44 0 20 8731 5555 FAX 44 0 20 8731 5511 BBS 44 0 181 235 5511 URL www dlink co uk E MAIL info dlink co uk U S A D Link U S A 53 Discovery Drive Irvine CA 92618 USA TEL 1 949 788 0805 FAX 1 949 753 7033 BBS 1 949 455 1779 1 949 455 9616 INFO 1 800 326 1688 URL www dlink com E MAIL tech dlink com support dlink com ...

Page 52: ...999 1000 or more 3 What network protocol s does your organization use XNS IPX TCP IP DECnet Others_______________________________________________________ 4 What network operating system s does your organization use D Link LANsmart Novell NetWare NetWare Lite SCO Unix Xenix PC NFS 3Com 3 Open Banyan Vines DECnet Pathwork Windows NT Windows NTAS Windows 95 Others_____________________________________...

Page 53: ......

Reviews: