background image

Configuration  

ADSL Setup – Manual Configuration 


To configure the Router’s basic configuration settings without running the Setup Wizard, you can access the 
menus used to configure ADSL Setup, LAN Setup, Time and Date, and Parental Control settings directly from 
the 

Setup

 directory. To access the 

ADSL Setup

 menus for PPPoE/PPPoA, Dynamic IP Address and Static IP 

Address connections, click on the 

ADSL Setup

 link button on the left side of the first menu that appears when 

you successfully access the web manager. 

D-Link DSL-2640R User Manual


23

Summary of Contents for DSL-2640R

Page 1: ......

Page 2: ... cause harmful interference to radio communications However there is no guarantee that interference will not occur in a particular installation If this equipment does cause harmful interference to radio or television reception which can be determined by turning the equipment off and on the user is encouraged to try to correct the interference by one or more of the following measures Reorient or re...

Page 3: ...Internet Connection Type Dynamic IP Address 20 Setup Wizard Step 2 Internet Connection Type Static IP Address 21 Setup Wizard Step 2 Internet Connection Type Bridge Mode 22 ADSL SETUP MANUAL CONFIGURATION 23 Manual ADSL Setup PPPoE PPPoA 24 Manual ADSL Setup Dynamic IP Address 25 Manual ADSL Setup Static IP Address 26 Manual ADSL Setup Bridge Mode 27 WIRELESS SETUP 28 Wireless Setup WEP 29 Wireles...

Page 4: ...rough Ethernet cable One Quick Installation Guide Warning The Router must be used with the power adapter included with the device System Requirements ADSL Internet service Computer with 200MHz Processor 64MB Memory CD ROM Drive Ethernet Adapter with TCP IP Protocol Installed Internet Explorer v6 or later FireFox v1 5 Computer with Windows 2000 Windows XP or Windows Vista D Link Click n Connect Uti...

Page 5: ...ed by major vendors RIP 1 RIP 2 The DSL 2640R supports both RIP 1 and RIP 2 exchanges with other routers Using both versions lets the Router to communicate with all RIP enabled devices Static Routing This allows you to select a data path to a particular network destination that will remain in the routing table and never age out If you wish to define a specific route that will always be used for da...

Page 6: ... Router Reset Button To manually reset depress button with the power on for about 6 to 8 seconds ADSL Port Use the ADSL cable to connect to the your telephone line RJ 11 port Ethernet Ports Use the Ethernet ports to connect the Router to a computer or an Ethernet LAN Power Insert Use the adapter shipped with the Router to connect to power source 3 ...

Page 7: ...tiation process has been settled A blinking green light indicates the ADSL line is in the process of synchronization Internet A solid green light indicates the WAN IP address from IPCP or DHCP and DSL is up or a static IP address is configured and PPP negotiation has been successfully completed If the indicator blinks green this means the Router is active If the Router power is off this remains da...

Page 8: ...an be easily accessed Be sure to keep this information safe and private Low Pass Filters Since ADSL and telephone services share the same copper wiring to carry their respective signals a filtering mechanism may be necessary to avoid mutual interference A low pass filter device can be installed for each telephone that shares the line with the ADSL line These filters are easy to install passive dev...

Page 9: ...DSL service is delivered through a PPPoE or PPPoA connection the information needed to establish and maintain the Internet connection can be stored in the Router In this case it is not necessary to install software on your computer It may however be necessary to change some settings in the device including account information used to identify and verify the connection All connections to the Intern...

Page 10: ...s may need to change the type of modulation used for their service The default DSL modulation Auto Synch Up used for the Router automatically detects all types of ADSL ADSL2 and ADSL2 modulation Security Protocol This is the method your ADSL service provider will use to verify your Username and Password when you log on to their network Your Router supports the PAP and CHAP protocols VPI Most users...

Page 11: ... interface The default Password is admin The user may change this LAN IP addresses for the DSL 2640R This is the IP address you will enter into the Address field of your web browser to access the Router s configuration graphical user interface GUI using a web browser The default IP address is 192 168 1 1 This may be changed to suit any IP address scheme the user desires This address will be the ba...

Page 12: ... computer or computers needs to be configured to obtain an IP address automatically that is they need to be configured as DHCP clients It is recommended that you collect and record this information here or in some other secure place in case you have to re configure your ADSL connection in the future Once you have the above information you are ready to setup and configure your DSL 2640R ADSL Router...

Page 13: ...o be changed before the Wireless ADSL Router can establish a connection Factory Reset Button The Router may be reset to the original factory default settings by using a ballpoint or paperclip to gently push down the reset button in the following sequence 1 With the router powered on check the Power LED to make sure it lights steady green press and hold down the reset button using a paper clip or s...

Page 14: ...lines when deciding what type of cable to use to make this connection When connecting the Router directly to a PC or server use a normal straight through cable You should use a crossed cable when connecting the Router to a normal MDI X port on a switch or hub Use a normal straight through cable when connecting it to an uplink MDI II port on a hub or switch The rules governing Ethernet cable length...

Page 15: ...er The easiest way to make sure your computer has the correct IP settings is to configure it to use the DHCP server in the Router The next section describes how to change the IP configuration for a computer running a Windows operating system to be a DHCP client To access the configuration utility open a web browser such as Internet Explorer and enter the IP address of the router 192 168 1 1 Type a...

Page 16: ...ings for Internet connection All configuration and management of the Router is done using the web based management interface pictured in the example The Setup Wizard allows you to configure the basic settings for the WAN Internet and Ethernet LAN including DHCP settings To launch the Setup Wizard click on the Setup Wizard button D Link DSL 2640R User Manual 13 ...

Page 17: ...zard click the Setup Wizard button in the first browser menu and follow the instructions in the menus that appear The initial menu summarizes the setup process Click the Next button to proceed You may stop using the Setup Wizard at any time by clicking the Cancel button If you exit the wizard you will return to the ADSL Setup menu without saving any of the settings changed during the process The f...

Page 18: ...ord and click Next to set the new password and continue or click Skip to keep the existing password The new menu that appears is used to select the Internet connection type Choose your Country from the pull down menu If you see your country listed follow the instructions beginning on the next page If you do not see your country listed choose Others and click Next skip ahead to Setup Wizard Step 2 ...

Page 19: ...n the list again the menu will be inoperable for a few seconds while it adjusts Some users will be required to select the Connection Type as well If necessary choose the Connection Type and click the Next button and continue to configure the connection as instructed by your ISP If you are configuring a Bridged connection the Wizard will go to the Finish menu Many users will use a form of PPP conne...

Page 20: ...Wizard Step 3 Finish After configuring the connection as instructed by your ISP the Router will need to be restarted Click the Finish button to save the configuration and restart the Router D Link DSL 2640R User Manual 17 ...

Page 21: ...nu should choose Others click the Next button and proceed to configure the Router as instructed by your ISP Choosing the Others options will disable the VPI VCI and Connection Type menus Click Next to choose the type of connection used for your account Select the connection type used by your ISP and click the Next button D Link DSL 2640R User Manual 18 ...

Page 22: ...mber type in the correct setting in the available entry fields Most users will not need to change these settings The Internet connection cannot function if these values are incorrect Some users may have to adjust the Connection Type from the drop down menu Click Next to go to the last Setup Wizard menu Click the Finish button to save the configuration and restart the Router D Link DSL 2640R User M...

Page 23: ...Some ISPs record the unique MAC address of your computer s Ethernet adapter when you first access their network This can prevent the Router which has a different MAC address from being allowed access to the ISPs network and the Internet To clone the MAC address of your computer s Ethernet adapter type in the MAC address in the Cloned MAC Address field and click the Clone MAC Address button This wi...

Page 24: ...the drop down menu If you are instructed to change the VPI or VCI numbers type in the correct setting in the available entry fields Most users will not need to change these settings The Internet connection cannot function if these values are incorrect Click Next to go to the last Setup Wizard menu Click the Finish button to save the configuration and restart the Router D Link DSL 2640R User Manual...

Page 25: ...in the correct setting in the available entry fields in this example no changes are needed so this setting is grayed out Most users will not need to change these settings The Internet connection cannot function if these values are incorrect Click Next to go to the last Setup Wizard menu Click the Finish button to save the configuration and restart the Router D Link DSL 2640R User Manual 22 ...

Page 26: ...configure ADSL Setup LAN Setup Time and Date and Parental Control settings directly from the Setup directory To access the ADSL Setup menus for PPPoE PPPoA Dynamic IP Address and Static IP Address connections click on the ADSL Setup link button on the left side of the first menu that appears when you successfully access the web manager D Link DSL 2640R User Manual 23 ...

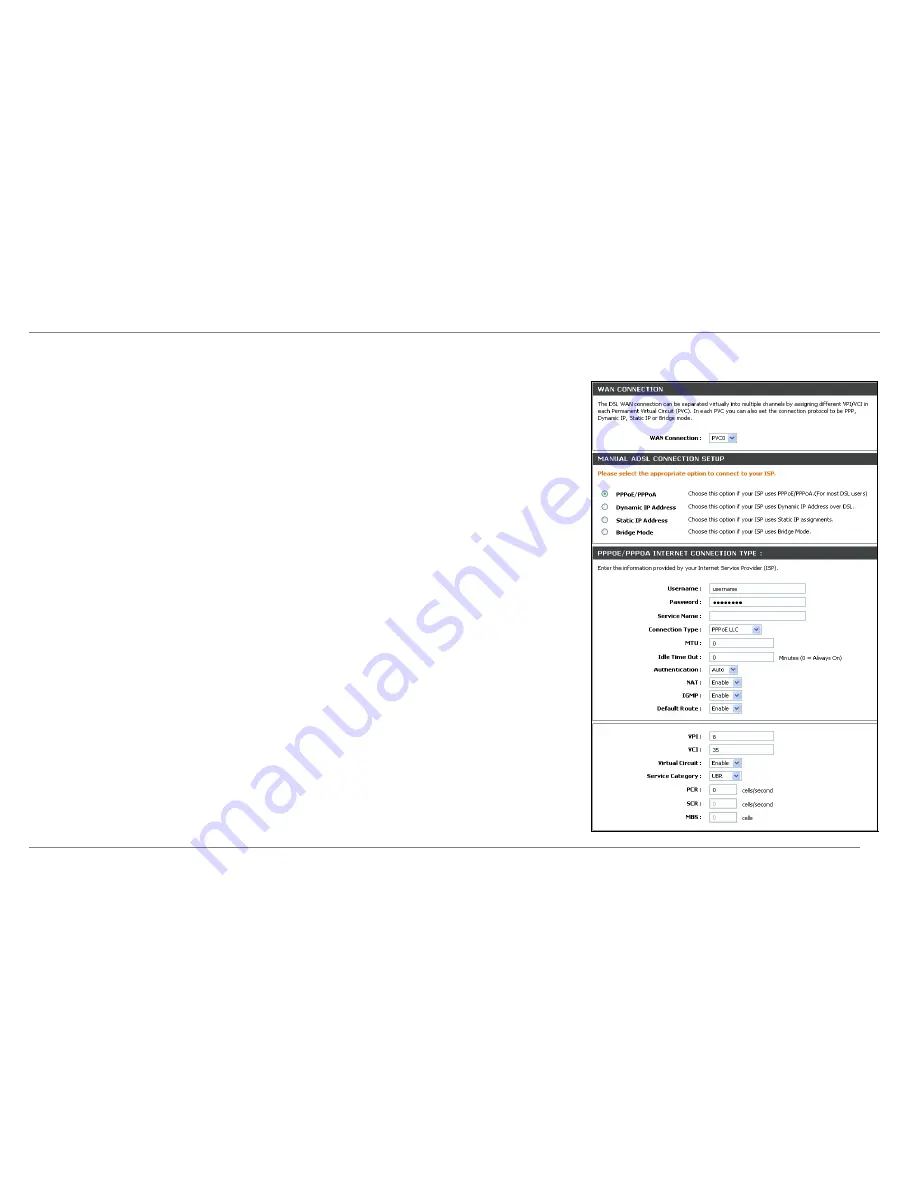
Page 27: ...Mux and PPPoE LLC If you have not been provided specific information for the Connection Type setting leave the default setting 3 Leave the MTU value at the default setting default 1500 unless you have specific reasons to change this see table below for more information 4 For time based accounts type an Idle Time Out in minutes Accounts that are not time based will want to choose the default connec...

Page 28: ... Router which has a different MAC address from being allowed access to the ISPs network and the Internet To clone the MAC address of your computer s Ethernet adapter type in the MAC address in the MAC Address field and click the Clone MAC Address button 3 NAT should remain Enabled If you disable NAT you will not be able to use more than one computer for Internet connections If you are using multip...

Page 29: ...P Address Subnet Mask and Default Gateway address as instructed by your ISP These are the global IP settings for the WAN interface This is the visible IP address of your account 3 NAT should remain Enable If you disable NAT you will not be able to use more than one computer for Internet connections NAT is enabled and disabled system wide therefore if you are using multiple virtual connections NAT ...

Page 30: ...rt Wizard at any time by clicking the Exit button If you exi t Choose the Connection Type from the pull down menu This defines both the connection type and encapsulation method used for your ADSL service The available options are 1483 Bridged IP LLC or 1483 Bridged IP VC Mux If you have not been provided specific information for the Connection Type setting leave the default setting etup Wizard ons...

Page 31: ... Guest SSID please see the Advanced Wireless section 3 Use the drop down menu to select the Channel used for your 802 11g wireless LAN What channels are available for use by the access point depends on the local regulatory environment Remember that all devices communicating with the device must use the same channel and use the same SSID 4 Click Apply Settings Additional Wireless Options Enable Aut...

Page 32: ...ys available To configure WEP settings 1 Select a WEP Key Length encryption level from the drop down menu and enter the proper length hexadecimal key in the available entry fields Up to 4 keys can be configured for use 2 Choose the Default WEP Key of from those just entered used as the active key 3 Select an Authentication type from the drop down menu Open or Shared Key or Shared Key 4 Click Apply...

Page 33: ...uthentication and requires periodic re authentication from associating wireless stations To configure WPA settings 1 Use the default WEP Mode to use WPA or WPA2 as needed or choose WPA Only or WPA2 Only operation 2 Choose the Default WEP Key of from those just entered used as the active key 3 Type a Group Key Update Interval to configure the interval time between re authorization in seconds 4 Clic...

Page 34: ...type in the desired values and click the Save Settings button Your web browser should automatically be redirected to the new IP address You will asked to login again to the Router s web manager The DHCP server is enabled by default for the Router s Ethernet LAN interface DHCP service will supply IP settings to workstations configured to automatically obtain IP settings that are connected to the Ro...

Page 35: ...eserve an IP address in the pool if the workstation is disconnected from the network or powered off If you opt to disable DHCP service all IP devices connected to the Router will require manual IP settings configuration or another DHCP server Static IP Address Assignment The router supports static IP address assignment for the LAN This means that an IP address is manually configured for a specifie...

Page 36: ...e your computer s system clock or set the time and date manually If you opt to use and alternative NTP server enter the SNTP server URL or IP address and click the Save Settings button to set the system time To obtain time settings from your computer deselect the Automatically Synchronize with Internet Time Server option and click the Copy Your Computer s Time Settings button Alternatively time ca...

Page 37: ...Setup Outbound Filter Inbound Filter DNS Setup VLAN Firewall DMZ Advanced ADSL Advanced Wireless Advanced LAN and Remote Management Click the corresponding link in the left panel of the window Port Forwarding is the first menu listed and the first to appear when accessing the Advanced directory D Link DSL 2640R User Manual 34 ...

Page 38: ...ing the Router for these features the Router will redirect these external services to an appropriate server on the users LAN Enter an IP address in the Private IP field select a Protocol Type from the drop down menu enter a range of ports in the Public Start Port and Public End Port fields and then click the Add Apply Settings button Finally click the Reboot button on the left panel to let your ch...

Page 39: ...ces for which QoS can be enabled QoS settings can be customized for wireless or Ethernet applications and services that are not included in those listed in the basic QoS menu To view the QoS settings menu for Wireless LAN click the Wireless QoS button under Advanced QoS see the description below Likewise to configure QoS settings for the Ethernet LAN click the LAN QoS button to view the settings m...

Page 40: ...ules for the Ethernet LAN type a Name for the rule choose the Priority level from the drop down menu choose the Protocol from the drop down menu and click the key to place a corresponding index number in the box or type an index number in the box Type the source port or range and the destination port or range in the spaces provided Where appropriate for example ICMP type a source and destination I...

Page 41: ...s for ICMP packets To create custom QoS rules for the Ethernet LAN type a Traffic Class Name for the rule choose the Wireless Transmit Priority level from the drop down menu choose the Protocol from the drop down menu Type the source port or range and the destination port or range in the spaces provided Where appropriate for example ICMP type a source and destination IP address or subnet Click Add...

Page 42: ...e the Source IP Address and Subnet Mask and Source Port if necessary The Destination IP Address Subnet Mask and Port can also be specified if required Click the Add Apply button to create and activate the new filtering rule The new rule appears listed in the Active Outbound IP Filter list A rule can be deleted by selecting the Remove option for the rule and clicking the Remove Selected button D Li...

Page 43: ... that will be allowed Type a Filter Name used for the rule select the Protocol and type the Source IP Address and Subnet Mask and Source Port if necessary The Destination IP Address Subnet Mask and Port can also be specified if required Click the Add Apply button to create and activate the new filtering rule The new rule appears listed in the Active Inbound IP Filter list A rule can be deleted by ...

Page 44: ...mote access to a host will be allowed by clicking a URL hyperlink in the following form dlinkddns com Because many ISPs assign public IP addresses using DHCP it can be difficult to locate a specific host on the LAN using the standard DNS For example if you are running a public web server or VPN server on your LAN DDNS ensures that the host can be located from the Internet if the public IP address ...

Page 45: ... 802 1Q compliant network device to another with the VLAN information intact This allows 802 1Q VLANs to span network devices and indeed the entire network if all network devices are 802 1Q compliant Select the Tagged option to enable tagging for the port Ports with tagging enabled will put the VID number priority and other VLAN information into the header of all packets that flow into and out of ...

Page 46: ...ewall bypass can be set up using a DMZ IP address The DMZ IP address is a visible address and does not benefit from the full protection of the firewall function Therefore it is advisable that other security precautions be enabled to protect the other computers and devices on the LAN It may be wise to use isolate the device with the DMZ IP address from the rest of the LAN For example if you want to...

Page 47: ...efault Auto Synch Up the mode used must be supported by the ISP in order for the ADSL signal to function Likewise for changing the ANNEX type if the Type used is not supported by the ISP in your region the ADSL signal will not function The Bitswap and SRA Seamless Rate Adaptation features can be enabled here If your ADSL modulation is ADSL2 or ADSL2 these features will only be useful if supported ...

Page 48: ...is more prevalent in a network with high traffic or high electromagnetic interference The default setting is 2347 Fragmentation Threshold The fragmentation threshold will determine if packets are to be fragmented Packets over the 2346 byte limit will be fragmented before transmission 2346 is the default setting DTIM Interval DTIM Delivery Traffic Indication Message Interval is a countdown informin...

Page 49: ...addresses and deny all other MAC addresses to associate Deny Association to the listed MAC addresses and allow association to others not on the list To use Wireless MAC Filters 1 Select the Activated option for Status 2 Choose the Action to either Allow Association or Deny Association of the listed MAC addresses 3 Type the MAC addresses effected by the chosen Action in the standard MAC address for...

Page 50: ...pplications such as streaming audio or video To use UPnP click the Enable UPnP option to check the box Multicast streaming support is enabled by default to allow streaming of audio and video and other multicast applications to pass through the Router To disable multicast streams click the Enable Multicast Streams box to remove the check mark Keep in mind that Internet radio and similar multicast s...

Page 51: ... restricted to the Router by specifying services allowed for management When remote management is enabled the options available are to either Allow All or Deny All with the Remote Admin Inbound Filter pull down menu Choose the services allowed from the LAN or WAN by checking the Enabled box for the service in the Remote Access Control list Click the Apply Settings button to make the change D Link ...

Page 52: ...Manual Maintenance Use the menus in the Maintenance directory to perform routine maintenance functions such as save configuration settings to hard disk and upgrading device firmware view system log and perform device diagnostic tests 49 ...

Page 53: ...s likely to change is the device password used to access the management software The administrator s user name of the Router admin cannot be changed The default password can be changed with the Password menu Change the password and click the Apply Settings button to establish the new password 50 ...

Page 54: ...be prompted to select a location on your computer to put the file To load a previously saved configuration file click the Browse button and locate the file on your computer Click the Upload Settings button to Load Settings From Local Hard Drive Confirm that you want to load the file when prompted and the process is completed automatically The Router will reboot and begin operating with the configu...

Page 55: ...ings so make sure you save the configuration settings with the Save Restore Settings menu described above or click the Backup Now button to go through the same procedure To upgrade firmware type in the name and path of the file or click on the Browse button to search for the file Click the Upgrade Firmware button to begin copying the file The file will load and restart the Router automatically 52 ...

Page 56: ...the local or external interface to test connectivity to known IP addresses The diagnostics feature executes a series of tests of your system software and hardware connections Use this menu when working with your ISP to troubleshoot problems Click the Re_run Diagnostics Tests button to view the connectivity status of the WAN connection 53 ...

Page 57: ...Maintenance D Link DSL 2640R User Manual System Log Use the System Log to view a log of events that occur on the Router 54 ...

Page 58: ...Maintenance D Link DSL 2640R User Manual Status Use these read only menus to view system information and monitor performance 55 ...

Page 59: ...tenance D Link DSL 2640R User Manual Device Info Use this menu to quickly view basic current information about the LAN and WAN interfaces and device information including Firmware Version and MAC address 56 ...

Page 60: ...Maintenance D Link DSL 2640R User Manual Connected Clients The Connected LAN Clients list displays active DHCP clients when the router is acting as a DHCP server and wireless clients 57 ...

Page 61: ...Maintenance D Link DSL 2640R User Manual Statistics Use this menu to monitor traffic on the Ethernet LAN Wireless LAN or ADSL interface This menu also displays information on the ADSL signal status 58 ...

Page 62: ...over Ethernet DC Power Input 100 120V 0 4A 50 60 Hz Output 12V 1 2A Data Transfer Rate G dmt full rate downstream up to 8 Mbps upstream up to 1 Mbps G lite ADSL downstream up to 1 5 Mbps upstream up to 512 Kbps G dmt bis full rate downstream up to 12 Mbps upstream up to 1 Mbps ADSL2 full rate downstream up to 24 Mbps upstream up to 1 Mbps Wireless Transfer Rates IEEE 802 11b 11 5 5 2 and 1Mbps IEE...

Reviews: