background image

29

Using the Configuration Utility (continued)

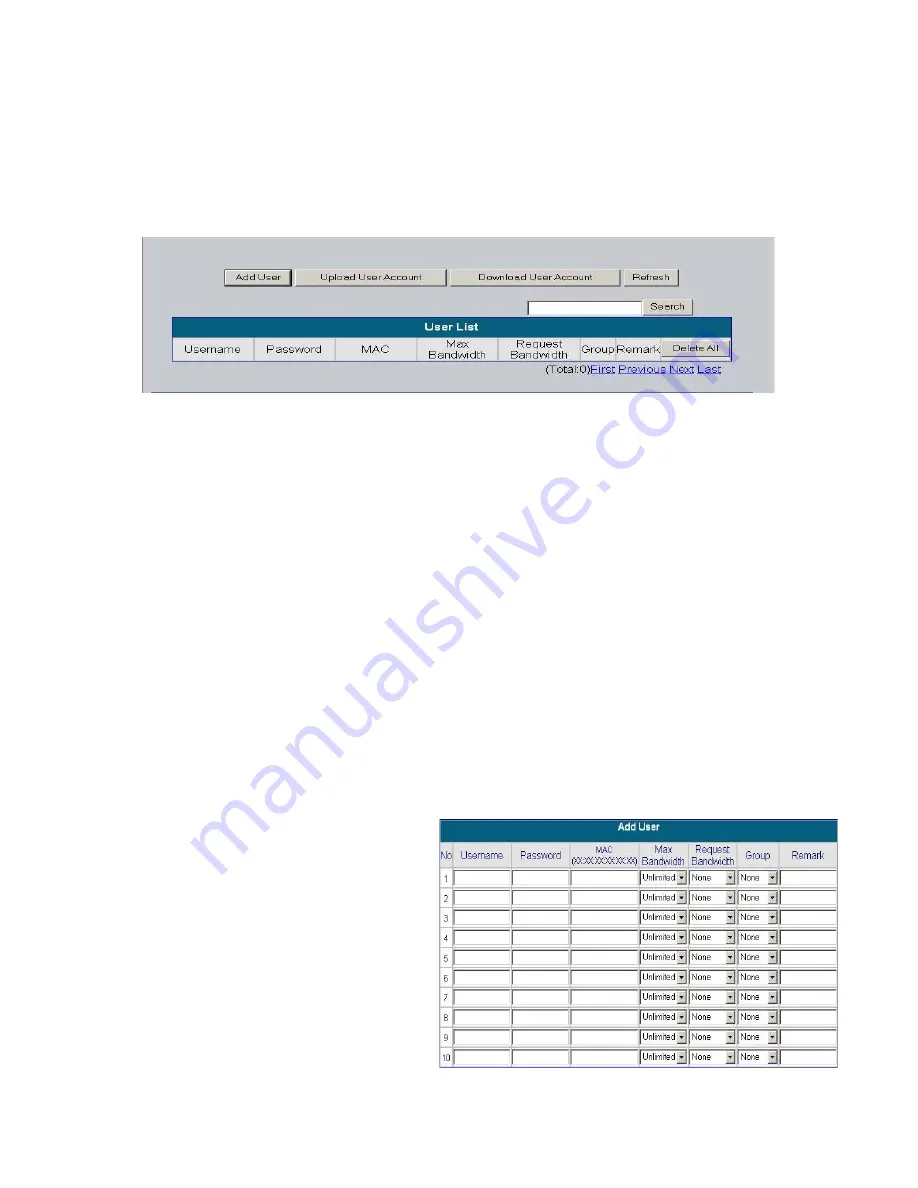
Authentication Methods>Local>Local Users List

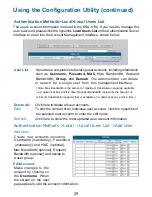
The user’s account information is stored in the DSA-5100. If you need to manage the
user’s account, please click the hyperlink Local Users List on the Authentication Server
interface to enter into the Account Management Interface, shown below.

User List:


It provides a complete list of existing user accounts, including information
such as Username, Password, MAC, 

Max Bandwidth, Request 

               Bandwidth, 

Group, and Remark. The


administrator can delete 


or search for a single user from this


management interface.


( Note: Max Bandwidth is the amount of maximum transmission capacity available

                          on a network at any point in time. Request Bandwidth represents the amount of 

                          minimum transmission capacity that is available on a network at any point in time.)
 

Delete All:


Click here to delete all user accounts

.

Edit:


To

 edit the content of an individual user account, click the hyperlink of

the selected user account to enter the edit mode.

Refresh:

        Click 

here to show the most updated user account information

Edit Account:

Make changes to the
account by clicking on
the  Username. When
the screen on the next
page appears, edit the account information.

Add User:

Create new accounts,including

Username 

(mandatory), 

Password

(mandatory) and 

MAC 

(optional),

Max Bandwidth (optional), Request 
Bandwidth (optional) and assign to 
a user group

.

Authentication Methods > Local  > Local Users List  > Add User

Summary of Contents for DSA 5100 - Airspot - Gateway

Page 1: ...Manual Building Networks for People Enterprise Gateway D Link Airspot DSA 5100 April 2006 v 1 03 ...

Page 2: ...res 6 Sample Network Setup 8 Installation 9 Setting Up the DSA 3100 9 TCP IP Network Setting 10 Internet Access Configuration 11 Using the Configuration Utility 13 Networking Basics 63 Technical Specifications 77 Technical Support 78 Warranty 81 Appendix Windows TCP IP Setup 84 ...

Page 3: ...installed Ethernet adapter System Requirements for Configuration D Link DSA 5100 Airspot Enterprise Gateway CD ROM with manual Quick Installation Guide Three 3 CAT5 UTP Straight through Ethernet cables One 1 CAT5 UTP Cross over cable One 1 Console cable 1 PC Style Power cable to 110 VAC If any of the above items are missing please contact your reseller 1 2 3 4 5 6 7 ...

Page 4: ...rnet Explorer or Netscape Navigator operating on Windows 98SE Me 2000 XP Macintosh OS 9 Macintosh OS X v10 1 5 or later Linux or Pocket PC 2000 2002 The DSA 5100 allows the operator to offer wired or wireless networking services and access to the Internet when used with a switch or wireless access point respectively The device features many management settings allowing for private and public acces...

Page 5: ...turn the unit to factory default settings or to reconfigure system settings Public LAN Port Can be connected to the open network environment managed by the system or WLAN and requires authentication before logging on the Internet Private LAN Port Can be connected to the Intranet environment by switch or Ethernet without authentication in order to log on to the Internet WAN 1 Port Connect to an ATU...

Page 6: ... DMZ server Supports machine operation status monitoring and reporting system Supports roaming across networks Provides several DoS protection mechanisms Customizable packet filter rules Customizable walled garden free surfing area The DSA 5100 supports at least 400 on line users concurrently Supports POP3 RADIUS and LDAP authentication mechanisms Supports two or more authentication mechanisms sim...

Page 7: ...tion interface and user logon interface Customizable user login logout web interface Customizable redirect after users are successfully authenticated during login logout Supports Console management interface Supports SSH remote administration interface Supports Web based administration interface Supports SNMP v2 Supports user s bandwidth restriction Supports remote firmware upgrade Supports built ...

Page 8: ...8 A Sample Network Setup ...

Page 9: ...ne of the supplied straight through Ethernet cables if connecting to a hub or switch Use the supplied crossover cable if connecting directly to an AP or PC Warning The Public LAN port cannot connect to a Layer 3 device 4 Connecting the Private LAN port The Private LAN port is used to provide Internet access without authentication for your existing Private Network Use one of the supplied straight t...

Page 10: ...DSA 5100 The DSA 5100 leases DHCP addresses from the Public and Private LAN ports for ease of configuration For Non Server Windows operating systems the default setting for TCP IP is DHCP client which will obtain an IP address automatically If you wish to use a static IP on the public or private LAN section or you wish to check the TCP IP setup please refer to the Appendix Windows TCP IP Setup ...

Page 11: ...iguration To configure your PCs to use the DSA 5100 for Internet access follow this procedure For Windows 98SE 2000 Select the Connection tab and click the Setup button Please select Start Menu Control Panel Internet Options ...

Page 12: ... complete Select Start Menu Control Panel Network and Internet Connection Select the Connection tab and click the Setup button Click Next on the New Connection Wizard screen Select Connect to the Internet and click Next Select Set up my connection manually and click Next Check Connect using a broadband connection that is always on and click Next Click Finish to close the New Connection Wizard Inte...

Page 13: ...k the enable box Start your Microsoft Internet Explorer Web browser program Type the IP address of the DSA 5100 the default IP address is 192 168 0 40 preceded by https in the address field and press Enter Make sure that the IP addresses of the DSA 5100 and your computer are in the same network User Name admin admin The administrator of the DSA 5100 Password admin You can log in as admin or as man...

Page 14: ...Setup Wizard please see the Installation Guide included with your purchase You can access the configuration features from this window User Authentication Authentication policies The User Authentication Authentication policies screen will appear if you logged in as a manager For more information on the Setup Wizard please see the Installation Guide You can access the configuration features from thi...

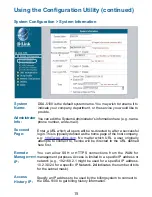
Page 15: ... This is typically defined as the home page of the host company e g http www dlink com No matter which URL a user originally attempts to connect to he she will be directed to the URL defined here first Access History IP Specify an IP address to be used by the billing system to connect to the DSA 5100 to get billing history information Remote Management IP You can allow SSH or HTTPS connections fro...

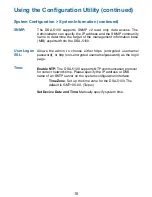
Page 16: ...exported from the DSA 5100 Time Enable NTP The DSA 5100 supports NTP communication protocol for correct network time Please specify the IP address or DNS name of an SNTP server on the system configuration interface Time Zone Set up the time zone for the DSA 5100 The default is GMT 08 00 Taipei Set Device Date and Time Manually specify system time User Logon SSL Allows the admin to choose either ht...

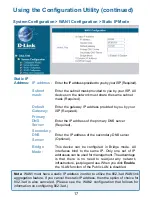
Page 17: ...er Enter the IP address of the secondary DNS server Optional Secondary DNS Server This device can be configured in Bridge mode All interfaces bind to the same IP Only one set of IP addresses can be used for management The advantage is that there is no need to readjust any network infrastructure just plug and use When you click Enable the VLAN function of the Public LAN is disabled Bridge Mode Note...

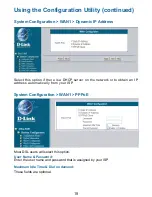
Page 18: ...me and password that is assigned by your ISP User Name Password System Configuration WAN1 PPPoE Most DSL users will select this option Select this option if there is a DHCP server on the network or to obtain an IP address automatically from your ISP These fields are optional Maximum Idle Time Dial on demand ...

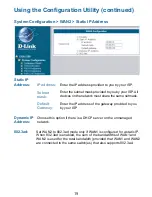
Page 19: ...k provided to you by your ISP All devices on the network must share the same netmask Subnet mask Enter the IP address of the gateway provided to you by your ISP Default Gateway Static IP Address 802 3ad Set WAN2 to 802 3ad mode only if WAN1 is configured for a static IP When 802 3ad is enabled the sum of the bandwidths of WAN1 and WAN2 is used for the total bandwidth provided that WAN1 and WAN2 ar...

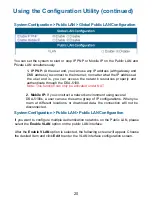
Page 20: ...h the DSA 5100 2 Mobile IP If you construct a network environment using several DSA 5100s a user can use the same group of IP configurations When you roam at different locations or download data the connection will not be disconnected Note This function can only be activated under NAT System Configuration Public LAN Public LAN Configuration If you want to configure multiple Authentication networks...

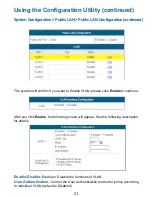
Page 21: ...irm if you want to Enable VLAN please click Enable to continue After you click Enable the following screen will appear See the following description for details Enable Disable Enable or Disable the functions of VLAN User Authentication Control the User Authentication method or policy according to individual VLAN default is Disabled ...

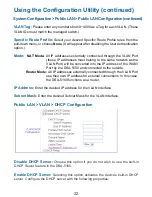
Page 22: ...e network as the VLAN Port will be converted into the IP address of the WAN1 Port by the DSA 5100 and connected to the outside Router Mode All IP addresses externally connected through the VLAN Port use their own IP address for external connections In this case the DSA 5100 functions as a router IP Address Enter the desired IP address for the VLAN Interface Subnet Mask Enter the desired Subnet Mas...

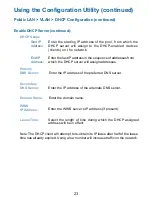
Page 23: ... the DHCP server will assign addresses End IP Address Enter the IP address of the preferred DNS server Primary DNS Server Enter the IP address of the alternate DNS server Secondary DNS Server Select the length of time during which the DHCP assigned address will be in effect Lease Time Enter the domain name Domain Name Enter the WINS server s IP address if present WINS IP Address Note The DHCP clie...

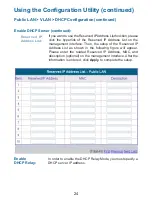
Page 24: ...link of the Reserved IP Address List on the management interface Then the setup of the Reserved IP Address List as shown in the following figure will appear Please enter the related Reserved IP Address MAC and description optional on the management interface After the information is entered click Apply to complete the setup Enable DHCP Relay In order to enable the DHCP Relay Mode you must specify ...

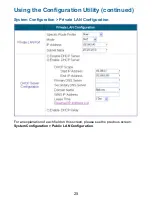
Page 25: ...g the Configuration Utility continued System Configuration Private LAN Configuration For an explanation of each field on this screen please see the previous screen System Configuration Public LAN Configuration ...

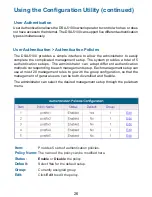
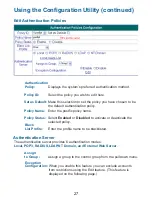
Page 26: ...s a total of 5 authentication setups The administrator can adopt different authentication methods corresponding to each management setup Each management setup can use at most 20 management rules to go with the group configuration so that the management of general users can be both diversified and flexible The administrator can select the desired management setup through the pull down menu Item Pro...

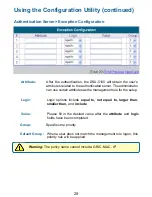
Page 27: ...x policy name Policy Status Select Enabled or Disabled to activate or deactivate the selected policy Black List Profile Enter the profile name to be blacklisted Authentication Server The authentication server provides 6 authentication modes Local POP3 RADIUS LDAP NT Domain and External Web Server Assign to Group Exception Configuration When you enable this feature you can exclude accounts from res...

Page 28: ...can use certain attributes as the management rule for the setup Logic options include equal to not equal to larger than smaller than and include Logic Please fill in the desired value after the attribute and logic fields have been completed Value Specifies the priority Group Warning The policy name cannot include GRIC MAC IP When a user does not match the management rule logon this priority rule w...

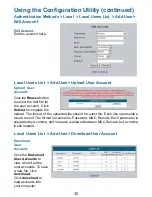
Page 29: ...nt of maximum transmission capacity available on a network at any point in time Request Bandwidth represents the amount of minimum transmission capacity that is available on a network at any point in time Delete All Click here to delete all user accounts Edit To edit the content of an individual user account click the hyperlink of the selected user account to enter the edit mode Refresh Click here...

Page 30: ...Download User Accounts to view a list of all the user accounts To save a new file click download Click download to load accounts into your computer Click the Browse button to select the text file for the user account Click Submit to complete the upload The format of the uploaded file should be a text file Each line represents a User Account The format is Username Password MAC Remark Each parameter...

Page 31: ...e the RADIUS server IP Address or Domain Name Authentication Port The authentication port for the RADIUS server Accounting Port The port reading the accounting information Secret Key This is for encryption and decryption must be configured on both RADIUS Server and DSA 5100 Accounting Service Select to enable the accounting service optional Using the Configuration Utility continued Authentication ...

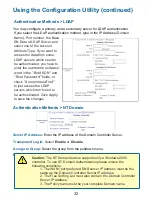
Page 32: ...ess the LDAP servers which don t need to be authenticated Click Apply to save the changes Authentication Methods NT Domain Server IP Address Enter the IP address of the Domain Controller Server Transparent Login Select Enable or Disable Assign to Group Select the group from the pulldown menu Exception Configuration Select Enable or Disable Caution The NT Domain feature supports only a Windows 2000...

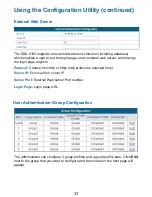
Page 33: ...change the login page anytime Protocol Choose from http or https http protocol is selected here Server IP External Web server IP Server Port External Web server Port number Login Page Login page URL User Authentication Group Configuration The administrator can configure 5 group profiles and a guest profile here Click Edit next to the group that you want to configure and the screen on the next page...

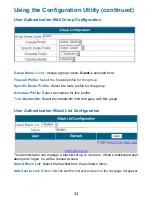
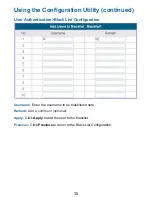
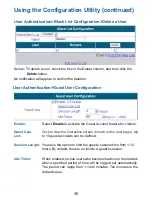
Page 34: ...for this group Schedule Profile Select a schedule for this profile Total Bandwidth Select the bandwidth limit that goes with this group User Authentication Black List Configuration The administrator can manage a blacklist of up to 40 users When a blacklisted user attempts to logon he will be denied access Select Black List Select the blacklist from the pulldown menu Add User to List Click on this ...
Page 35: ...d User Authentication Black List Configuration Username Enter the username to be blacklisted here Remark Add a comment optional Apply Click Apply to add the user to the blacklist Previous Click Previous to return to the Black List Configuration ...

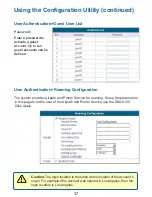
Page 36: ...st Session Length Idle Timer Click to view the interactive screen shown on the next page Up to 10 guest accounts can be defined You have the option to limit the guest s session time from 1 12 hours By default there is no limit to a guest s session Select Enable to activate the Guest Account feature for visitors When enabled on line users who become inactive on the network after a specified period ...

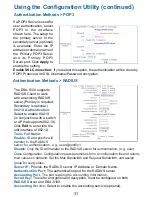
Page 37: ... Authentication Roaming Configuration The system provides Airpath and Pronto Service for roaming Set up the parameters in this page to let the user of the Airpath and Pronto Service use the DSA 5100 Click Apply Caution The login location is the same as the location of the account s origin For example if the account was opened in Los Angeles then the login location is Los Angeles ...

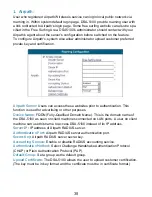
Page 38: ...nction is used for advertising or other purposes Device Name FQDN Fully Qualified Domain Name This is the domain name of the DSA 5100 as seen on client machines connected on LAN ports A user on client machine can use this name to access DSA 5100 instead of its IP address Server IP IP address of Airpath RADIUS server Authentication Port Airpath RADIUS server authentication port Secret Key Airpath R...

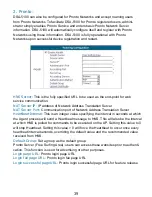
Page 39: ...ation port of Network Address Translation Server Heartbeat Interval This is an integer value specifying the interval in seconds at which the Agent process will send a Heartbeat message to HNS This will also be the interval at which HNS is polled for commands to be executed on the AP Setting this value to 0 will stop Heartbeat Setting this value 0 will force the Heartbeat to occur once every heartb...

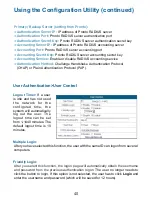
Page 40: ...r no longer needs to click the button to login If this option is not selected the user has to click Login and enter the username and password which will be saved for 12 hours Primary Backup Server setting from Pronto Authentication Server IP IP address of Pronto RADIUS server Authentication Port Pronto RADIUS server authentication port Authentication Secret Key Pronto RADIUS server authentication ...

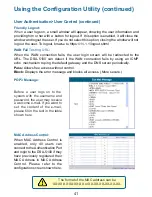
Page 41: ...connection fails by using an ICMP echo mechanism to ping the default gateway and the DNS server periodically Pass Allows free access without control Block Displays the error message and blocks all access More secure Before a user logs on to the system with the username and password the user may receive a welcome e mail If you want to set the content of the e mail please fill in the text in the tab...

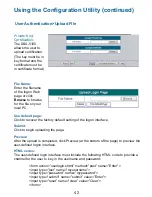
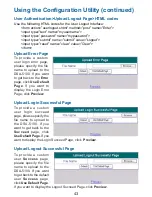
Page 42: ...ver the factory default setting of the logon interface Submit Click to begin uploading the page Preview After the upload is completed click Preview at the bottom of the page to preview the user defined logon interface The user defined login interface must include the following HTML code to provide a channel for the user to key in the username and password form action userlogin shtml method post na...

Page 43: ...oad to the DSA 5100 If you want to get back to the Error page click Use Default Page If you want to display the Login Error Page click Preview Upload Login Successful Page To provide a custom user login succeed page please specify the file name to upload to the DSA 5100 If you want to get back to the Succeed page click Use Default Page If you want to display the Login Succeed Page click Preview Up...

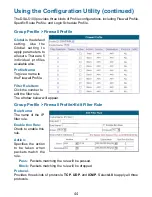
Page 44: ...le also Profile Name To give a name to the Firewall Profile Filter Rule Item Click the number to edit the filter rule The window below will appear Group Profile Firewall Profile Edit Filter Rule Rule Name The name of the IP filter rule Enable this Rule Check to enable this rule Action Specifies the action to be taken when packets match the rule Pass Packets matching the rule will be passed Block P...

Page 45: ...ply to all four interfaces Source Destination Interface Subnet Mask of the Network component sending receiving the request Source Destination Subnet Mask IP address of the Network component sending receiving the request Source Destination Operator Provides the comparison rules Equal Not Equal Larger Than and Less Than Source Destination Start Port Start Port of the Network component sending receiv...

Page 46: ...t Netmask Specifies the target network or host IP Destination IP Address Gateway IP Address Specifies the target subnet mask Specifies the IP address of the next hop router Caution To allow two machines to access data from each other add a static route to the next connected router in order to send all packets back to the DSA 5100 After the static route is changed it is necessary to restart the DSA...

Page 47: ... the corresponding combination at the Ethernet end Virtual IP Address and WAN end Public IP Address The WAN port of the system will automatically set the public address defined here These settings will be effective immediately after you click the Apply button Virtual Server The function of this item permits you to define at most 40 virtual servers so that computers may access LAN resources from th...

Page 48: ... effective immediately after you click Apply Network Configuration Privilege List Port and IP Redirect To permit a specific device at the user end to have network access without going through authentication you only need to key in the IP address of the user on this interface This system permits at most 100 IP addresses to have network access without going through authentication These settings will...

Page 49: ...y after you click Apply Warning Permitting specific MAC addresses to have access rights without going through authentication may cause security problems Network Configuration Monitor IP List The system will send out the packet regularly to monitor the connection status of the IP addresses on the list If the monitored IP address does not respond the system will send an e mail to the administrator A...

Page 50: ...and NTLM are Microsoft proprietary mechanisms Only PLAIN and LOGIN can use the UNIX login password Netscape uses PLAIN Outlook and Outlook express default to using LOGIN although they can be set to use NTLMv1 Pegasus uses CRAM MD5 or LOGIN but you are not able to configure which to use Eudora possibly uses NTLMv1 perhaps LOGIN that have not been verified Network Configuration Free Surfing Area The...

Page 51: ...If you have built a Proxy Server in your network environment and the user s browser is set to Proxy you must set your External Proxy Server IP address and Proxy Port in this section fo the configuration in order to operate in the Proxy network environment Internal Proxy Server Enable this function to configure the DSA 5100 as a proxy server External Proxy Server ...

Page 52: ...ator in the DSA 5100 manager This user has the right to manage a user account the admin functions are denied The admin and manager can change their passwords specify the current password first The new password must be entered twice Note If you lost or forgot the Administrator s Password you can reset it through the text mode management interface of the serial port ...

Page 53: ... restore the factory default settings to the system Create Backup Image Create Generate the backup image file Restore Settings From File Browse Browse for the backup file Restore Click to load the selected backup file for the setup status Reset to the Factory Default Restore to the factory default setting of the system Setting Caution The image file must be generated by the the system ...

Page 54: ...rading the firmware You must restart the system before the firmware upgrade is effective If you have modified any setting remember to save the setting before restarting the system Warning Please restart the system through the management interface Do not turn off the system directly and then turn on the power again Doing so may damage the unit Utilities Restart This function allows you to safely re...

Page 55: ...55 Using the Configuration Utility continued Status System Status You can use this function to get the overview of the system status Please refer to the following example ...

Page 56: ...up to a maxi mum of 3 days E mail To Send the history to this email address Time Time Server Name The DSA 5100 uses an external Time Server to check time The system time is Greenwich time User Idle Timer It is the logout time for idling The online user will be forced to logout after being idled for 10 minutes Multiple Login It does not allow multiple logins for a user Guest Account Enable the Gues...

Page 57: ...57 Using the Configuration Utility continued Status Interface Status ...

Page 58: ...58 Using the Configuration Utility continued Status Interface Status continued ...

Page 59: ...to the internal DRAM If you want to automatically send the history to your E mail address please enter your E mail address in the History E mail column History Email Notify Configuration The Interval column shows the interval for sending the history E mail If you choose one day then the history mail will be sent to you once a day Interval Syslog To Specify the IP and Port of the Syslog server Chec...

Page 60: ... provided The terminal simulation program that you use such as the Hyperterminal should be set to the parameter value of 115200 8 n 1 The main console is a basic interface using interactive dialog boxes Please use the arrow keys on the keyboard to browse the menu and press the Enter key to select specific menus and confirm entered data Console Interface Main Menu Once you properly connect to the s...

Page 61: ... of the successful setup of another static route on the DSA 5100 Display ARP table The internal ARP table of the DSA 5100 is displayed Display system up time The system up time of the DSA 5100 is displayed Check service status The current status of each service on the DSA 5100 Set device into safe mode If the administrator is unable to use the Web Management Interface through a Web browser then he...

Page 62: ... administrator s password If you forget the password and are unable to login to the console management interface of the DSA 5100 you can still use the null modem cable to connect directly to the console management interface of the DSA 5100 You will need to set the administrator s password again Using the Configuration Utility continued Console Interface Change Admin password Caution When using SSH...

Page 63: ...soft Windows XP Note Please refer to websites such as http www homenethelp com and http www microsoft com windows2000 for information about networking computers using Windows 2000 ME or 98SE Go to Start Control Panel Network Connections Select Set up a home or small office network Networking Basics When this screen appears click Next ...

Page 64: ...ns in this window Networking Basics continued Click Next In the following window select the best description of your computer If your computer connects to the internet through a gateway router select the second option as shown Click Next ...

Page 65: ...65 Enter a Computer description and a Computer name optional Networking Basics continued Click Next Enter a Workgroup name All computers on your network should have the same Workgroup name Click Next ...

Page 66: ... while the Network Setup Wizard applies the changes Networking Basics continued When the changes are complete click Next Please wait while the Network Setup Wizard configures the computer This may take a few minutes ...

Page 67: ...w select the option that fits your needs In this example Create a Network Setup Disk has been selected You will run this disk on each of the computers on your network Click Next Insert a disk into the Floppy Disk Drive in this case drive A Click Next ...

Page 68: ...lease read the information under Here s how in the screen below After you com plete the Network Setup Wizard you will use the Network Setup Disk to run the Network Setup Wizard once on each of the computers on your network Click Next ...

Page 69: ...ew settings will take effect when you restart the computer Click Yes to restart the computer You have completed configuring this computer Next you will need to run the Net work Setup Disk on all the other computers on your network After running the Net work Setup Disk on all your computers your new Windows network will be ready to use ...

Page 70: ...corner of the screen Right click on My Computer Select Properties Select the Computer Name Tab in the System Properties window You may enter a Computer Description if you wish this field is optional To rename the computer and join a domain click Change Networking Basics continued Naming your Computer ...

Page 71: ...rk must have the same Workgroup name Click OK Checking the IP Address in Windows XP The adapter equipped computers in your network must be in the same IP Address range see Getting Started in this manual for a definition of IP Address Range To check on the IP Address of the adapter please do the following Right click on the Local Area Connection icon in the task bar Click on Status ...

Page 72: ...ys Broadband Routers will automatically assign IPAddresses to the computers on the network using DHCP Dynamic Host Configuration Protocol technology If you are using a DHCP capable Gateway Router you will not need to assign Static IP Addresses If you are not using a DHCP capable Gateway Router or you need to assign a Static IP Address please follow these instructions Go to Start Double click on Co...

Page 73: ...73 Networking Basics continued Assigning a Static IP Address in Windows XP 2000 continued Double click on Network Connections Double click on Properties Right click on Local Area Connections ...

Page 74: ...92 168 0 4 The subnet mask must be the same for all the computers on the network Networking Basics continued Assigning a Static IP Address in Windows XP 2000 Input your DNS server addresses Note If you are entering a DNS server you must enter the IP address of the Default Gateway the IP address of the firewall The DNS server information will be supplied by your ISP Internet Service Provider Click ...

Page 75: ... Go to the Apple Menu and se lect System Preferences cClick on Network Select Built in Ethernet in the Show pull down menu Select Manually in the Configure pull down menu Input the Static IPAddress the Subnet Mask and the Router IP Address in the appropriate fields Click Apply Now ...

Page 76: ...sh OSX Go to the Apple Menu and select System Preferences Click on Network Select Built in Ethernet in the Show pull down menu Select Using DHCP in the Configure pull down menu Click Apply Now The IP Address Subnet mask and the Router s IP Address will appear in a few seconds ...

Page 77: ...ess Point A good wireless connection will show four replies from the Wireless Router or Acess Point as shown Go to Start Run type command A window similar to this will appear Type ping xxx xxx xxx xxx where xxx is the IP Address of the Wireless Router or Access Point A good wireless connection will show four replies from the wireless router or access point as shown Note The following illustrations...

Page 78: ...lected at a time On line status monitoring and history traffic data review SSL protected access to the administration interface and user authentication inter face Customizable user login logout web interface Customizable target URL for users who successfullly get authorization Built in DHCP server High speed policy routing engine Customizable peremptory traffic redirection NTP client Local network...

Page 79: ...not need authentication Public LAN port 10 100Mbps Fast Ethernet connects to workstations devices that need authentication Console port RS 232 default set to 115200 n 8 1 no flow control Power Supply PC Power Cord Power Input 110 VAC Operating Temperature 0 50 C Storage Temperature 25 55 C EMI Certification FCC Class A CE Class A VCCI Class A C Tick Safety UL CSA TUV GS T Mark Device Ports ...

Page 80: ...tomers within the United States D Link Technical Support over the Telephone 877 453 5465 Twenty four hours a day seven days a week D Link Technical Support over the Internet http support dlink com email support dlink com Tech Support for customers within Canada D Link Technical Support over the Telephone 800 361 5265 Monday through Friday 7 30am to 12 00am EST D Link Technical Support over the Int...

Page 81: ...e portion of the product Software will substantially conform to D Link s then current functional specifications for the Software as set forth in the applicable documentation from the date of original retail purchase of the Software for a period of ninety 90 days Warranty Period provided that the Software is properly installed on approved hardware and operated as contemplated in its documentation D...

Page 82: ...as been altered tampered with defaced or removed Initial installation installation and removal of the product for repair and shipping costs Operational adjustments covered in the operating manual for the product and normal maintenance Damage that occurs in shipment due to act of God failures due to power surge and cosmetic damage Any hardware software firmware or other products or services provide...

Page 83: ...reserved CE Mark Warning This is a Class B product In a domestic environment this product may cause radio interference in which case the user may be required to take adequate measures FCC Statement This equipment has been tested and found to comply with the limits for a Class B digital device pursuant to part 15 of the FCC Rules These limits are designed to provide reasonable protection against ha...

Page 84: ...necessary to make any modification here With the factory default settings the DSA 5100 will automatically assign an appropriate IP address and related information to each PC after the PC has been booted You can check the TCP IP setup according to the following procedure Check the TCP IP Setup of Windows ME 98SE Select Start Control Panel Network ...

Page 85: ...nued Select the TCP IP communication protocol of the network card Click Properties Using DHCP If you want to use DHCP please select Obtain an IP Address Automatically which is also the default setting of Windows Reboot the PC to make sure an IP address is obtained from the DSA 5100 ...

Page 86: ...ou have completed the setup for your PC please inform the network administrator before modifying the following setup If the DNS Server column is blank please click Enable DNS Enter the DNS address or the DNS address provided by your ISP Click OK Select the Gateway tab and enter the IP address of the DSA 5100 Click Add ...

Page 87: ...87 Appendix Windows TCP IP Setup Check the TCP IP Setup of Windows 2000 Select Start Control Panel Network and Dial up Connections Right click Local Area Connection Select Properties ...

Page 88: ...Windows 2000 continued Select Internet Protocol TCP IP Click Properties Using DHCP If you want to use DHCP please select Obtain an IP Address Automatically which is also the default setting Reboot the PC to make sure an IP address is obtained from the DSA 5100 ...

Page 89: ...tatic IP Address If you have completed the setup for your PC please inform the network administrator before modifying the following setup Click Advanced in the TCP IP properties Select the IP Settings tab Enter the IP address of the DSA 5100 in the Default Gateways column Click Add Click Add ...

Page 90: ...up Check the TCP IP Setup of Windows 2000 continued Click Using the following DNS Server Address Enter the DNS address provided by your ISP Click OK Check the TCP IP Setup of Windows XP Select Start Control Panel Network Connection ...

Page 91: ...1 Appendix Windows TCP IP Setup Check the TCP IP Setup of Windows XP continued Right click Local Area Connection Select Properties Click Properties Select the General tab Select Internet Protocol TCP IP ...

Page 92: ...2 Appendix Windows TCP IP Setup Check the TCP IP Setup of Windows XP continued If you want to use DHCP please select Obtain an IP Address Automatically Click OK Click Advanced Using the Static IP Address ...

Page 93: ...ings tab Enter the IP address of the DSA 5100 in the Default Gateways column Click Add Click OK If the DNS Server field is blank select Use the following DNS Server Addresses Enter the DNS address Click OK Check the TCP IP Setup in Windows XP 04 18 06 ...

Reviews: