1
49
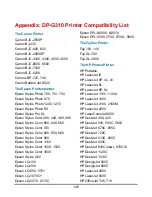
The IBM Printer
IBM 5577
IBM 4039 16L
IBM Infor Printer 20
IBM InfoPrint 32
The Lexmark Printer
Lexmark 4039 10R
Lexmark 5700
Lexmark Optra Color 45
Lexmark Optra C710
Lexmark Optra E, E+, E310
Lexmark Optra K1220
Lexmark Optra M410, M412
Lexmark Optra N
Lexmark Optra R+
Lexmark Optra S1250, S1855
Lexmark Optra SC-1275
Lexmark Optra SE-3455
Lexmark Optra T614
Lexmark Optra W810
Lexmark Z53
The NEC Printer
NEC P2200
NEC P3200
NEC P5300
NEC P6300
NEC P7300
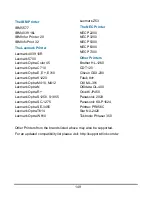
Other Printers
Brother HL-1260
CD T120
Citizen GSX-230
Futek 84+
OKI ML-391
OKIdata OL-400
Olivetti JP450
Panasonic 2023
Panasonic KX-P1624
Printtec PR856C
Star NX-2420
Tektronix Phraser 350
Other Printers from the brands listed above may also be supported.
For an updated compatibility list please visit: http://support.dlink.com.tw
Summary of Contents for AirPlus DP-G310
Page 1: ...1 D Link DP G310 Wireless G Print Server Manual Rev 01 February 2008 ...
Page 59: ...54 ...
Page 63: ...58 Reboot If you want to reset the print server you may just click the Reboot for restarting ...
Page 64: ...59 Refresh Printer Status Click Printer to refresh printer status ...
Page 65: ...60 TCP IP Printing for Windows Vista Go to Start Î Control Panel Î Printers ...
Page 66: ...61 Click Add a printer Select the first option Add a local printer and then click Next ...
Page 69: ...64 Select Custom and click Settings ...
Page 71: ...66 ...
Page 73: ...68 Click Next to start installing the printer ...
Page 74: ...69 After clicked Print a test page a small dialogue box will show up as below Click Close ...
Page 75: ...70 Click Finish The printer is now ready for printing with Windows Vista on your network ...
Page 77: ...72 Select the first option Local printer attached to this computer and click Next ...
Page 79: ...74 Click Next ...
Page 81: ...76 Select Custom and click Settings ...
Page 83: ...78 ...
Page 84: ...79 Click Next ...
Page 85: ...80 Click Finish ...
Page 87: ...82 At this screen you can input a name for the printer and then click Next ...
Page 88: ...83 Select Yes to print a test page click Next ...
Page 89: ...84 Click Finish The printer is now ready for printing with Windows XP on your network ...
Page 91: ...86 Select the first option Local printer attached to this computer and click Next ...
Page 93: ...88 Click Next ...
Page 95: ...90 Select Custom and click Settings ...
Page 97: ...92 ...
Page 98: ...93 Click Next ...
Page 99: ...94 Click Finish ...
Page 101: ...96 At this screen you can input a name for the printer and then click Next ...
Page 102: ...97 Select the first option Do not share this printer and click Next ...
Page 103: ...98 Select Yes to print a test page click Next ...
Page 104: ...99 Click Finish The printer is now ready for printing with Windows 2000 on your network ...
Page 109: ...104 Click Add Port ...
Page 111: ...106 ...
Page 113: ...108 Click OK Windows will ask for a restart Click Yes ...
Page 128: ...123 5 The Add a new print queue menu appears click Forward to continue ...
Page 130: ...125 8 Select the printer model ...
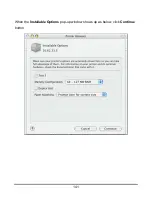
Page 146: ...141 When the Installable Options pop up window shows up as below click Continue button ...


