9
when used with other D-Link devices.
Wireless Installation Considerations
Installing Consideratons
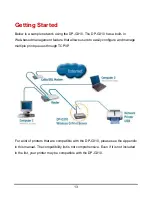
The D-Link DP-G310 lets you print through your network, using a wireless
connection, from virtually anywhere within its operating range. Keep in mind,
however, that the number, thickness and location of walls, ceilings, or other objects
that the wireless signals must pass through, may limit the range. Typical ranges vary
depending on the types of materials and background RF (radio frequency) noise in
your home or business. The key to maxinmizing wireless range is to follow these
basic guidelines:
1. Keep the antenna of the DP-G310 in an upright position.
2. Keep the number of walls and ceilings between the DP-G310 and other
network devices to a minimum. Each wall or ceiling can reduce your D-Link
wireless products range from 3-90 feet (1-30 meters). Position your devices
so that the number of walls or ceilings is minimized.
3. Be aware of the direct line between network devices. A wall that is 1.5 feet
thick (0.5 meters), at a 45-degree angle appears to be almost 3 feet (1meter)
thick. At a 2-degree angle it looks over 42 feet (14 meters). Polistion devices
so that the signal will travel straight through a wall or ceiling (instead of at an
angle) for better reception.
4. Building
materials
can
impede the wireless signal. A solid metal door or
aluminum studs amy have a negative effect on range. Try to position
wireless devices and computers with wireless adapters so that the signal
passes through drywall or open doorways and not other materials.
5. Keep your product away (at least 3-6 feet or 1-2 meters) from electrical
overhead lower actual data throughput rate.
Summary of Contents for AirPlus DP-G310
Page 1: ...1 D Link DP G310 Wireless G Print Server Manual Rev 01 February 2008 ...
Page 59: ...54 ...
Page 63: ...58 Reboot If you want to reset the print server you may just click the Reboot for restarting ...
Page 64: ...59 Refresh Printer Status Click Printer to refresh printer status ...
Page 65: ...60 TCP IP Printing for Windows Vista Go to Start Î Control Panel Î Printers ...
Page 66: ...61 Click Add a printer Select the first option Add a local printer and then click Next ...
Page 69: ...64 Select Custom and click Settings ...
Page 71: ...66 ...
Page 73: ...68 Click Next to start installing the printer ...
Page 74: ...69 After clicked Print a test page a small dialogue box will show up as below Click Close ...
Page 75: ...70 Click Finish The printer is now ready for printing with Windows Vista on your network ...
Page 77: ...72 Select the first option Local printer attached to this computer and click Next ...
Page 79: ...74 Click Next ...
Page 81: ...76 Select Custom and click Settings ...
Page 83: ...78 ...
Page 84: ...79 Click Next ...
Page 85: ...80 Click Finish ...
Page 87: ...82 At this screen you can input a name for the printer and then click Next ...
Page 88: ...83 Select Yes to print a test page click Next ...
Page 89: ...84 Click Finish The printer is now ready for printing with Windows XP on your network ...
Page 91: ...86 Select the first option Local printer attached to this computer and click Next ...
Page 93: ...88 Click Next ...
Page 95: ...90 Select Custom and click Settings ...
Page 97: ...92 ...
Page 98: ...93 Click Next ...
Page 99: ...94 Click Finish ...
Page 101: ...96 At this screen you can input a name for the printer and then click Next ...
Page 102: ...97 Select the first option Do not share this printer and click Next ...
Page 103: ...98 Select Yes to print a test page click Next ...
Page 104: ...99 Click Finish The printer is now ready for printing with Windows 2000 on your network ...
Page 109: ...104 Click Add Port ...
Page 111: ...106 ...
Page 113: ...108 Click OK Windows will ask for a restart Click Yes ...
Page 128: ...123 5 The Add a new print queue menu appears click Forward to continue ...
Page 130: ...125 8 Select the printer model ...
Page 146: ...141 When the Installable Options pop up window shows up as below click Continue button ...

