TG1260/2460
TICKET PRINTER
TG1260 seriesTG2460 series
60 mm
www.custom.it
User Manual
Page 1: ...TG1260 2460 TICKET PRINTER TG1260 series TG2460 series 60 mm www custom it User Manual...
Page 2: ...rising from its use Feedback regarding any errors in the manual s content or suggestions on how it could be improved would be greatly appreciated Since its products are subject to continuous checking...
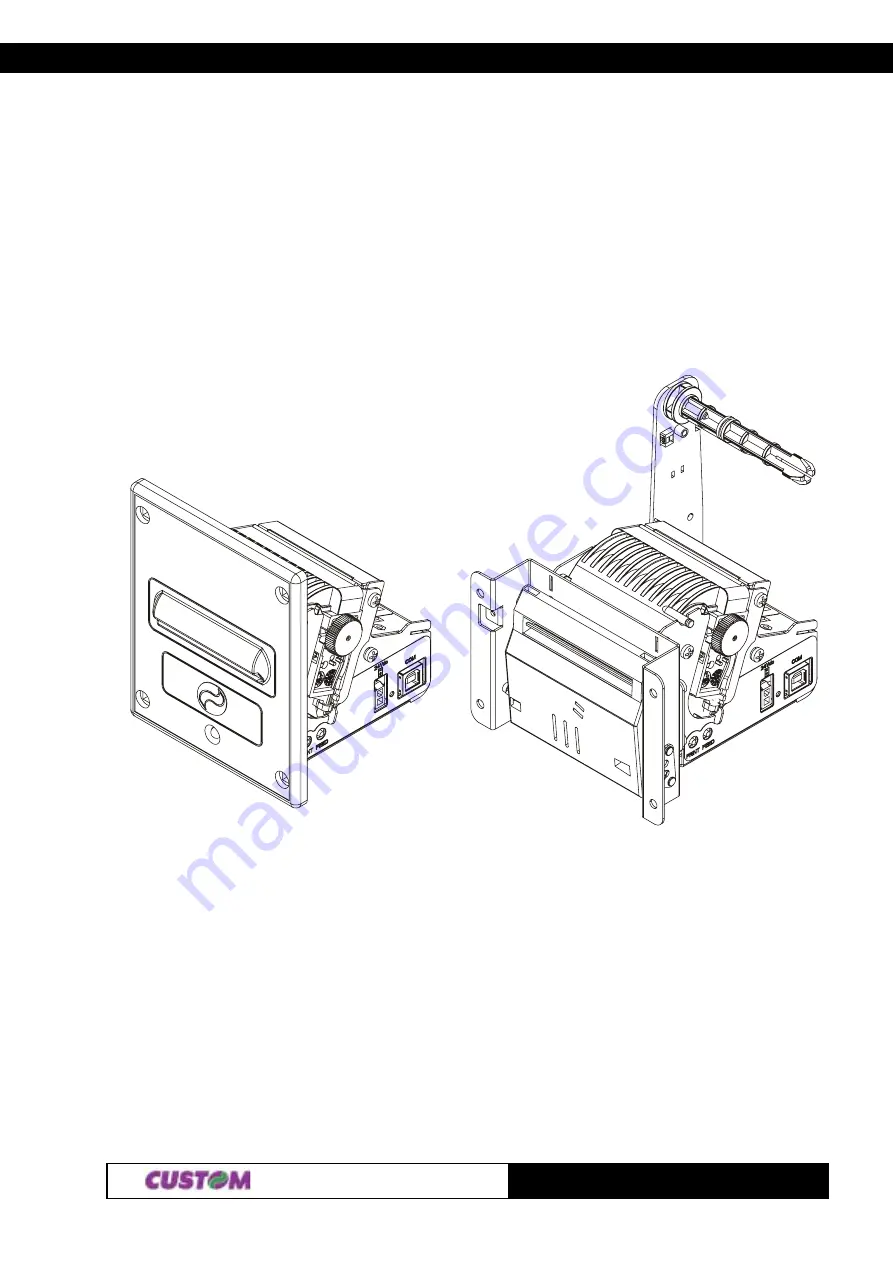
Page 3: ...TG2460 x A 1 External view 1 The x suffix indicates the following models TG1260 TG2460 U A USB interface metal front panel and autocutter model TG1260 TG2460 S A RS232 serial interface metal front pa...
Page 4: ...connector 5 USB interface connector 6 Printer frame 7 Plastic front panel 8 Paper output 9 Status Led C TG1260 TG2460 x M 3 external view 3 The x suffix indicates the following models TG1260 TG2460 U...
Page 5: ...TG1260 2460 1 2 D Back view 4 4 The back view is the same for all models available 1 Paper input 2 Inspection cover for paper outlet...
Page 6: ...TG1260 2460 Blank page...
Page 7: ...ll 1 5 1 4 2 Notes for installation and using the printer in the upside down position 1 6 2 PRINTER FUNCTIONS 2 1 CONTROL CHARACTERS 2 1 2 1 1 ESC POS Emulation 2 1 2 1 2 CUSTOM Emulation 2 29 2 1 3 C...
Page 8: ...TABLE OF CONTENTS TG2460 ii Blank page...
Page 9: ...nstructions which follow Before cleaning the printer be sure to pull out the electrical cable Use a damp cloth to clean the printer Do not use liquid or spray products Do not operate the printer near...
Page 10: ...pped with fireproof plastic or metal front panel with or without autocutter When the PRINT key is pressed during printer power up it prints the graphic test When the FEED key is pressed during printer...
Page 11: ...1 V 4 2 R E W O P 2 D N G D N U O R G L A N G I S WARNING Be sure to observe the correct polarity for the power supply 1 1 2 Power supply 2460 Every printer available is equipped with a 2 pin male mol...
Page 12: ...e signals on the pins of the USB connector are as follows 1 1 4 RS232 serial connector The printer with serial RS232 interface is equipped with RJ45 connector In the following table are described the...
Page 13: ...onfiguration of the printer default parameters see fig 1 4 pressing both the PRINT and the FEED keys during the printer power up The parameters affected during configuration are Printer emulation ESC...
Page 14: ...ort After this each time the PRINT key is pressed the parameter is modified and its current value is printed Once the required value has been obtained press the FEED key to proceed to the next paramet...
Page 15: ...e to paper roll compartment and check that there are no scraps of paper at the area indicated with a letter near the printing head If there are remove the scraps before proceeding with any other opera...
Page 16: ...the paper roll 1 so that it rotates in the direction shown in fig 1 6 2 Insert the end of the paper roll in the print mechanism 2 and wait until the roll loads automatically 3 Remove the ticket from t...
Page 17: ...in this position 1 Release the spring as indicated in fig 1 8 and placed it in the new position as indicated in fig 1 9 2 The printer is ready to be installed in the upside down position 3 NOTE The op...
Page 18: ...2 5 B 1 n R C S E t e s r e t c a r a h c l a n o i t a n r e t n i t c e l e S n 6 5 B 1 n V C S E 0 9 y b d e t a t o r e d o m t n i r p t e S H n L n C 5 B 1 H n L n C S E n o i t i s o p t n i r...
Page 19: ...8 6 D 1 n h S G e d o c r a b f o t h g i e h t c e l e S 0 0 m B 6 D 1 L U N m k S G e d o c r a b t n i r P n 2 7 D 1 n r S G s u t a t s t i m s n a r T n 7 7 D 1 n w S G e d o c r a b f o n o i t...
Page 20: ...t position at the beginning of the line Default See autofeed parameter on Setup Reference 0A Example n 4 0 0 1 Name Transmission of status in real time Format ASCII DLE EOT n Hex 10 04 n Decimal 16 4...
Page 21: ...b t o n s i r e p a P n O 8 0 8 n o t t u b D E E F y b d e f g n i e b s i r e p a P 4 D E V R E S E R 5 f f O 0 0 0 p o t s d n e r e p a p o N n O 0 2 2 3 d n e r e p a p o t e u d s p o t s g n i...
Page 22: ...n 17 Paper status t i B n O f f O x e H l a m i c e D n o i t c n u F 0 D E V R E S E R 1 D E V R E S E R 2 f f O 00 0 g n i n n u r t o n r o t o M n O 4 0 8 g n i n n u r r o t o M 3 D E V R E S E R...
Page 23: ...1 0 1 d e t a e h r e v o d a e h t n i r P 1 R D E V R E S E 2 R D E V R E S E 3 f f O 0 0 0 e g n a r n i e g a t l o v y l p p u s r e w o P n O 8 0 8 e g n a r f o t u o e g a t l o v y l p p u s...
Page 24: ...tables t i B n O f f O x e H l a m i c e D n u F n o i t c 0 f f O 0 0 0 d e t c e l e s A t n o f r e t c a r a h C n O 1 0 1 d e t c e l e s B t n o f r e t c a r a h C 1 D E V R E S E R 2 D E V R...
Page 25: ...rizontal motion units are specified by 1D 50 The command 1D 50 can change the horizontal and vertical motion unit However the value cannot be less than the minimum horizontal movement amount In standa...
Page 26: ...If the width of the printing area set by the commands 1D 4C and 1D 57 is less than the width required by the data sent with the command 1B 2A the excess data is ignored To print the bit image use comm...
Page 27: ...0 Hex 1B 30 Decimal 27 48 Description Selects 1 8 inch line spacing Notes Default Reference 1B 32 1B 33 Example 2 3 B 1 Name Set line spacing at 1 6 inch Format ASCII ESC 2 Hex 1B 32 Decimal 27 50 De...
Page 28: ...ode Script mode can also be turned on or off by using 1B 21 Note however that the last command received is effective Default n 0 Reference 1B 21 Example n D 3 B 1 Name Select peripheral device Format...
Page 29: ...he space to the right of the character and double width characters are set with a width which is double that of normal characters This command cancels the previous horizontal tab setting When setting...
Page 30: ...E Example n J C S E Name Print and feed paper Format ASCII ESC J n Hex 1B 4A n Decimal 27 74 n Range 0 n 255 Description Prints the data in the print buffer and feeds the paper n vertical or horizonta...
Page 31: ...C V n Hex 1B 56 n Decimal 27 86 n Range 0 n 1 48 n 49 Description Enable disable print mode rotated by 90 n is used as follows n n o i t c n u F 8 4 0 e d o m n o i t a t o r 0 9 f f o s n r u T 9 4 0...
Page 32: ...ue The horizontal and vertical motion units are specified by 1D 50 The command 1D 50 can change the horizontal and vertical motion unit However the value cannot be less than the minimum horizontal mov...
Page 33: ...at ASCII ESC d n Hex 1B 64 n Decimal 27 100 n Range 0 n 255 Description Prints the data in the print buffer and feeds the paper n lines Notes This command sets the print starting position at the begin...
Page 34: ...atus Format ASCII ESC v Hex 1B 76 Decimal 27 118 Description Transmits the current paper sensor status upon receiving this command Notes This command is executed immediately even when the reception bu...
Page 35: ...cription Turns upside down printing mode on off When the LSB of n is 0 upside down printing mode is turned off When the LSB of n is 1 upside down printing mode is turned on Notes Only the LSB of n is...
Page 36: ...0 dn Range 0 nL nH 255 1 m 2 0 d0 dn 255 Description Received nL nH x 256 x 2 bytes and store in the flash If nL nH x 256 exceeds 32768 the data following will be processed as normal data Saved the gr...
Page 37: ...and automatic paper moving back Format ASCII FS 4 Hex 1C C0 34 Decimal 28 192 52 Description This command enables cutter operation and executes a total cut and automatic paper moving back if there is...
Page 38: ...on one line the are aligned at the baseline or topline see 1D 7E The character size can also be selected by the command 1B 21 However the setting of the last received command is effective Default n 0...
Page 39: ...rence Example m n 0 3 3 4 D 1 Name Select counter print mode Format ASCII GS C 0 n m Hex 1D 43 30 n m Decimal 29 67 48 n m Range 0 n 5 m 0 1 2 48 49 50 Description Selects a print mode for the serial...
Page 40: ...he maximum value of the counter is aL aH 256 and the minimum value is bL bH 256 If counting down reaches a value less than minimum it is resumed with the maximum value When the command is executed the...
Page 41: ...h the minimum value If the counter value set by sc is outside the counter operation range the counter value is forced to convert to the minimum value by executing 1D 63 In setting count down mode the...
Page 42: ...a p l a m r e h t l e b a L 3 D E V R E S E R 4 f f O 0 0 0 f f O o t d e x i F 5 D E V R E S E R 6 D E V R E S E R 7 f f O 0 0 0 f f O o t d e x i F Notes When the DTR DSR control is selected the pri...
Page 43: ...rmat ASCII GS P x y Hex 1D 50 x y Decimal 29 80 x y Range x 100 200 y 100 200 Description Sets the horizontal and vertical motion units at 1 x inches and 1 y inches respectively When x is set at 0 the...
Page 44: ...ute macro Format ASCII GS r t m Hex 1D 5E r t m Decimal 29 94 r t m Range 0 r t 255 0 m 1 Description Executes a macro r specifies the number of times to execute the macro t specifies the waiting time...
Page 45: ...B it is forced to convert to the minimum value In count down mode if the counter value set by this command goes out of the counter operation range set by 1D 43 31 or 1D 43 3B it is forced to convert t...
Page 46: ...6 8 5 7 4 6 4 5 4 7 3 9 E D O C 1 k 5 5 2 1 d 7 2 1 8 8 2 1 E D O C 2 k 5 5 2 1 d 7 2 1 0 2 2 3 E D O C 8 k 9 8 4 d 7 5 5 6 A C P U 1 1 n 2 1 8 4 d 7 5 6 6 E C P U 1 1 n 2 1 8 4 d 7 5 7 6 N A J 3 1 N...
Page 47: ...data as normal data When to use CODE93 The printer prints an HRI character o as a start character at the beginning of the HRI character string The printer prints an HRI character o as a stop characte...
Page 48: ...o t d e x i F Notes This command is executed when the data is processed in the reception buffer There may therefore be a time lag between receiving the command and transmitting the status depending o...
Page 49: ...racters with different heights on the same line Default n 0 Reference 1B 21 1D 21 E x a n C 7 D 1 Name Set printing density Format ASCII GS n Hex 1D 7C n Decimal 29 124 n Range 0 n 4 48 n 52 Notes The...
Page 50: ...0 B 4 B 1 R C d K C S E y e k t n i r P g n i s s e r p n o t i m s n a r t o t s r e t c a r a h c t e S 7 4 B 1 G C S E s r e t e m a r a p t l u a f e d t e S D 4 B 1 M C S E e d o m t n i r p f o...
Page 51: ...Format ASCII STX Hex 02 Decimal 2 Description Printing of the character is executed in double height format X E H m o C I I C S A m o C n o i t p i r c s e D b s B 3 a s B 3 3 4 D 1 B 3 c s B 3 r s B...
Page 52: ...t ASCII EOT Hex 04 Decimal 4 Description Character printing is executed in small format normal Notes Setting remains until next set Default Set up from front keys Reference 00 01 02 03 Example A 0 Nam...
Page 53: ...40 printer graphic mode i e to print in graphic mode transmit the command 11 at the beginning of each line One line for the DP24 40 printer 24 column model corresponds to 44 horizontal dots divided i...
Page 54: ...m d l o B 4 f f O 0 0 0 d e t c e l e s t o n e d o m t h g i e h e l b u o D n O 0 1 6 1 d e t c e l e s e d o m t h g i e h e l b u o D 5 f f O 0 0 0 d e t c e l e s t o n e d o m h t d i w e l b u...
Page 55: ...follows m e d o M n o i t c e r i d l a c i t r e V 1 n o i t c e r i d l a t n o z i r o H t o d N I P D I P D k a t a d f o N 0 y t i s n e d e l g n i s s t o d 8 8 7 6 0 0 1 6 5 2 x H n L n 1 y t...
Page 56: ...e power was turned on Notes Same as hardware reset Default Reference Example 2 4 B 1 Name Select Font 1 Format ASCII ESC B Hex 1B 42 Decimal 27 66 Description Select FONT 1 Notes Setting remains until...
Page 57: ...ws t i B n O f f O x e H l a m i c e D n u F n o i t c 0 f f O 0 0 0 e d o m g n i t n i r p L A M R O N n O 1 0 1 e d o m g n i t n i r p E S R E V E R 1 f f O 0 0 0 d e t u c e x e d n a m m o c D 0...
Page 58: ...of d is 163 A3 E 4 B 1 Name Set printing in NORMAL Format ASCII ESC N Hex 1B 4E Decimal 27 78 Description Selects printing in NORMAL mode Notes Setting remains until next set Default Set up from fron...
Page 59: ...eference 1B 21 1B 2D Example n 1 6 B 1 Name Select justification Format ASCII ESC a n Hex 1B 61 n Decimal 27 97 n Range 0 n 2 48 n 50 Description Aligns all the data in one line in the position specif...
Page 60: ...ption Reads default and on line parameters Notes See 1B 47 Default Set up from front keys Reference 1B 47 Example 2 7 B 1 L a H a Name Read EEPROM position Format ASCII aH aL ESC r Hex aH aL 1B 72 Dec...
Page 61: ...H aL dH dL 1B 77 Decimal aH aL dH dL 27 119 Range 0 a 63 0 aH 9 A aH F 0 aL 9 A aL F 0 d 255 0 dH 9 A dH F 0 dL 9 A dL F Description Writes at the location addressed by a data dwhere aH is the most si...
Page 62: ...nL nH x 256 x 2 bytes and store in the flash If nL nH x 256 exceeds 32768 the data following will be processed as normal data Saved the graphics bank from flash m selects the bank as follows d0 dn val...
Page 63: ...ame Total cut and automatic paper moving back Format ASCII FS 4 Hex 1C C0 34 Decimal 28 192 52 Description This command enables cutter operation and executes a total cut and automatic paper moving bac...
Page 64: ...ro are not cleared by the command 1B 40 Therefore 1B 40 can be included in the contents of the macro definitions If the printer receives the command 1D 3A again immediately after previously receiving...
Page 65: ...y the counter range n specify the stepping amount when counting up or down r indicates the repetition number when the counter value is fixed Notes Count up mode is specified when aL aH 256 bL bH 256 a...
Page 66: ...from O to 9 sa and sb specify the counter range sn indicates the stepping amount for counting up or down sr indicates the repetition number with the counter value fixed sc indicates the counter value...
Page 67: ...n o i t a c i f i t n e d i e d o m r e t n i r P 0 6 4 2 G T D 6 0 5 2 n o i t a c i f i t n e d i n o i t c n u F w o l e b e l b a t e e S 1 5 3 M O R n o i t a c i f i t n e d i n o i s r e v D n...
Page 68: ...ly specified values The calculated result from combining this command with others is truncated to the minimum value of the mechanical pitch or an exact multiple of that value Default x 200 y 200 Refer...
Page 69: ...The counter mode is set by 1D 43 31 or 1D 43 3B In count up mode if the counter value set by this command goes out of the counter operation range set by 1D 43 31 or 1D 43 3B it is forced to convert t...
Page 70: ...x 1D 6B m n Decimal 29 107 m n Range 0 m 6 65 m 73 Description Selects a bar code system and prints the bar code m selects a bar code sys m B m e t s y s e d o c r a s r e t c a r a h c f o r e b m u...
Page 71: ...data after receiving 11 without check digit or 12 with check digit byte bar code data When the bar code system used is EAN13 the printer prints the bar code after receiving 12 without check digit or 1...
Page 72: ...3 B 7 1 5 3 2 1 4 C N F 4 4 3 B 7 2 5 3 2 1 B 7 B 7 3 2 1 3 2 1 Default Reference 1D 48 1D 66 1D 68 1D 77 Example n 7 7 D 1 Name Set bar code width Format ASCII GS w n Hex 1D 77 n Decimal 29 119 n Ra...
Page 73: ...h c d e d n a p x e h t i w g n i t n i r P 4 0 T O E s r e t c a r a h c l l a m s h t i w g n i t n i r P A 0 F L d e e f e n i l d n a t n i r P C 0 F F g n i t n i r p r e t f a d e e f m r o f t...
Page 74: ...of the character is executed in double width format Notes Setting remains until next set Default Set up from front keys Reference 00 02 03 04 Example 2 0 Name Printing in double height character Forma...
Page 75: ...il next set Default Set up from front keys Reference 00 01 02 03 0E 0F 1E 1F Example A 0 Name Print and line feed Format ASCII LF Hex 0A Decimal 10 Description Prints the data in the buffer and feeds...
Page 76: ...ormat ASCII SO Hex 0E Decimal 14 Description Printing of the character is executed in expanded format Notes The command SO is automatically launched after printing Same as 1E Default Set up from front...
Page 77: ...rases alternately reverse printing mode Notes Default Reference Example 8 1 Name Cancel print data buffer Format ASCII CAN Hex 18 Decimal 24 Description Deletes all the print data in the current print...
Page 78: ...x 1B 31 Decimal 27 49 Description Sets 3 mm line spacing Notes Default Reference 1B 32 Example 2 3 B 1 Name Set 5 5 mm line spacing Format ASCII ESC 2 Hex 1B 32 Decimal 27 50 Description Set 5 5 mm li...
Page 79: ...n2 Range 1 n1 240 n2 mute data Description This command prints n1 bytes of data in graphic mode The data bytes are arranged vertically starting from the left margin but only the first seven LSBs are s...
Page 80: ...170 the printer does not execute the command Se xL xH 256 yL yH 256 1170 the printer only prints 1170 xL xH 256 1 dotlines Default Reference Example To print logo1 from flash bank dotline 100 to dotli...
Page 81: ...l e b a l n o N n O 4 0 4 r e p a p l a m r e h t l e b a L 3 D E V R E S E R 4 f f O 0 0 0 0 t a d e x i F 5 D E V R E S E R 6 D E V R E S E R 7 f f O 0 0 0 0 t a d e x i F Notes This command is exec...
Page 82: ...n e r e p a p e r u t a r e p m e t d a e H t u p t u o d n e r e p a p r a e n l a n r e t x e L A N O I T P O n o i t c e r i d t n i r P 0 8 1 l a m r o N t a m r o f t n i r P c i l a t i d e n i...
Page 83: ...2 2 4 d e e p s g n i t n i r P c e s s r e t c a r a h C 0 2 5 0 1 9 c e s s e n i L 6 1 2 6 1 2 m m H x L r e t c a r a h C l a m r o N 3 x 2 3 x 2 1 n o i t c e r i d t n i r P e s r e v e R d n a...
Page 84: ...3 TECHNICAL SPECIFICATIONS TG1260 2460 3 3 3 2 DIMENSIONS 3 2 1 TG2460 U A 3 2 2 TG2460 U N Fig 3 1 Fig 3 2...
Page 85: ...3 TECHNICAL SPECIFICATIONS TG1260 2460 4 3 3 2 3 TG2460 U M NOTE the figures in this part show the USB interface model but the dimensions are the same even for the serial RS232 interface model Fig 3 3...
Page 86: ...CHARACTER SET The printer has seven sets of 224 character each one In the following figures are shown the examples ESC POSTM 32 columns ESC POSTM 42 columns ESC POSTM 56 columns DPT 24 FONT A DPT 24...
Page 87: ...4 CHARACTER SET TG1260 2460 2 4 Blank page...
Page 88: ...r TG2460 The figure below illustrates the power supply provided by Custom to be used for printer operation Protection devices Shortcircuit overload and overvoltage Fig A 1 Tab A 1 PPSPS 100 24V Switch...
Page 89: ...ge V V PE V V N L OUTPUT ADJ V V V V V IN N L Fig A 1 2 Tab A 1 2 PPSPS 070 12V Switching power supply 12V 070W Input specification Input voltage 85V 264 Current 0A 1 8A Inpout frequency 47 Hz 63 Hz S...
Page 90: ...to use bigger diameter paper rolls max 80mm 0 6 4 2 G T P S X C P r o s n e s C F Q d n a t i K t r o p p u s r e d l o h r e p a P The kit is already assembled as shown in fig A 2 Paper holder suppo...
Page 91: ...1260 2460 4 A 1 2 3 Assembling instructions The paper holder support positioning isn t fixed but adjustable on 3 different positions back lower and upper as shown in fig A 3 1 Upper positioning 2 Back...
Page 92: ...s on issue in the kit Screw them where shown in fig A 4 and connect the near paper end sensor cable to the printer connector WARNING Check the paper roll pin is assembled with the beveled side turned...
Page 93: ...e in the kit Screw them where shown in fig A 6 and connect the near paper end sensor cable to the printer connector WARNING Check the paper roll pin is assembled with the beveled side turned in the lo...
Page 94: ...ue in the kit Screw them where shown in fig A 8 and connect the near paper end sensor cable to the printer connector WARNING Check the paper roll pin is assembled with the beveled side turned in the l...
Page 95: ...the near paper end sensor on the paper holder support works correctly and with a slot which hinder the disks from rotating around their own axises In this slot must be inserted the special paper roll...
Page 96: ...APPENDIX A ACCESSORIES AND SPARE PARTS TG1262 2460 9 A Dimensions of printer with paper holder support TG2460 U A model USB interface metal front panel and autocutter model Fig A 11...
Page 97: ...APPENDIX A ACCESSORIES AND SPARE PARTS TG1260 2460 10 A TG2460 U N model USB interface and plastic front panel Fig A 12...
Page 98: ...APPENDIX A ACCESSORIES AND SPARE PARTS TG1262 2460 11 A TG2460 U M model USB interface and metal front panel without autocutter Fig A 13...
Page 99: ...er dispenser unit Assembling paper dispenser unit Insert the paper dispenser unit feathers in their seats on the plate which holds the autocutter Assemble the fastening screw of paper dispenser unit t...
Page 100: ...CESSORIES AND SPARE PARTS TG1262 2460 13 A Tab A 4 5 5 X 0 6 T C R l l o r r e p a p l a m r e h t m m 0 6 38 7 31 0 8 59 51 5 5 28 5 38 5 57 1 20 1 19 3 2 1 36 4 8 2 24 8 7 2 26 8 2 5 A 2 SPARE PARTS...