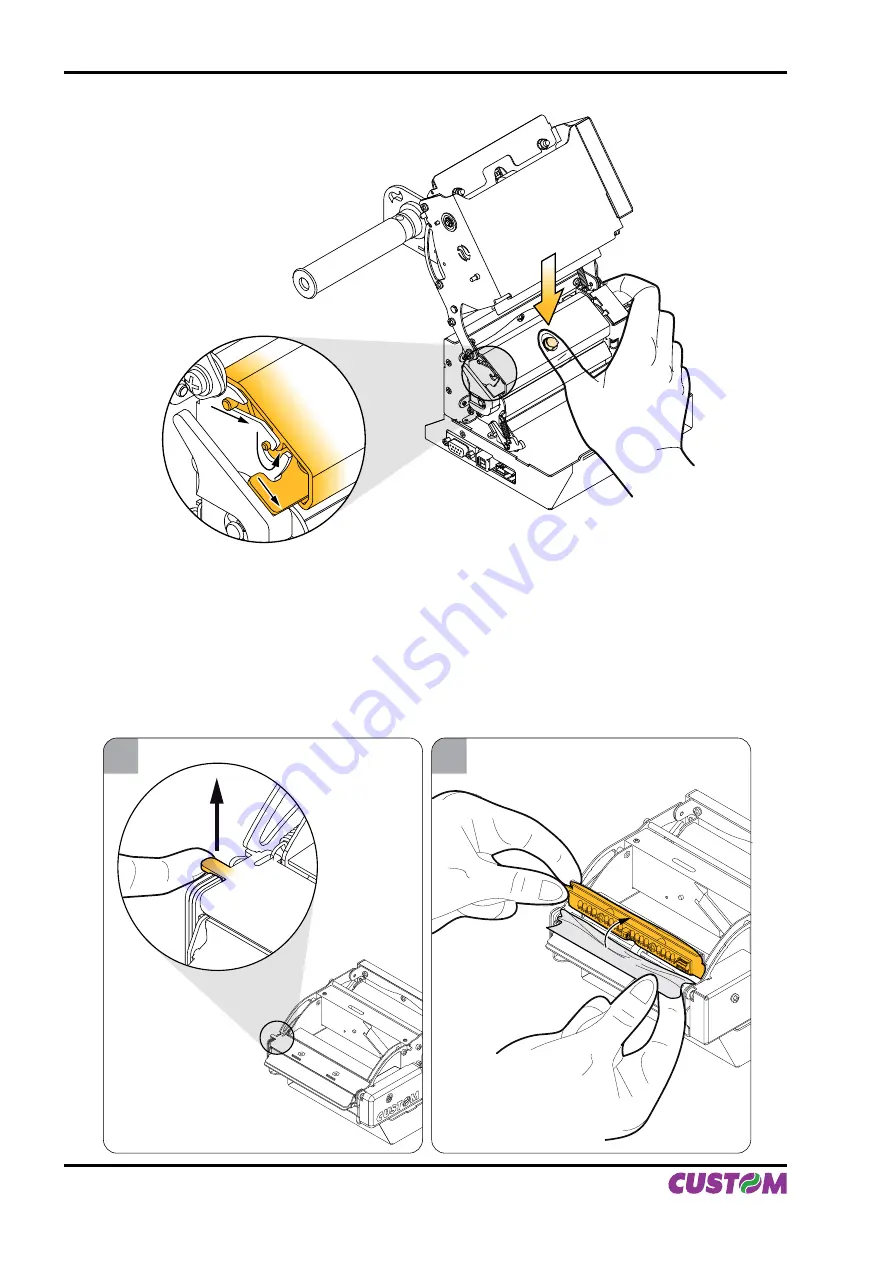
1.5.2 Paper jam
•
Lift up the inspection door using the prong on the left side (see
fi
g. 1.7) e
Remove possible scraps of paper (see
fi
g.1.8).
•
Open the printer (see previous paragraphs) and remove possible scraps of paper near the cutter
(see
fi
g. 1.9) and under printing mechanism (see
fi
g. 1.10)
1
2
(Fig.1.7)
(Fig.1.8)
(Fig.1.6)
1. INSTALLATION AND USE
1-6 VKP112
User Manual
Summary of Contents for VKP112
Page 1: ...OEM USER MANUAL VKP112 VKP112 Command Reference DOMC 0001e ...
Page 8: ...Blank page TABLE OF CONTENTS ii VKP112 User Manual ...
Page 19: ...3 4 Fig 1 9 Fig 1 10 1 INSTALLATION AND USE User Manual VKP112 1 7 ...
Page 21: ...P3 P4 P5 Fig 1 13 Fig 1 14 Fig 1 15 1 INSTALLATION AND USE User Manual VKP112 1 9 ...
Page 23: ...1 3 VRRR 2 Fig 1 18 Fig 1 19 Fig 1 20 1 INSTALLATION AND USE User Manual VKP112 1 11 ...
Page 26: ...Blank page 1 INSTALLATION AND USE 1 14 VKP112 User Manual ...
Page 32: ...Blank page 2 INTERFACES 2 6 VKP112 User Manual ...
Page 36: ... Fig 3 2 Fig 3 3 Fig 3 4 3 TECHNICAL SPECIFICATIONS 3 4 VKP112 User Manual ...
Page 37: ... Fig 3 5 Fig 3 6 3 TECHNICAL SPECIFICATIONS User Manual VKP112 3 5 ...
Page 38: ...Blank page 3 TECHNICAL SPECIFICATIONS 3 6 VKP112 User Manual ...
Page 42: ...Blank page 4 CHARACTER SETS 4 4 VKP112 User Manual ...
Page 46: ...Blank page APPENDIX A ACCESSORIES AND SPARE PARTS A 4 VKP112 User Manual ...
Page 47: ......


