background image

COOKING IN THE  

HORIZONTAL POSITION

NOTE:

 Cooking in the horizontal position  

is recommended for waffles with add-ins 
(such as nuts, berries, sliced fruit, chocolate 
chips) but this position can also be used to  
make plain Belgian waffles.

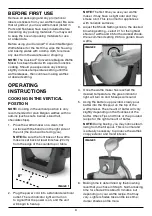
1.  Stand the closed waffle maker upright on a 

clean, flat surface where you intend to use it 
with the handle on the right side of the unit 
(the knob will be facing you).

 NOTE:

 Be sure the front base of the waffle 

maker is set back at least 8 inches from the 
edge of the countertop or table. Refer to 
Image 1 on page 4.

2.  Plug the power cord into a standard electrical 

outlet. The red indicator light will turn on to 
signal that the power is on, and the unit will 
begin to heat up.

 NOTE:

 The first time you use your waffle 

maker, it may have a slight odor and may 
smoke a bit. This is normal for appliances 
with nonstick surfaces.

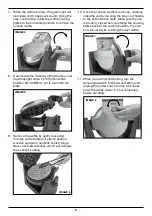
3.  Adjust the temperature knob to the desired 

browning setting – select #1 for the lightest 
shade of waffle and #5 for the darkest shade. 
We recommend setting #3 for a golden 
brown waffle. Refer to Image 2 on page 4.

4.  Once the waffle maker has reached the 

desired temperature, the green indicator  
light will illuminate and 5 beeps will sound. 
Using the stay-cool handle, rotate the waffle 
maker to the horizontal position.

5.  Using the batter cup provided, pour batter 

into the center of the horizontal positioned 
waffle maker and spread to the outer edges 
using a heatproof spatula. The amount  
of batter will vary slightly depending on 
its thickness. Check Tips and Hints or the 
provided recipe for the right amount of batter. 

Once the batter is evenly spread, sprinkle on 
your add-ins. Close the waffle plate securely 
using the stay-cool handle. 

NOTE:

 During baking, you may notice steam 

rising from the fill spout. This is normal and 
is actually necessary to produce the waffle’s 
crispy exterior and moist interior.

6.  Baking time is determined by the browning 

level that you chose in Step 3. Normal baking 
time for shade #3 is about 3 minutes, but 
depending on your waffle recipe, that may 
vary. Lighter shades take a little less time; 
darker shades a little more.

7.  When the waffle is ready, the green light will 

illuminate and 5 beeps will sound.

8.  Open the waffle maker by lifting the stay-cool 

handle upright when it’s in the horizontal 
position. BE CAREFUL not to touch the hot 
plate. Refer to Image 5 on page 5.

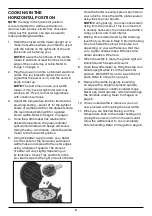
9.  Remove the waffle by gently loosening 

an edge with a heatproof plastic spatula, 
wooden spatula or nonstick coated tongs. 
Never use metal utensils, which will damage 
the nonstick coating. Refer to Image 6 on 
page 5.

10.  Once cooked waffle is removed, you can  

now proceed with cooking the next waffle.

11.  When you are finished baking, turn the 

temperature knob to the lowest setting and 
unplug the power cord from the wall outlet. 
Allow the waffle maker to cool completely 
before handling. Refer to Image 8 on page 5.

6

Summary of Contents for WAF-V400C Series

Page 1: ...Convertible Belgian Waffle Maker INSTRUCTION AND RECIPE BOOKLET WAF V400C Series For your safety and continued enjoyment of this product always read the Instruction Book carefully before using ...

Page 2: ...ontaining hot oil or other hot liquids 15 WARNING TO REDUCE THE RISK OF FIRE OR ELECTRIC SHOCK REPAIRS SHOULD BE DONE ONLY BY AUTHORIZED PERSONNEL NO USER SERVICEABLE PARTS ARE INSIDE 16 Do not operate your appliance in an appliance garage or under a wall cabinet When storing in an appliance garage always unplug the unit from the electrical outlet Not doing so could create a risk of fire especiall...

Page 3: ...eleases front plate to remove waffle locks to securely close and rotate unit 7 Audible Signal not shown 5 beeps sound when waffle maker is ready to bake and when waffle is fully cooked and ready to eat 8 Storage not shown Cord wraps around the base stand of the unit Closed waffle maker stands upright for compact storage 9 Drip Tray Stainless steel drip tray for catching any overflow during backing...

Page 4: ... 8 inches 20 cm from the edge of the countertop or table 2 Plug the power cord into a standard electrical outlet The red indicator light will turn on to signal that the power is on and the unit will begin to heat up NOTE The first time you use your waffle maker it may have a slight odor and may smoke a bit This is normal for appliances with nonstick surfaces 3 Adjust the Shade Setting knob to the ...

Page 5: ...spatula wooden spatula or nonstick coated tongs Never use metal utensils which will damage the nonstick coating 10 Once the cooked waffle is removed carefully close the unit by lowering the stay cool handle to the bottom back plate Make sure the unit is properly closed before rotating the cooking plates back to the vertical position You can now proceed with cooking the next waffle 11 When you are ...

Page 6: ... the horizontal positioned waffle maker and spread to the outer edges using a heatproof spatula The amount of batter will vary slightly depending on its thickness Check Tips and Hints or the provided recipe for the right amount of batter Once the batter is evenly spread sprinkle on your add ins Close the waffle plate securely using the stay cool handle NOTE During baking you may notice steam risin...

Page 7: ...in mind the batter will expand as it cooks in most cases a full cup of batter is best Do not overfill the waffle maker when using in the vertical position it should not be filled to the top of the waffle grid Always use the provided measuring cup as a guide Thinner batters should be poured through the fill spout in a slow steady stream Thicker batters and those with mix ins should be added to the ...

Page 8: ...tly 2 teaspoons 10 ml pure vanilla extract teaspoon 2 5 ml lemon or orange zest optional Maple syrup for serving 1 Whisk together the dry ingredients in a large bowl In a separate bowl whisk the buttermilk eggs butter vanilla and zest to combine Add the liquid ingredients to the dry and whisk until mostly smooth 2 Preheat the waffle maker to the desired setting a higher setting is recommended for ...

Page 9: ...syrup if desired Nutritional information per half waffle based on 5 waffles accounts for about 3 tablespoons 45 ml combined walnuts and chocolate chips Calories 293 46 from fat carb 35g pro 6g fat 16g sat fat 10g chol 51mg sod 236mg calc 295mg fiber 3g Overnight Rye Blueberry Waffles Rye flour adds unexpected complexity to these yeasted waffles Makes 4 to 5 waffles 8 tablespoons 120 ml 1 stick uns...

Page 10: ...p with flour Use a rolling pin to roll out the sheet into a 10 by 12 inch 25 to 30 cm rectangle Spread the dough with two tablespoons of the softened butter leaving a inch 1 25 cm border at the top edge Sprinkle half of the cinnamon sugar mixture evenly over the top and gently press to adhere Brush the border with water 3 Use a pastry wheel to cut the sheet into 8 equal strips Tightly roll one str...

Page 11: ...tter is smooth 3 Preheat the waffle maker to the desired setting these waffles turn out best on setting 4 or 5 due to their soft texture 4 When the waffle maker signals it is ready rotate the plates to the horizontal position Pour a cup of batter onto the center of the bottom waffle plate Top with 2 tablespoons 30 ml each of pecans and coconut Close the waffle maker and leave in the horizontal pos...

Page 12: ...the horizontal position Pour a cup of batter onto the center of the bottom waffle plate Top with a heaping to cup 60 to 75 ml charred corn kernels Close the waffle maker and leave in the horizontal position to cook When the waffle maker signals again carefully open the waffle maker and remove the baked waffle Continue with the remaining batter 5 Drizzle or pipe for a restaurant style presentation ...

Page 13: ...formation per half waffle accounts for 1 tablespoons 25 ml Ranch Dressing Calories 312 68 from fat carb 16g pro 7g fat 21g sat fat 7g chol 31mg sod 755mg calc 121mg fiber 1g Falaffles Forget frying This waffled take on traditional falafels slashes both oil and mess but still has all the flavour Makes 2 waffles enough for 4 servings 2 garlic cloves 6 scallions white and green parts cut into 1 inch ...

Page 14: ...icken when the lemon juice is added Continue to whisk adding one tablespoon of ice water at a time until a smooth and pourable consistency is achieved Taste and adjust seasoning as desired Sumac a staple spice used in Middle Eastern cooking brightens any dish with its almost citrus characteristics It s widely available and worth stocking up on Nutritional information per half waffle accounts for c...

Page 15: ...il such as vegetable canola or peanut for frying 4 prepared Jalapeño Popper Waffles page 15 kept warm Maple syrup for serving 1 In a medium nonreactive bowl stir together the buttermilk hot sauce mustard 1 teaspoon 5 ml salt and 1 teaspoon 5 ml freshly ground pepper Add the chicken pieces and coat well with buttermilk mixture Refrigerate 2 In a shallow mixing bowl mix together the flour baking pow...

Page 16: ... only in 120 volt outlets and only with authorized accessories and replacement parts This warranty expressly excludes any defects or damages caused by attempted use of this unit with a converter as well as use with accessories replacement parts or repair service other than those authorized by Cuisinart If the appliance should become defective within the warranty period do not return the appliance ...

Reviews: