background image

12/2008 - Art. Nr. 4200 1013 9300A

38

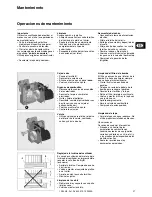
Maintenance

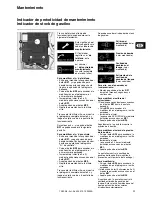
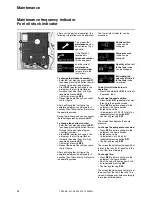
Maintenance frequency indicator
Fuel oil stock indicator

After a certain period of operation, the 
following information may be displayed:

This means that 

maintenance

 must 

be carried out by a 
specialist.

If the fitter has 
recorded his

telephone number

this one appears

and the current

maintenance 
contract number

(accessible in the 
fault menu)

To change the telephone number

•  Enter the fault menu by pressing 

BP1

then keep pressing the button to scroll 
through to the desired pictogram.

•  Press 

BP2

 to enter a change in the 

pictogram: the first figure flashes.

•  Increase the value (from 0 to 9) by 

repeatedly pressing 

BP1

.

•  Confirm by pressing 

BP2

.

•  Repeat the operation until you reach 

the last figure.

After confirming the last figure, the 
complete pictogram is displayed for 5 
seconds, then the control unit returns to 
the operating screen.

During these 5 seconds, you can access 
the following screen by pressing 

BP1

:

To change the contract number

•  Enter the fault menu by pressing 

BP1

then keep pressing the button to scroll 
through to the desired pictogram 
«contract number»..

•  Press 

BP2

 to enter a change in the 

pictogram: the first figure flashes.

•  Increase the value (from 0 to 9) by 

repeatedly pressing 

BP1

.

•  Confirm by pressing 

BP2

.

•  Repeat the operation until you reach 

the last figure.

After confirming the last figure, the 
complete pictogram is displayed for 5 
seconds, then the control unit returns to 
the operating screen.

The fuel oil stock indicator can be 
accessed:

Nozzle calibre 

(value can be 
changed)

Pump pressure 

(value can be 
changed)

Quantity of fuel oil 
in the tank 

(value 

can be changed)

Estimating the 
quantity of fuel oil 
in the tank 

(value 

calculated)

To do this while the burner is 
operating:

•  Press and hold button 

BP1

 for at least 

5 seconds, then:

To change the nozzle calibre:

•  Press button 

BP1

 repeatedly to scroll 

through to the desired screen.

•  Press 

BP2

 to enter a change in the 

pictogram: the figure flashes.

•  Increase the value

(in increments of 0.05 US GAL/h) by 
repeatedly pressing button 

BP1

.

•  Confirm by pressing 

BP2

.

The screen then displays the pump 
pressure.

To change the pump pressure value:

•  Press 

BP2

 to enter a change in the 

pictogram: the figure flashes.

•  Increase the value

(in increments of 0.5 bar) by 
repeatedly pressing button 

BP1

.

•  Confirm by pressing 

BP2

.

The screen then displays the quantity of 
fuel oil in the tank (N.B.: quantity in the 
tank at the time of delivery)

To change this:

•  Press 

BP2

 to enter a change in the 

pictogram: the figure flashes.

•  Enter the value (4 figures from 0 to 9) 

by repeatedly pressing 

BP1

.

•  Confirm by pressing 

BP2

.

The screen then displays an estimate of 
the quantity of fuel oil in the tank. This 
value will change over time according to 
the values entered above.

Summary of Contents for NC4

Page 1: ...ectrique et hydraulique Schemi elettrico e idraulico Esquema el ctrico y hidr ulico Electric and hydraulic diagrams Elektro und Hydraulikschema 4200 1013 9400 Br leurs fuel Bruciatori di gasolio Quema...

Page 2: ...lement suivi des protections appropri es fusible et disjoncteur diff rentiel 30mA Ce br leur contient des composants lectroniques il est recommand d utiliser en amont de l installation un disjoncteur...

Page 3: ...t ristiques d utilisation Temp rature ambiante d utilisation 5 40 C de stockage 20 70 C Puissance lectrique maxi absorb e 244W 230V 50Hz NC4 NC6 NC9 A Min 270 270 297 Max 310 310 357 B Min 70 70 70 Ma...

Page 4: ...pour citerne en charge exclusivement D poser le flexible de retour retirer le raccord et le bouchon de d rivation Obturer avec un bouchon cylindrique et un joint Raccordement lectrique L installation...

Page 5: ...ent de 92 Effectuer les r glages de la t te de combustion cote Y gradu e de 0 20mm commande manuelle du volet d air 103B gradu e de 0 18 Mise feu Fermer le circuit de r gulation D verrouiller le coffr...

Page 6: ...r te sans mettre de signal de d faut Une fois que la tension normale a t r tablie le coffret red marre automatiquement Verrouillage et d verrouillage Le coffret peut tre verrouill manuellement mis en...

Page 7: ...ignation Borne D signation 1 Masse 14 Phase du moteur de ventilation 2 Signal de d tection de flamme 15 Terre 3 Phase 16 Neutre 4 Signal de d verrouillage distance 17 L1 de la vanne c t r seau lectriq...

Page 8: ...uvercle Retirer le filtre le nettoyer ou le remplacer Remonter le filtre et le couvercle avec un joint neuf Visser nergiquement Ouvrir la vanne de combustible Contr ler l tanch it Nettoyage du capot N...

Page 9: ...d alimentation Coffret d fectueux V rifier l origine de la baisse ou de l absence de tension Changer le coffret Le br leur d marre la mise sous tension durant un temps tr s court Le coffret a t verrou...

Page 10: ...on de la quantit de fuel dans la cuve Cette valeur voluera dans le temps en fonction des valeurs entr es ci dessus Apr s un certain temps de fonctionnement les informations suivantes peuvent appara tr...

Page 11: ...immat riels ou indirects tels que notamment manque gagner perte d utilisation perte de jouissance perte de revenu r clamations de tiers Bien entendu la garantie ne s applique pas au remplacement ou l...

Page 12: ...alizzata con un trasformatore d isolamento munito di protezioni adeguate fusibile e interruttore differenziale da 30mA Questo bruciatore contiene dei componenti elettronici si consiglia di utilizzare...

Page 13: ...di ricambio richiesto di 1 2 m3 kWh bruciatore Caratteristiche d impiego Temperatura ambiente d impiego 5 40 C di stoccaggio da 20 a 70 C Potenza elettrica max assorbita 244W 230V 50Hz NC4 NC6 NC9 A...

Page 14: ...raccordo Collegamento di tipo monotubo solo per serbatoio in carico Smontare il tubo flessibile di ritorno togliere il raccordo e il tappo di derivazione Otturare con un tappo cilindrico e una guarniz...

Page 15: ...potenza nominale della caldaia con un rendimento del 92 Effettuare le regolazioni della testa di combustione quota Y graduata da 0 a 20 mm comando manuale della serranda dell aria 103B graduata da 0...

Page 16: ...re alcun segnale di errore Non appena la tensione ritorna normale il programmatore si riavvia automaticamente Bloccaggio e sbloccaggio Il programmatore pu essere bloccato manualmente messo in sicurezz...

Page 17: ...to Descrizione Morsetto Descrizione 1 Massa 14 Fase del motore di ventilazione 2 Segnale di rilevamento della fiamma 15 Terra 3 Fase 16 Neutro 4 Segnale di sbloccaggio a distanza 17 L1 della valvola l...

Page 18: ...ogliere le viti e il coperchio Estrarre il filtro pulirlo o sostituirlo Rimontare il filtro e il coperchio con una guarnizione nuova Avvitare energicamente Aprire la valvola del combustibile Controlla...

Page 19: ...ne della diminuzione o dell assenza di tensione Sostituire il programmatore Il bruciatore si avvia alla messa sotto tensione per un tempo molto breve Il programmatore stato bloccato manualmente Sblocc...

Page 20: ...mare con un impulso su BP2 Ripetere l operazione fino all ultima cifra Dopo la conferma dell ultima cifra il pittogramma completo compare per 5 secondi poi il programmatore ritorna alla schermata di f...

Page 21: ...to seguido por protecciones adecuadas fusible y diferencial de 30 mA Este quemador incorpora componentes el ctricos y por tanto se recomienda utilizar en el tramo anterior de la instalaci n un disyunt...

Page 22: ...ducido en el quemador Caracter sticas de uso Temperatura ambiente de uso 5 40 C de almacenaje 20 70 C Potencia el ctrica m xima absorbida 244 W 230 V 50 Hz NC4 NC6 NC9 A m n 270 270 297 m x 310 310 35...

Page 23: ...ra cisterna de carga exclusivamente Desmonte el latiguillo de retorno retire el racor y el tap n de derivaci n Obt relo con un tap n cil ndrico y una junta Conexi n el ctrica La instalaci n el ctrica...

Page 24: ...rendimiento del 92 Realice los ajustes de la cabeza de combusti n cota Y graduada de 0 a 20 mm control manual de la v lvula de aire 103B graduada de 0 a 18 Encendido Cierre el circuito de regulaci n...

Page 25: ...et n se para sin emitir ninguna se al de fallo En cuanto se recupera la tensi n normal el cajet n vuelve a arrancar autom ticamente Bloqueo y desbloqueo El cajet n puede bloquearse manualmente bloqueo...

Page 26: ...l Designaci n Terminal Designaci n 1 Masa 14 Fase del motor de ventilaci n 2 Se al de detecci n de llama 15 Tierra 3 Fase 16 Neutro 4 Se al de desbloqueo a distancia 17 L1 de la v lvula lado red el ct...

Page 27: ...coger el gas leo Desmonte los tornillos y la tapa Retire el filtro l mpielo o sustit yalo Vuelva a montar el filtro y la tapa con una junta nueva Apriete en rgicamente Abra la v lvula de combustible C...

Page 28: ...n Cajet n defectuoso Compruebe el origen de la ca da o ausencia de tensi n el ctrica Cambie el cajet n El quemador vuelve a arrancar cuando se recupera la tensi n tras un tiempo muy corto El cajet n s...

Page 29: ...ta la operaci n hasta la ltima cifra Tras aceptar la ltima cifra se muestra el pictograma completo durante 5 s y luego el cajet n vuelve a la pantalla de funcionamiento Se puede acceder al indicador d...

Page 30: ...lating transformer and appropriate protection 30 mA circuit breaker and fuse This burner contains electronic components it is recommended that a type A differential circuit breaker is used upstream of...

Page 31: ...duced by the burner Operating specifications Ambient temperature during use 5 40 C during storage 20 70 C Max electrical power consumed 244W 230V 50Hz NC4 NC6 NC9 A Min 270 270 297 Max 310 310 357 B M...

Page 32: ...nk only Remove the return hose remove the connection and the bypass cap Plug it using a cylindrical cap and a seal Electrical connection The electrical setup and the burner connection must be performe...

Page 33: ...the following settings on the combustion head dimension Y graduated from 0 to 20 mm manual control of the air flap 103B graduated from 0 to 18 Firing Close the regulator circuit Unlock the control uni...

Page 34: ...The control unit switches itself back on again once the voltage has returned to normal levels Locking and unlocking the system The control unit can be manually locked switched to malfunction mode and...

Page 35: ...al Designation Terminal Designation 1 Earth 14 Fan motor live 2 Flame detection signal 15 Earth 3 Live 16 Neutral 4 Remote unlocking signal 17 L1 on valve electrical net side 5 Live 18 Earth 6 Live 19...

Page 36: ...er the pump to collect the fuel oil Remove the screws and cover Pull out the filter clean or replace Refit the filter and the cover using a new seal Screw down firmly Open the fuel valve Check it is a...

Page 37: ...power supply Defective unit Check source of low or missing voltage Change unit The burner starts up briefly when the power supply is switched on The unit has been manually locked Unlock the unit The b...

Page 38: ...at the operation until you reach the last figure After confirming the last figure the complete pictogram is displayed for 5 seconds then the control unit returns to the operating screen The fuel oil s...

Page 39: ...nstrafo mit geeigneten Schutzvorrichtungen Sicherung und Differentialschutzschalter 30mA erfolgen Dieser Brenner beinhaltet elektronische Komponenten es empfiehlt sich der Anlage einen FI Schutzschalt...

Page 40: ...ebungstemperatur Betrieb 5 40 C Lagerung 20 70 C Max Eingangsleistung 244W 230V 50Hz NC4 NC6 NC9 A Min 270 270 297 Max 310 310 357 B Min 70 70 70 Max 120 120 138 C 80 80 90 D Min 21 21 15 Max 71 71 83...

Page 41: ...ausschlie lich bei gef lltem Tank Den R cklaufschlauch abbauen und das Anschlussst ck und den Umleitstopfen entfernen Mit einem zylindrischen Stopfen und einer Dichtung verschlie en Elektrische Versor...

Page 42: ...kopf vornehmen Ma Y mit Skalierung von 0 bis 20mm manuelle Steuerung der Luftklappe 103B mit einer Skalierung von 0 bis 18 Z ndung Regelkreis schlie en Feuerungsautomaten entriegeln Der Brenner steht...

Page 43: ...at ohne ein Fehlersignal ab Nach Wiedererreichen einer normalen Spannung l uft der Automat automatisch wieder an Verriegelung und Entriegelung Der Automat kann ber den Entst rknopf R manuell verriegel...

Page 44: ...zeichnung 1 Masse 14 Phase des Gebl semotors 2 Signal des Flammen berwachungskreises 15 Erde 3 Phase 16 Neutral 4 Signal der Fernentriegelung 17 L1 des Ventils netzseitig 5 Phase 18 Erde 6 Phase 19 Ne...

Page 45: ...ter wieder einsetzen Deckel mit einer neuen Dichtung wieder schlie en Schrauben kr ftig anziehen Brennstoffventil ffnen Dichtheit kontrollieren Haubenreinigung Haube mit Wasser und einem Reinigungsmit...

Page 46: ...renner nicht Keine St rungsanzeige am Feuerungsautomat Ab oder Ausfall der Versorgungsspannung St rung des Automaten Ursprung des Abfalls oder Ausbleibens der Spannung feststellen Automat austauschen...

Page 47: ...uf BP2 dr cken um zu best tigen Den Vorgang bis zur letzten Zahl wiederholen Nach Best tigung der letzten Zahl wird das vollst ndige Piktogramm 5 Sek lang angezeigt danach erscheint wieder die Betrieb...

Page 48: ...12 2008 Art Nr 4200 1013 9300A 48 48 49 50 51 51 52 53 54 55 56 A1 A4 B3 M1 T1 pL Y Y1 3 Y 5 7 8 9 7P 14 15 16 102 103B 105 113 230 50 30 A 7...

Page 49: ...x192 NC 4 R101A MZ 770S 44 63 16 4 1 5 3 4 18 40 0 5 0 85 FPHB5 NC 4 H101A 63 16 4 1 7 3 4 20 40 0 5 0 85 NC 6 R101A 63 16 6 3 4 4 6 40 55 1 1 2 FPHB5 NC 6 H101A 63 16 6 3 4 4 6 40 55 1 1 2 NC 9 H101A...

Page 50: ...H L 60 0 60 1 00 4 6 6 8 8 10 4 3 2 1 0 5 0 0 5 1 2 3 17 14 12 10 9 8 7 6 4 54 47 40 34 31 27 24 21 14 8 80 70 60 51 46 42 48 42 36 30 28 25 H H H 0 500 0 501 800 0 5 801 1300 1 0 1301 1800 1 5 1801...

Page 51: ...G1 8 6 7 10 Y1 45 60 20 1 8 0 50 11 5 9 24 2 2 0 60 11 5 10 27 3 2 5 0 60 11 10 10 32 7 3 0 0 75 11 10 13 37 1 3 4 0 85 11 10 15 43 6 4 0 1 00 11 12 15 48 4 4 1 10 11 20 18 54 4 9 1 25 11 5 8 67 6 1 1...

Page 52: ...12 2008 Art Nr 4200 1013 9300A 52 R 1 2 9 BP1 BP1 B 2 BP2 R A4...

Page 53: ...12 2008 Art Nr 4200 1013 9300A 53 230 1 14 2 15 3 16 4 17 L1 5 18 6 19 7 20 8 21 9 22 10 23 11 24 12 25 13 26...

Page 54: ...12 2008 Art Nr 4200 1013 9300A 54 K 0 A B...

Page 55: ...12 2008 Art Nr 4200 1013 9300A 55 BP1 c 400...

Page 56: ...12 2008 Art Nr 4200 1013 9300A 56 BP1 BP2 0 9 BP1 BP2 5 5 BP1 BP1 BP2 0 9 BP1 BP2 5 BP1 5 BP1 BP2 0 05 BP1 BP2 BP2 0 5 BP1 BP2 N B BP2 4 0 9 BP1 BP2...

Page 57: ...12 2008 Art Nr 4200 1013 9300A 57...

Page 58: ...12 2008 Art Nr 4200 1013 9300A 58...

Page 59: ...12 2008 Art Nr 4200 1013 9300A 59...

Page 60: ...D 18 rue des Buchillons F 74100 Annemasse Fabriqu en EU Fabricato in EU Fabricado en EU Made in EU Hergestellt in EU Document non contractuel Documento non contrattuale Documento no contractual Non co...

Reviews: