background image

3.2  Checking for spillage

Issue 1

!

13

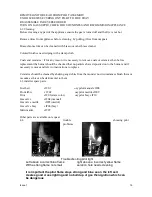
Checking for clearance of combustion products 

Close all doors and windows in room 

Light the fire and allow to run for approximately 5 minutes on high position

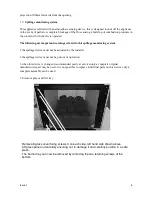
After approximately 5 minutes hold a smoke match inside the diverter as shown below
,(it is recommended that a suitable smoke match holder is used when checking for 
clearance of combustion )most of the smoke must be drawn into the flue
If in doubt repeat the test after the fire has been burning for 10 minutes 

If spillage persists ,the flue is not functioning correctly and a fault exists ,if after 
investigation the fault cannot be traced and rectified,the fire must be disconnected from 
the gas supply and expert advise obtained 

If there is an extractor fan fitted any where in the vicinity of the appliance ,the spillage 
test should be repeated with the fan running on maximum and all interconnecting doors 
open 

After ensuring that the fire is safe to use it should be left on high position to fully warm up 
during this time a slight odor may be noticed this is due to the newness of the fire and will 
soon disappear 

Fit trim and using 4 magnets on vertical flanges on fire box and fit fret centrally in front of 
fire

Finally hand the installation and maintenance instructions to the user and explain the 
operation of the fire in detail

Insert smoke match into 
Diverter as shown just 
Above glass cover 

Summary of Contents for Cf2 Montana

Page 1: ...Issue 1 1 COAL EFFECT GAS FIRE Cf2 MONTANA Installation maintenance user instructions Hand these instructions to the user Natural gas G20 at a supply pressure of 20mbar in G B I E...

Page 2: ...d fire tray 8 Section 2 installing the fire 2 1 installing the fire box 9 2 2 Gas supply 9 2 3 secure to fireplace 9 10 2 4 gas tightness and inlet pressure 10 Fitting fuel bed and commissioning 3 1 a...

Page 3: ...Max gross heat input 5 2 kW Min gross heat input 2 6 kW Cold pressure 20 0 1 0 mbar Gas G20 natural gas cat I2H Firebox dimensions including trim Width Height Depth Gas connection 8mm compression at t...

Page 4: ...al flue pipes for gas appliances 6 Bs 8303 installation of domestic heating appliances 7 Is 813 domestic gas installation republic of ireland No purpose made additional ventilation is normally require...

Page 5: ...ed to ensure that all of the following conditions are satisfied 1 check that the chimney flue only serves one fireplace and is clear of any obstruction any dampers or register plates must be removed o...

Page 6: ...rect size opening any surround must be suitably sealed to the fireplace to prevent leakage See below fig 1 When installing into a brick built chimney you must ensure that there is sufficient depth to...

Page 7: ...OTE IF THE FLUE BOX IS TO BE USED WITH AN EXISTING BRICK OR STONE CHIMNEY A 125 mm 5 MINIMUM DIAMETER FLUE LINER CONFORMING TO BS 715 MAY BE USED NOTE A BRICK CHAMBER TO THE SIZES IN FIG 2 IN AN EXIST...

Page 8: ...evice must not be adjusted by the installer 2 the spillage device must not be put out of operation 3 when this device is changed recommended yearly at service only a complete original manufacturers pa...

Page 9: ...it the wall plugs provided and screw the fixing eyes securely into the rear of the fire opening Uncoil the two fire fixing cables and thread one of each of the cables through the small holes either si...

Page 10: ...therwise serious damage can be done to the gas control valve on the fire 2 4 gas tightness and inlet pressure Refit gas fire tray into fire box and screw it secure using two screws at bottom Connect t...

Page 11: ...MAIN FIBRE BASE IS LIABLE TO HAVE SURFACE CRACKS DUE TO THE HIGH TEMPERATURES OF THE FIBRE AND THE PAINT BEING DIFFERENT THIS IS QUITE NORMALAND SHOULDN T CAUSE CONCERN Issue 1 11 The rear matrix sit...

Page 12: ...arts Under no circumstances add additional pieces Replace glass by inserting the glass piece with the glass seal towards the fire and ensure a good snug fit Then replace the glass cover securing using...

Page 13: ...gation the fault cannot be traced and rectified the fire must be disconnected from the gas supply and expert advise obtained If there is an extractor fan fitted any where in the vicinity of the applia...

Page 14: ...T ELBOW REMOVE FIRE TRAY BY UNSCREWING TWO SCREWS AT FRONT BOTTOM SECTION OF FIRE TRAY REMOVE CONTRO KNOB DISCONNECT GAS CONNECTIONS TO VALVE INCLUDING PILOT CONNECTION AND THERMOCOUPLE CONNECTION REM...

Page 15: ...burner and if necessary remove and refer to instructions to replace Ceramics should be cleaned by shaking any debris from them under no circumstances brush them or vacuum as this can be detrimental to...

Page 16: ...tandards regulations issued by the scottish executive any purpose made ventilation must be checked periodically to ensure that it is free from obstruction If this appliance is fitted directly against...

Page 17: ...y the correct number of coals may be used and genuine replacement parts used Always keep furniture and combustible materials well clear of the fire and never dry clothing or items either on or near to...

Page 18: ...WED TO THE RIGHT OF THE FIRE JUST BEHIND THE FRONT LOG SET 5 THE APPLIANCE CAN BE ADJUSTED BETWEEN HIGH AND LOW BY MOVING THE CONTROL KNOB TO SUIT THE KNOB WILL NEED TO BE DEPRESSED SLIGHTLY TO MOVE F...

Page 19: ...LIGHTING RELEASE KNOB A AND TURN FURTHER LEFT TO ON POSITION SHOWN IN FIGURE 1 ABOVE PILOT GAS FLOWS AND MAIN BURNER FLOWS IN ACCORDANCE TO THE TEMPERATURE SETTING KNOB B AS SHOWN IN FIG 1 ABOVE ADJUS...

Page 20: ...ON THERMOCOUPLE TYPE 3 SWITCHING OFF THE REMOTE IS NOT NECESSARY THE SENSOR AND BATTERY HOLDER A INSERTED BENEATH THE RIGHT SIDE OF THE FIRE TO REPLACE BATTERIES ALLOW FIRE TO COOL FOR AT LEAST 30 MIN...

Page 21: ...he pilot and main burner will light The remote handset is now used to control all functions of the fire To turn the fire down or up incrementally press the DOWN UP arrows as shown above and the gas in...

Page 22: ...ABLE TO HAVE SURFACE CRACKS DUE TO THE HIGH TEMPERATURES OF THE FIBRE AND THE PAINT BEING DIFFERENT THIS IS QUITE NORMALAND SHOULDN T CAUSE CONCERN Issue 1 22 Front 4 coals sit as shown Left hand coal...

Page 23: ...e of the glass panel Spare parts Fuel bed cf2 01 Front fibre cf2 02 Trim cf2 03 state color Main matrix cf207 Warning Only use the fuel pieces supplied with the fire and when replacing use only the sa...

Page 24: ...but if you can keep it clean it will assist with the long life of your fire Troubleshooting pilot light Left above a correct blue flame right above a incorrect yellow flame With a strong flame not sm...

Reviews: