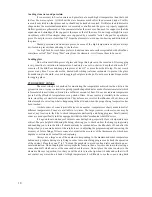
Cress E18 Owner'S Manual Download Page 5

WD = wired direct - no cord. A licensed electriction must follow all local and federal codes.


Maximum 

Chamber 

Inside   

Outside Outside Dimensions  Fuse  Wire 

Model 

Amps  

Volts 

Cone  Temp. Opening 

Depth   Cu.Ft.  Depth 

Width  Height Size 

Size 

E1814 

24 

220 

10       2350  14"Hep. 

18        1.84  

21 

25.5 

31 

25 

 8 


25.5  208 

10       2350  14"Hep. 

18        1.84  

21 

25.5 

31 

30 

 8

E18  

25 

220 

10       2350  17.5" Oct.  18        2.60  

22.5 

27 

31 

30 

 8 


26.5  208 

10       2350  17.5" Oct.  18        2.60  

22.5 

27 

31 

30 

 8

E23 

36 

240 

10       2350  17.5" Oct.  22.5     3.30  

22.5 

27 

35.5 

50 

 6


32 

208 

10       2350  17.5" Oct.  22.5     3.30  

22.5 

27 

35.5 

40 

 6

ET23 

36 

240 

10       2350  17.5" Oct.  22.5     3.30  

23.5 

28 

36.5 

50 

 6


32 

208 

10       2350  17.5" Oct.  22.5     3.30  

23.5 

28 

36.5 

40 

 6

E27 

44 

220 

10       2350  23.38" Dec  27        7.00  

29.5 

34 

40 

60WD   4


54 

208 

10       2350  23.38" Dec  27        7.00  

29.5 

34 

40 

60WD   4

ET27 

44 

220 

10       2350  23.38" Dec  27        7.00  

30.5 

35 

41 

60WD   4


55 

208 

10       2350  23.38" Dec  27        7.00  

30.5 

35 

41 

60WD   4

ET28 

48 

240 

 8       2300  28.13 “ RD  27        9.92  

35.5 

40 

41 

60WD   4

KILN PLACEMENT AND INSTALLATION


All kilns should be located in an area free from flammable materials such as drapes, boxes, paper, spray 

cans, paint, gasoline, etc.  All kilns must be located a minimum of 18 inches from every vertical surface. Do not 

place any kiln under any overhead obstruction such as cabinets, shelf, drapes, hanging plastic, etc., and never lean 

anything against your kiln. Do not store anything between the kiln and a wall or under your kiln; keep these areas 

clear at all times. Keep material off the top of your kiln; do not use the lid  as a shelf.


Recommended floor surfaces include cement, ceramic tile with cement grout, brick, or stone.  If it is 

necessary to put your kiln on a synthetic or wooden floor, use a sheet of fireproof material underneath your kiln 

and extending 24" beyond the kiln in all directions.  A layer of hard firebrick is also acceptable for this purpose.  

Floor coloration may be sensitive to heat.


Good housekeeping must be maintained at all times in the kiln area for safety. 


Your kiln must be fired on the metal stand provided; it has been designed specifically for the height and 

weight of your kiln. Do not use any other stand. Be sure to center the kiln on the stand so that it is stable, and posi-

tion it so that the cord does not touch the sides of the kiln, which will be hot during firing. It is also important that 

the stand and kiln be level (use a bubble level for this purpose), otherwise there is a possibility of pieces of ware 

falling during firing. Screw the stand to the kiln with the screws provided.


Use your kiln only in a well ventilated room. Vapors containing poisonous gases are possible when firing 

certain materials. Do not breath fumes from kiln when firing. 

ELECTRICAL SPECIFICATIONS


Proper electrical wiring is necessary to safely and efficiently operate a kiln. Even though the 

voltage is a full 120 volts or 234 volts at the meter, the voltage on which the kiln operates will be somewhat lower 

at the kiln location. Make sure your electrical outlet has the correct electrical capacity and voltage to handle your 

kiln. It is necessary to measure the voltage at the location of the kiln with the kiln turned on. Voltage drops occur 

on all wiring. Proper electrical wiring will provide an adequate operation voltage and current at the kiln without 

significant voltage drop. (Voltage may be temporarily low during brownouts especially on a hot day in the summer 

when all your neighbors have their air conditioning turned on and during peak electrical usage periods in your area). 

If the wire coming from your power source to the kiln is too small or too long the kiln will not operate properly, 

even if the wire meets national electrical safety codes. If the voltage is low, the kiln may not reach the maximum 

desired temperature or will fire too slowly. This may reduce element life. 230 volt and 240 volt kilns may be used 

with 220 volt to 245 volt power.


Do not attempt to change the receptacle on an existing line without using the services of a licensed 

electrician. The electrician will know whether the wire size is correct. It is advisable to use a larger wire size than 

absolutely necessary to prevent voltage drop, especially if the run to the meter is long. The increase in cost is usu-

ally very small compared to the long term savings in firing times and line loss (voltage loss). Never cut the plug 

off and replace it. If the plug becomes damaged, change the entire cord with a CRESS factory supplied cord which 

will meet temperature as well as electrical requirements. The outlet must be in good condition or heating of the 

cord and plug cap will occur. Do not use an extension cord at any time.


Temperature rating specifications as well as the electrical rating requirements for your kiln are listed on a 

decal on the kiln. Your electrician must make sure all local codes are met with your house wiring.  Your licensed 

electrician is responsible for meeting the requirements for the local and national codes.

  Copper

Summary of Contents for E18

Page 1: ...ELECTRONIC KILNS OWNER S MANUAL ...

Page 2: ...st power surges when the kiln is not in use We are proud of our products and gratified that you have joined the many thousands of ceramic enthusiasts who have compared and chosen Cress firing equipment We sincerely wish you many years of creative and rewarding use of your Cress kiln UNPACK SHIPMENT IMMEDIATELY When this shipment was given to the carrier neither the crating nor contents were damaged ...

Page 3: ...3 ...

Page 4: ... touch heating elements with anything 12 Do not touch hot sides of kiln or hot lid Burns may result 14 Never store anything under kiln never lean objects against kiln 15 Do not store or use flammable liquids or sprays in the same room with your kiln 16 Do not store or use your kiln outside keep rain and moisture away from kiln 17 Do not use kiln if cord is damaged 18 Wall receptacle must not be cor...

Page 5: ...ise there is a possibility of pieces of ware falling during firing Screw the stand to the kiln with the screws provided Use your kiln only in a well ventilated room Vapors containing poisonous gases are possible when firing certain materials Do not breath fumes from kiln when firing ELECTRICAL SPECIFICATIONS Proper electrical wiring is necessary to safely and efficiently operate a kiln Even though the...

Page 6: ...ofile STOP KEY used to stop a firing profile PREVIEW KEY used to display program or firing information varies with mode of operation F or C SELECT KEY used to select the temperature scale the control operates in CONE TABLE KEY used to look up the temperature equivalent of a pyrometric cone RAMP HOLD KEY used to select or to create a custom firing profile CONE FIRE KEY used to select a preprogrammed firin...

Page 7: ...IMPORTANT THE ZEROES IN A PYROMETRIC CONE NUMBER ARE A NECESSARY PART OF THE NUM BER OMITTING THESE ZEROES WILL RESULT IN A SERIOUS OVERFIRE CONE O6 IS MUCH COLDER THAN CONE 6 SETTING UP A CONE FIRE MODE PROGRAM 1 Turn on the master power switch located below the control on the front of the kiln panel 2 Press the CONE FIRE key the display prompts you to enter a cone number Use the 10 digit key pad...

Page 8: ...rease or a de crease in target temperature To do so press the CONE FIRE key when displaying IdLE select 999 as the cone number then press the ENTER key Select the cone number to offset then press ENTER The display will read F or C OS and the current offset value To raise the temperature enter 00 then the number of degrees of change 1 50 and press ENTER To lower the tem perature enter 90 then the n...

Page 9: ...nt profile chart for FAST is SEGMENT RATE TEMPERATURE HOLD 1 570 F 200 F below setpoint 0 2 200 F setpoint 0 The firing time varies depending on the load and the cone selected Because it takes time for moisture to evaporate from the ware and for chemical changes to occur FAST is not recommended for thick hand made pieces MED FAST cone 06 example 500 F per hour temperature rise until the kiln reaches...

Page 10: ...to density of load and cone selected Examples of the type of ware most often fired at this speed would be low fire glazes thick greenware or cast earthenware MED SLOW cone 06 example 400 F per hour temperature rise until the kiln reaches 1000 F then 100 F per hour until the kiln reaches 1100 F then 400 F per hour until the final 250 F of the firing then 108 F per hour until the setpoint is reached The...

Page 11: ...erature rise and the length of hold time as well as the absolute temperature More on the nature and use of pyrometric cones may be found on the section on cones It is essential to have an understanding of the properties of cones before creating custom programs based on temperature cone setpoints The firing profiles in the CONE FIRE mode are already prepro grammed for optimal firing curves for each co...

Page 12: ...n to the next segment If no hold time is desired program in 0 The highest possible hold time is 99 hours 99 minutes In the display numbers to the left of the decimal point represent hours numbers to the right of the decimal point represent minutes CREATING A CUSTOM PROGRAM 1 To create a custom program from IDLE press the RAMP HOLD key The display flashes USEr and a number select a user file number 1...

Page 13: ... in hours and minutes 00 00 Selects hold time at end of first segment 00 00 11 ENTER Inputs hold time for segment 1 rA 2 zero for this example 12 Temperature 1 9999 108 Selects temperature rise rate 2nd segment 108 13 ENTER Inputs rate of rise F 2 14 Temperature 1 2350 1900 Selects end temperature for segment 2 1900 15 ENTER Inputs end temperature for segment 2 HLd 2 16 Time in hours and minutes 00...

Page 14: ...se is 0 degrees per hour The rate of rise is checked every 7 5 minutes Slow rate must persist for 22 5 minutes before the error is triggered 2 The program is in hold and the temperature is 50 degrees or more above the hold temperature The error must persist for 18 seconds before the error is triggered 3 The program is in hold and the temperature is 50 degrees or more below the hold temperature The...

Page 15: ...rol is saying there was a power failure for more than 2 minutes or that the kiln was turned off for more than two minutes rA 1 6 For each segment the control is waiting for the user to enter a temperature rate of rise in F per hour or C per hour SEGS IT S NOT SE65 The control is waiting for the user to enter the number of segments in the profile being programmed SlO Slow speed firing profile Spd The ...

Page 16: ... the unprotected elements The first firing will test the shelves a very small percentage of which may crack on the first firing Test firing shelves is a wise precaution for any new shelves LOADING Careful loading of ware in the kiln is important for satisfactory results You need to plan the placement and distribu tion of the items to be fired Careless hurried loading might result in mishaps which could ...

Page 17: ...t is evenly distributed on the piece below Do not however place a heavy piece upon a small piece or the weight may cause the lower piece to warp or crack Tile and large flat pieces should be fired flat on a shelf so they do not warp Slow firing is required in such cases because the shelf mass effects the temperature uniformity across the flat piece Strain on any delicate portion of a piece could result...

Page 18: ...de of ceramic material which is formulated to melt when subjected to a sufficient amount of heat It does not indicate temperature per se but the effects of temperature over a period of time Cones react very similarly to the ceramic ware since they are similar in composition They deform as a result of the influence of heat time and kiln atmosphere revealing what is happening in the kiln and when the ...

Page 19: ...orks satisfactorily in most cases is 06 Cones used to fire china paint gold and decals range from 015 to 019 Cone 4 to cone 6 is used for porcelain Stoneware may be fired to cone 8 or cone 10 All clay and glaze manufacturer s recommend the correct heat treatment for their products Clays and glazes do vary so check labels or ask your local ceramic supply dealer for advice on the proper cones to use s...

Page 20: ...e ventilation and has many advantages Besides removing fumes coming off the ware from the kiln room and eliminating the need to prop and then lower the lid during firing the Fanfare increases temperature uniformity provides for less cross contamination of colors during glaze firings and achieves the clearest brightest and purest colors pos sible Firing Glass Glass is very sensitive to variations in ...

Page 21: ...ing ware too close to the elements Stressing delicate area by improper support Removing ware incorrectly from the mold Failure of glaze or underglaze to adhere to the ware crawling glaze can be attributed to one of the following causes Dirty bisque surface Dust and skin oil are the most common offenders Try to clean recover and refire the ware Damp bisque Allow to dry completely then reapply and re...

Page 22: ...azes may be used with his reds Insufficient air circulation during firing This usually results in black spots Reds need sufficient oxygen to mature Try leaving peephole plugs out until true red no pun intended heat has been reached Soaking too long at maximum temperature Cracking and crazing crazing is characterized by many very fine cracks running throughout the glaze surface may be caused by one or ...

Page 23: ...iln clean It is easier to clean before burning contaminants onto the stain less jacket Use glass cleaner when kiln is cool RARELY NEEDED MAINTENANCE Lid Brace Be aware of lid brace operation every time the kiln is fired Replace lid brace if it be comes bent or does not function perfectly WARNING Do not use kiln if lid brace is not in perfect operating condition Lid Band Tighten lid band when necess...

Page 24: ...24 ...

Page 25: ... for consistent controlled firing This device does not always shut off due to operator induced mechanical variables and must be checked manually KILN WASH Arefractory material used as a coating to prevent sticking of ware and glazes to parts of the kiln and shelves It is a powder which is mixed with water and applied with a brush LOW FIRE Ware fired only to medium temperature as for earthenware pott...

Page 26: ...rog fired clay particles and is usually made of native clays TERRA COTTA A natural low fire red clay THERMAL SHOCK the result of putting ware through sudden changes in temperature THERMOCOUPLE Two wires of different metals which are inserted into the kiln and comprise the temperature sensing part of the pyrometer It produces a very small voltage in proportion to the difference in temperature between...

Page 27: ...r must be placed on the outside of the returned part or kiln Repair or replacement of defective kiln parts shall be considered as complete fulfillment of this warranty This warranty does not include kiln damaged by overfiring exceeding the melting temperature of the material being fired regardless of cause kilns damaged by transporting abuse improper use reactive materials being fired i e reduction fir...

Page 28: ......

Reviews: